
Whether you’re a marketer or a front-line salesperson, finding and converting new customers is a constant challenge. From cold calling and trade shows to SEO, social media, and paid ads—there are plenty of ways to reach potential clients. But when it comes to cost-effectiveness, flexibility, and ease of use, email marketing stands out as one of the best options.
I’ve tested many email marketing tools over the years. Most fall short in one of two ways: either they have powerful automation but no access to real leads, or they offer rich data but come with painfully rigid workflows. That changed when I discovered Apollo, a powerful lead generation and email outreach tool.
With just a modest monthly investment, I’m able to build a scalable email marketing workflow that delivers real results. By combining my own sales experience with Apollo’s robust data engine and smart filters, I can identify high-quality prospects and add them into automated sequences in just a few clicks—turning cold leads into warm conversations.
I spend about an hour each day on lead screening, and the rest runs on autopilot. Emails are sent, followed up, and tracked in the background. More than once, I’ve wrapped up my day with a surprise: a reply from a lead generation campaign, maybe even a Fortune 500 procurement manager asking to hop on a Zoom call.
Sound interesting? You’re in the right place. What follows is a step-by-step Apollo setup guide—from account configuration to live campaigns—designed to help you launch your own high-performance email marketing system.
Register
Click Apollo to visit their website, and then use your corporate email or personal email to complete the account registration.
Setting Your Email Account
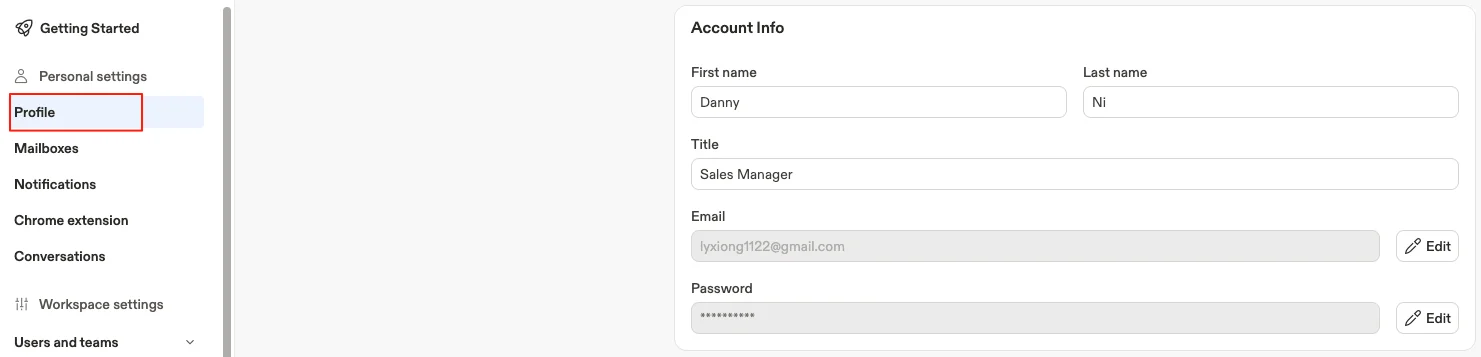
Setting profile
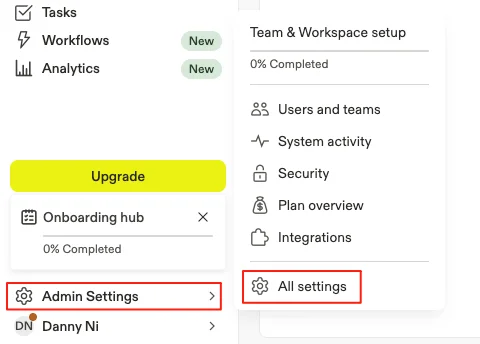
Step 1: Click Admin Settings-All Settings in the lower left corner.
Step 2: Set up the account profile.
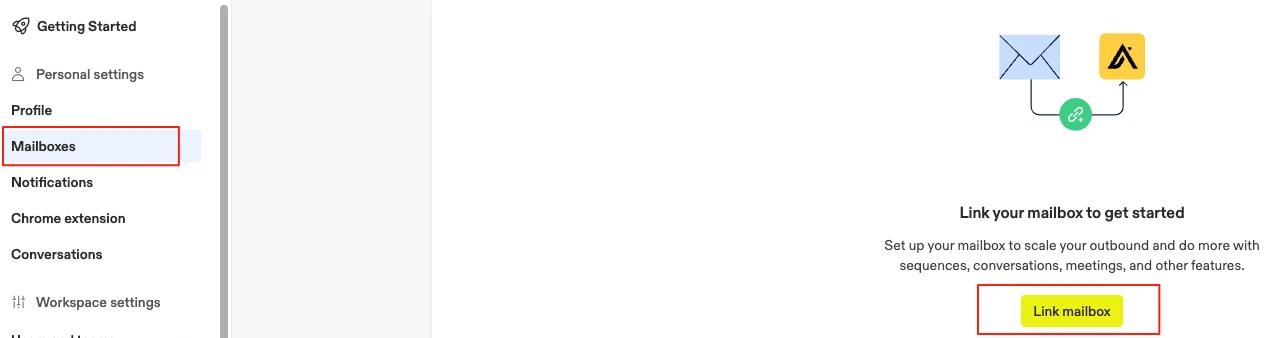
Linking mailboxes used for email marketing
Step 3: This step is crucial—connect the mailbox you’ll be using for email marketing and lead generation. It’s highly recommended to use a corporate email address to build greater trust with recipients.
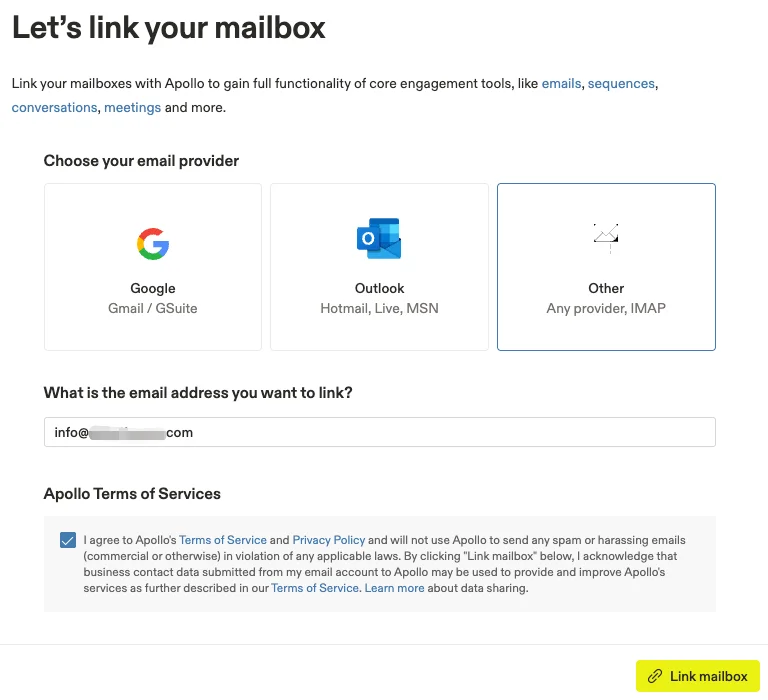
Step 4: Choose your email provider. If you’re not using Google or Outlook, select ‘Other’ to connect a custom IMAP mailbox.

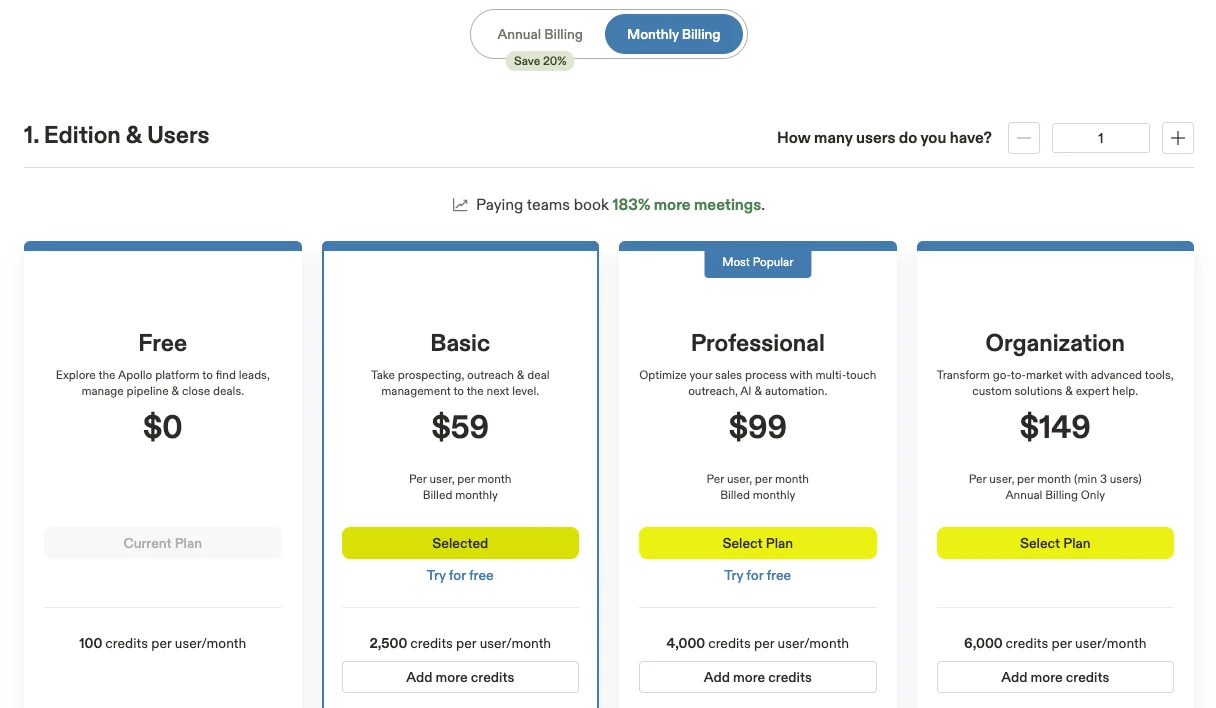
However, the ‘Other’ option for mailbox connection is only available to paid users. I recommend starting with the Basic monthly plan, which allows linking just one mailbox. Try it out for a month—if Apollo turns out to be the right email markting tool fit for your email marketing workflow, you can then consider switching to the annual plan, which offers a better overall price.
Step 5: Once you’ve upgraded to a paid plan, choose ‘Other’ as your mailbox provider. Enter the email address you want to link, agree to Apollo’s Terms of Service, and then click the “Link mailbox” button in the bottom-right corner.
Step 6: Next, enter the password for your email account, along with the IMAP host and port, and the SMTP host and port. You’ll need to get these settings from your email provider—every provider has different IMAP/SMTP hostnames and ports. If you’re unfamiliar with IMAP and SMTP, check out this blog: What Are IMAP and SMTP?
Below is the configuration for Aliyun Enterprise Mail that I personally use:
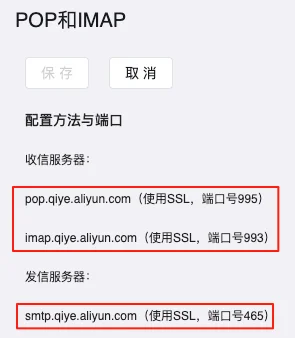
Simply fill in your Aliyun IMAP/SMTP details in Apollo’s mailbox settings and click Next.

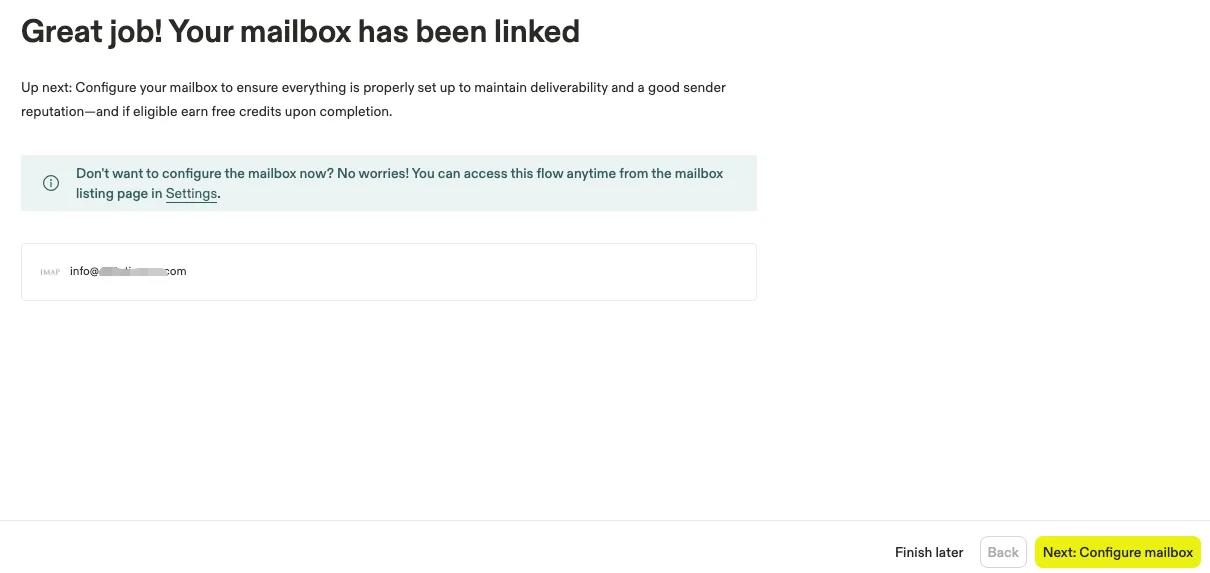
Once you see the confirmation screen like the one below, your mailbox is successfully linked. Then, click Next: Configure mailbox to proceed.
Email marketing warm up
Step 7: Apollo’s Warm Up feature helps build the sending reputation of a new email account by simulating real human activity—like sending, receiving, opening, and replying to emails.
Once enabled, Apollo will:
- Send a set number of emails daily to its internal warm-up network
- Automatically simulate opens, replies, and “read” behavior
- Gradually increase the sending volume based on your settings
Think of this as a “warm-up workout” for your email—preparing it for cold email campaigns and reducing the risk of being flagged as spam.
Technically, if your mailbox has already been active for over 2 months and consistently handles dozens of real emails per day, you may not need to use Warm Up.
But we still strongly recommend enabling it, especially if you plan to use this mailbox for high-volume, template-based cold email.
Once it’s activated, you may notice unusual emails being sent or received through your Apollo-linked mailbox. Don’t worry—this is part of the automated warm-up process, not a security issue.
To start the Warm Up:
- Enter your SMTP password (usually the same as your email password)
- Fill in the SMTP host and SMTP port
- Add the From email (i.e., the address you’ll be sending from)
Then click Check Connection to proceed.

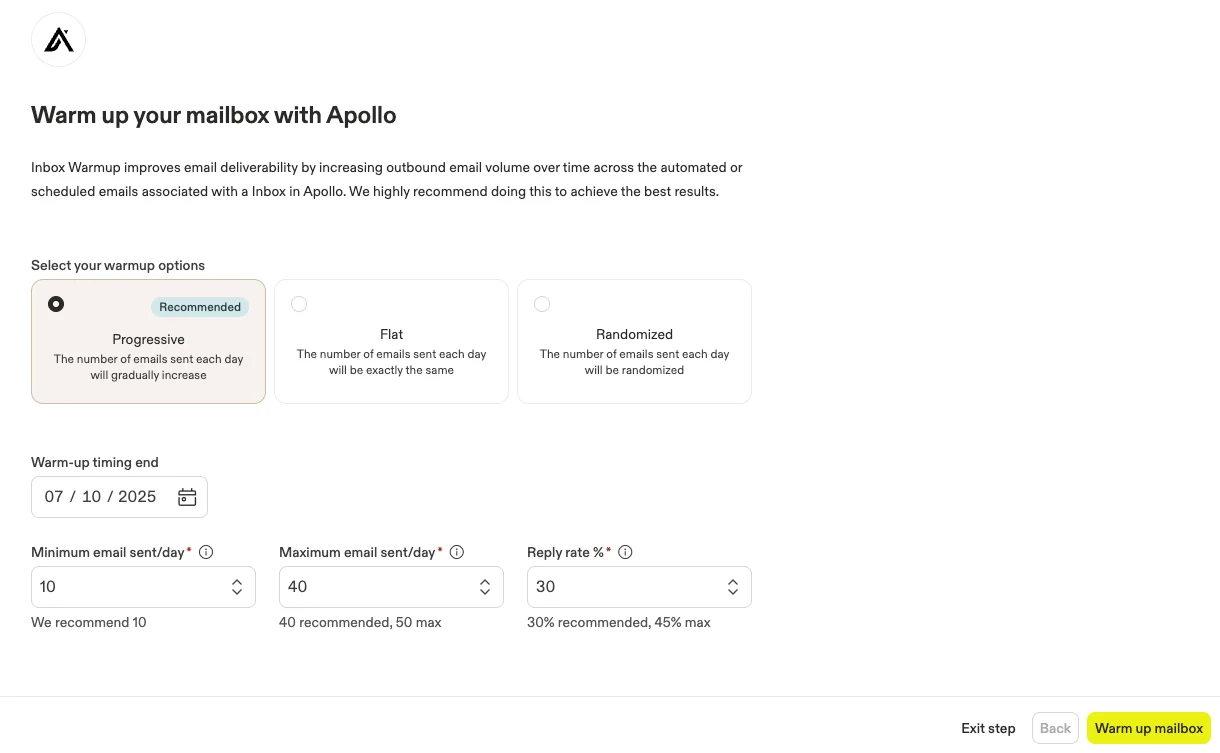
This screen displays the warm-up rule settings. We’ll keep the default configuration and simply click “Warm up mailbox” to proceed.
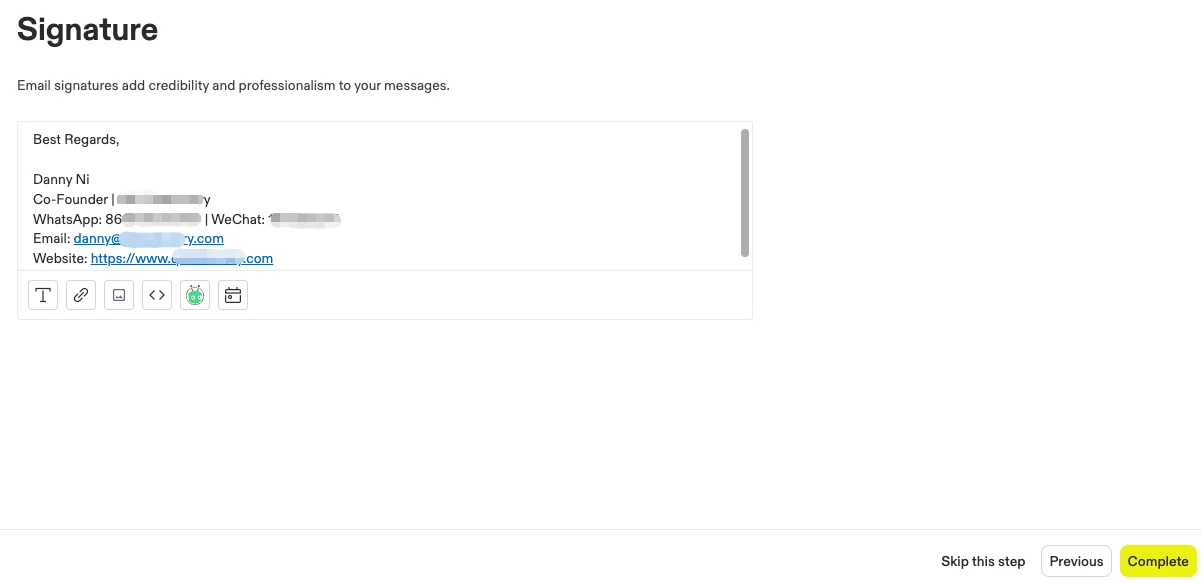
Email signature
Step 8: Set up your email signature, then click “Complete.”
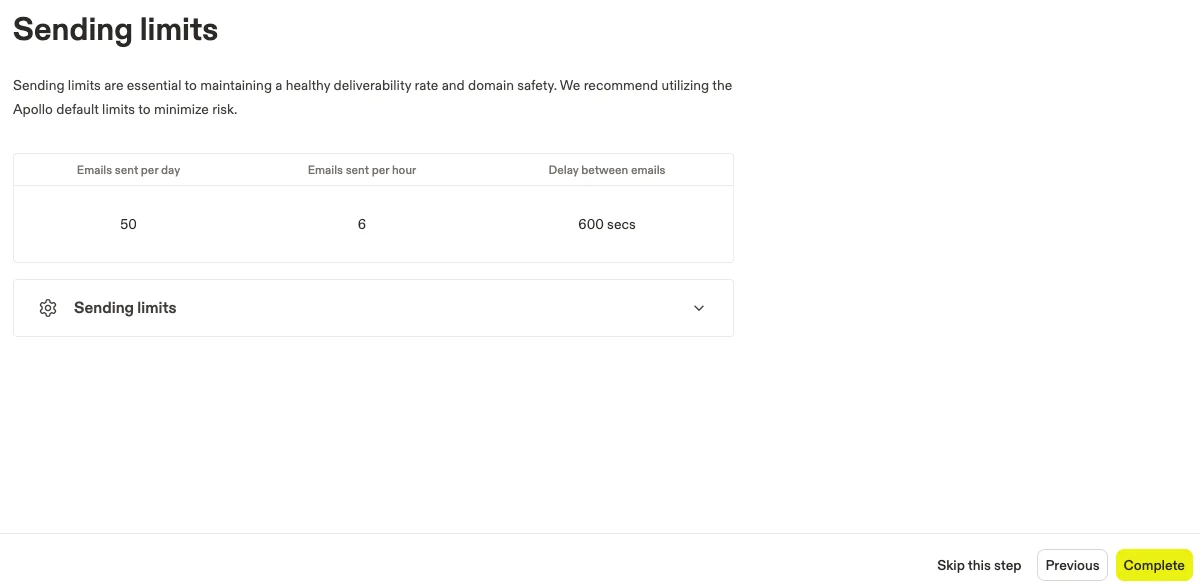
Sending limits for email outreach
Step 9: Configure your sending limits. It’s recommended to use Apollo’s default daily limit to ensure stability and deliverability, then click “Complete.”
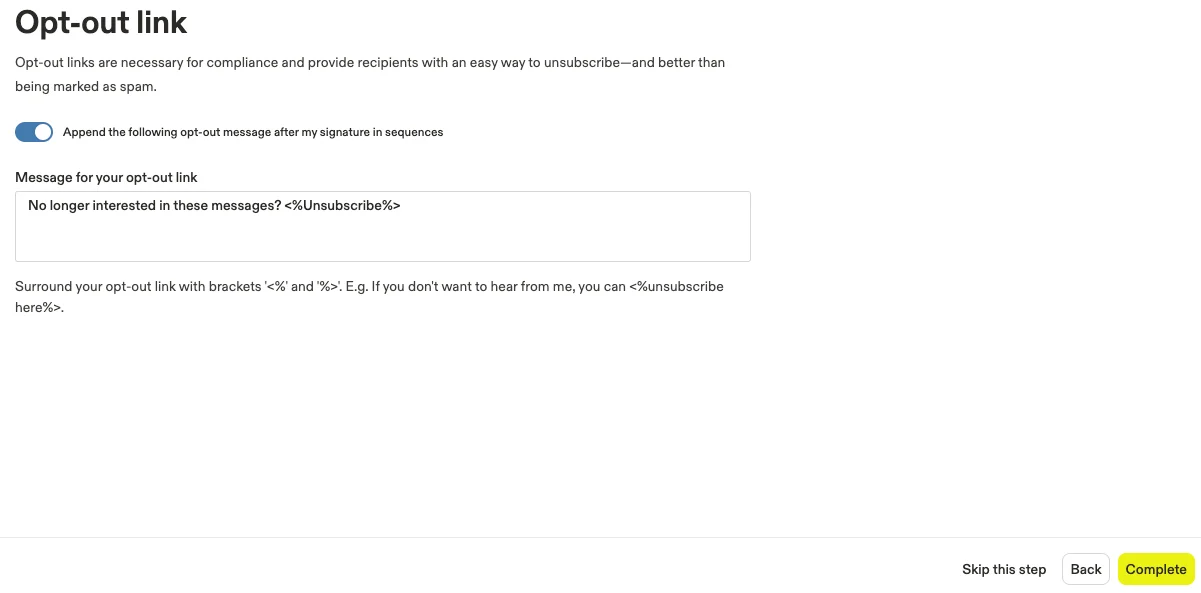
Opt-out link
Step 10: Enable the Opt-out link to make your cold email marketing legally compliant, reduce the risk of spam complaints, and improve your sender reputation and long-term deliverability. Then click “Complete.”
Custom tracking subdomain
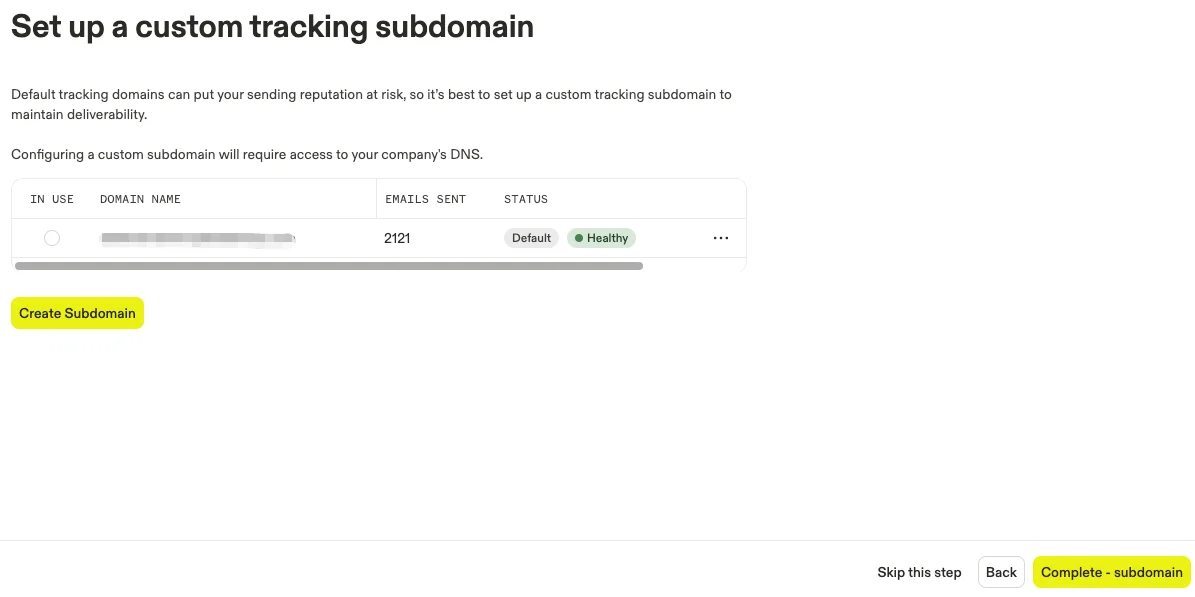
Step 11: Set up a custom tracking subdomain, which binds all tracking links in your emails to your own domain—this improves deliverability, avoids spam flagging, and strengthens your brand credibility. Click “Create Subdomain.”
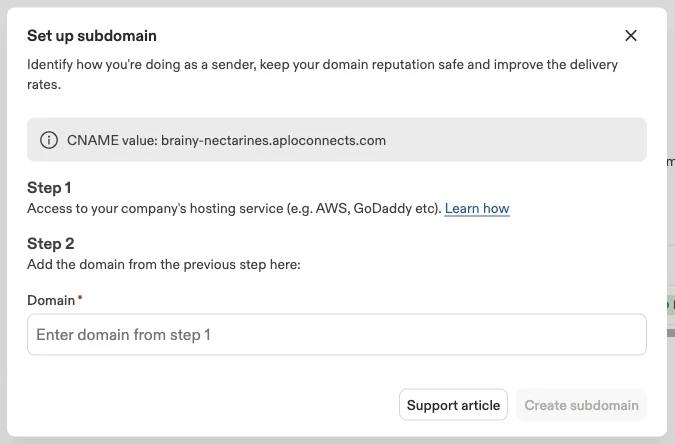
Copy the CNAME value shown in the gray highlighted box.
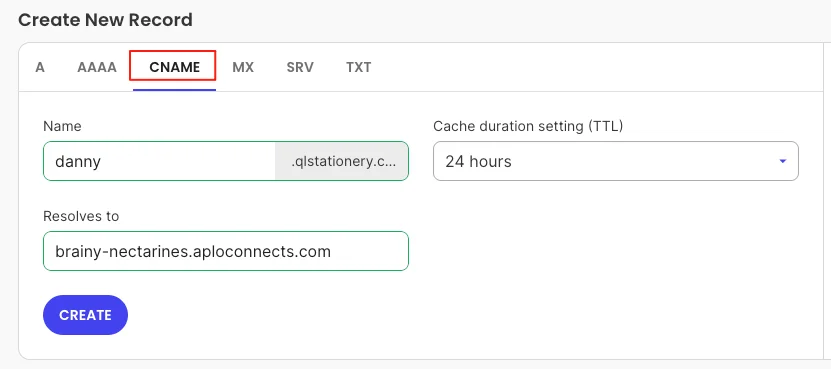
Go to your DNS management platform and add a CNAME record.
For the name, avoid using spaces, punctuation, or spam-trigger words like “tracking” or “sales.” I used my own name, danny, to keep it clean and safe.
In the resolves to field, paste the CNAME value provided by Apollo from the gray box.
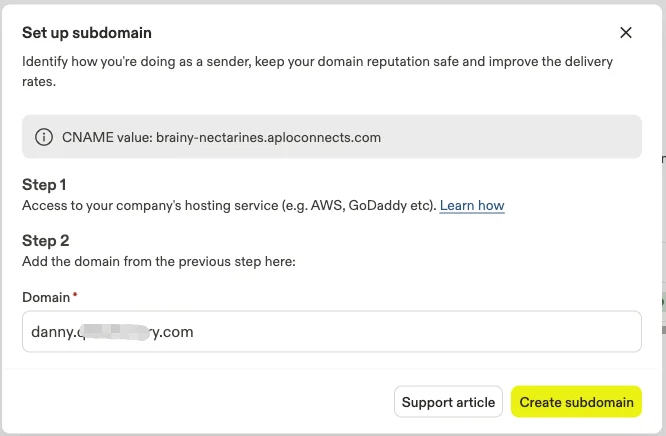
Next, enter the subdomain you just created into Apollo’s subdomain settings, and click “Create Subdomain.”
The status will show as “In Progress.” It may take up to 24 hours to complete, so you can leave it for now and return later.
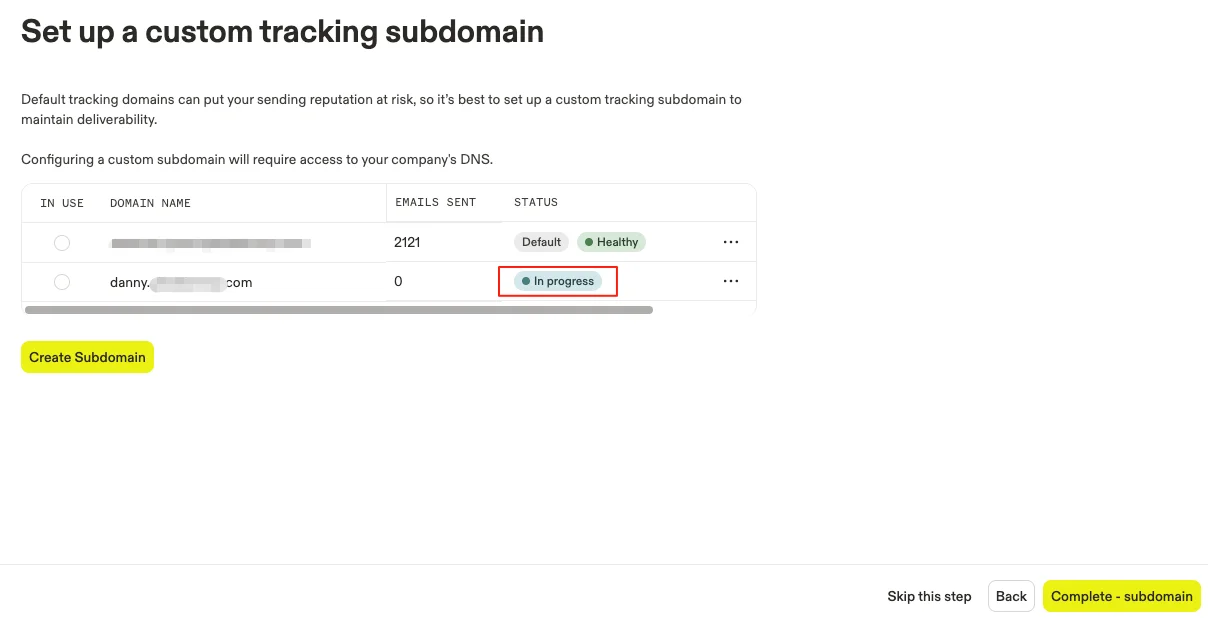
When the Status changes to “Healthy,” it means your tracking subdomain is successfully set up. Simply check the box next to it and click “Complete Subdomain.”
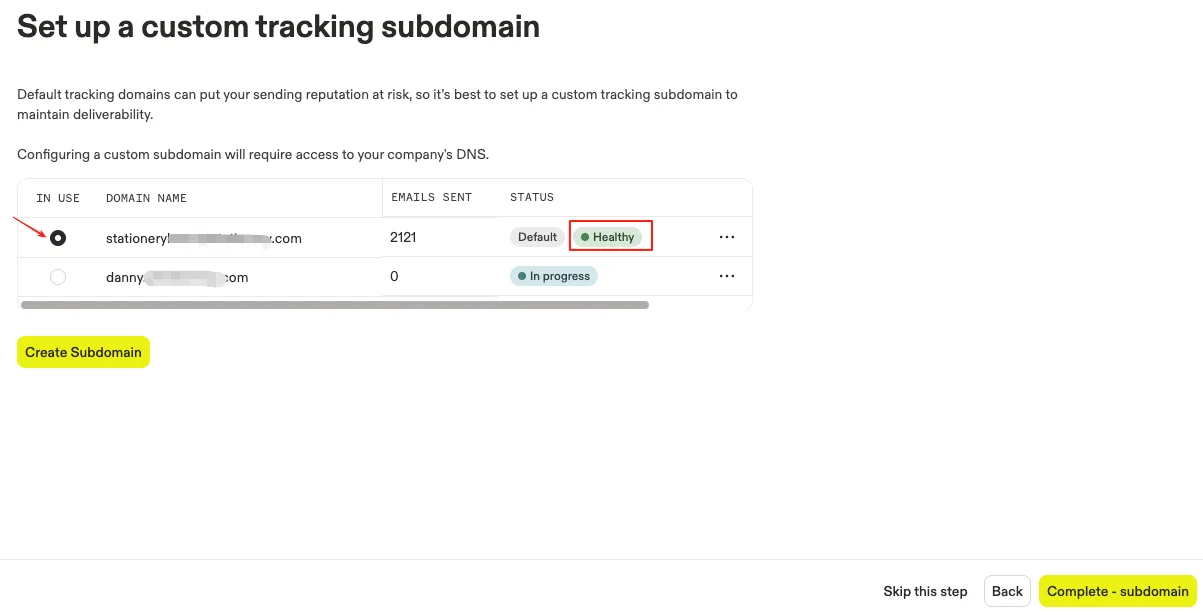
Once this step is done, you’re officially ready to use Apollo for email marketing and lead generation. However, to further reduce the chance of your emails landing in the spam folder, there’s still one more important step to go.
Domain authentification
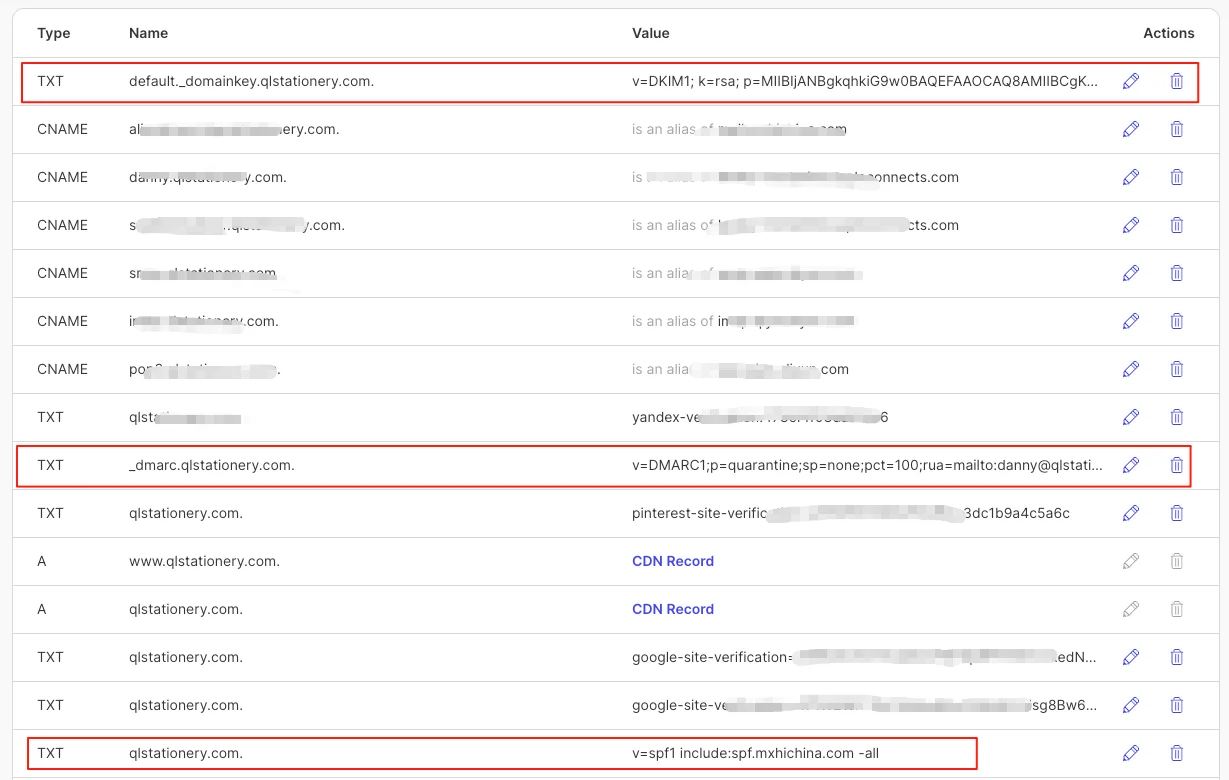
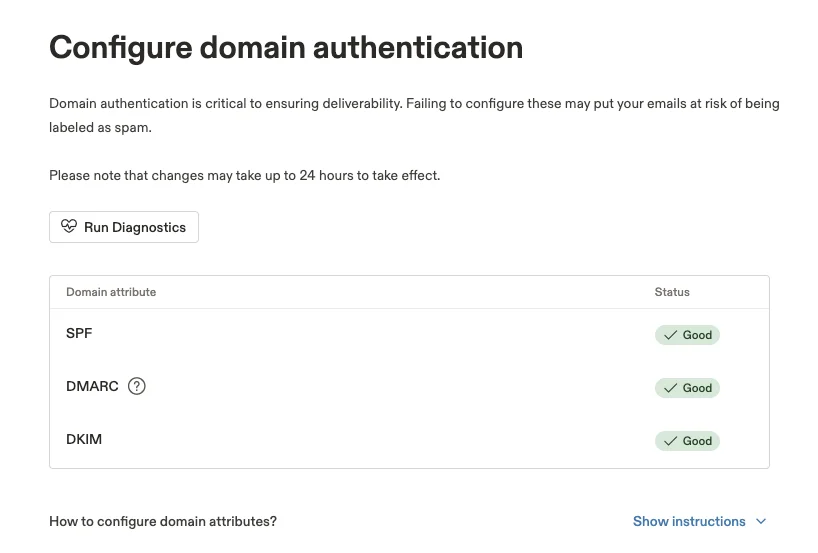
Step 12: Domain authentication. You’ll need to verify three DNS TXT records—SPF, DMARC, and DKIM—to improve deliverability and reduce the chances of your emails landing in spam folders. SPF and DKIM records can be retrieved directly from your email provider. For DMARC, Apollo provides a default value, and you just need to replace both instances of [email protected] with the email address you’ve linked to Apollo.
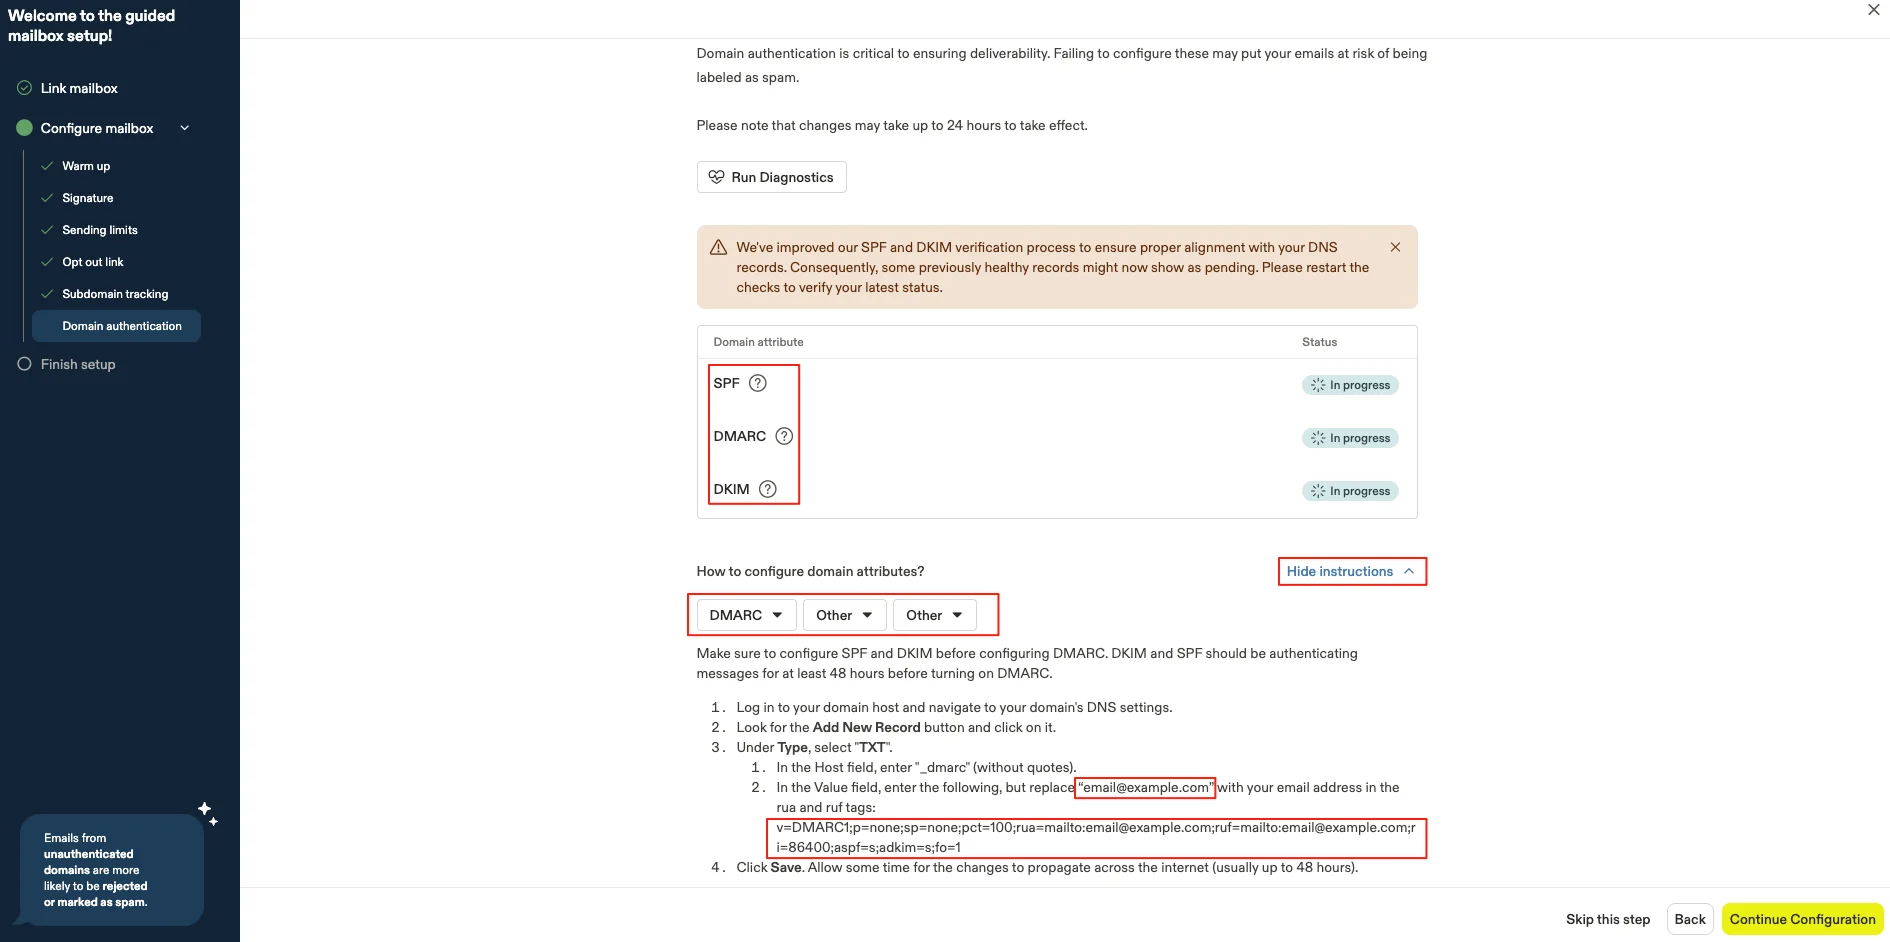
You can see the three TXT records added in your domain’s DNS management panel.
Once all three records have been added, just click “Run diagnostics” in Apollo to begin the verification process. While this step isn’t strictly required for using Apollo, it is highly recommended to maximize email marketing deliverability and minimize spam risk.
Lead Generation
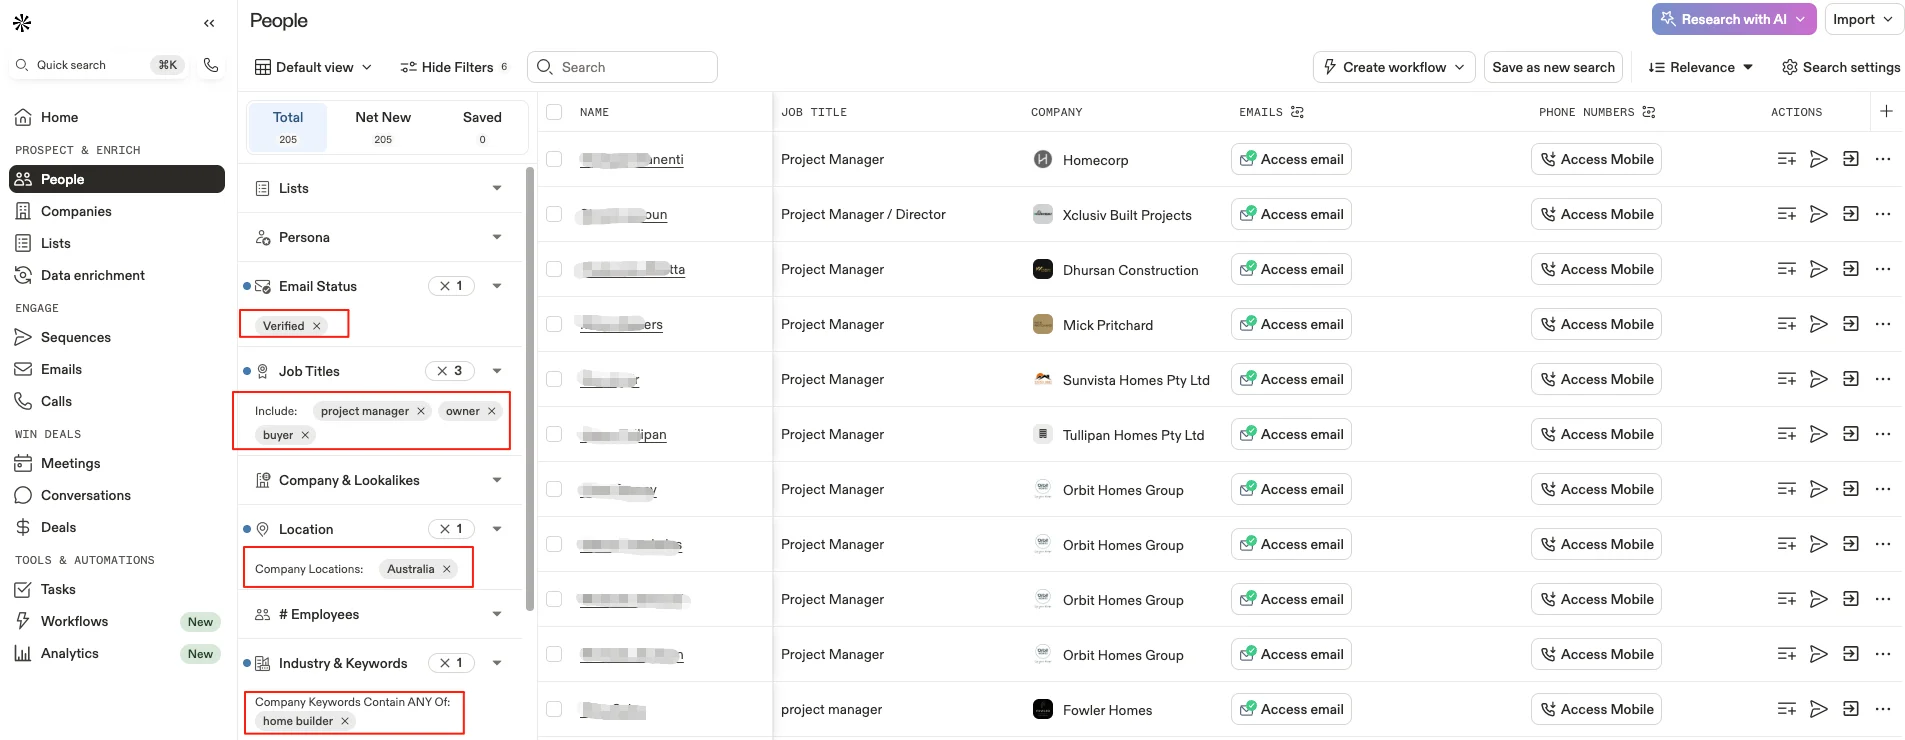
One of the most powerful features of Apollo is its ability to help you filter and find your ideal lead generation targets using specific criteria—such as industry, job title, location, and company keywords. For example, when sourcing potential clients for an Australian home-building service provider, I applied the following filters:
- Email Status: Verified — This ensures the contact’s email has been verified by Apollo. Targeting verified emails significantly reduces bounce rates and protects your domain’s sender reputation. It’s strongly recommended to check this box.
- Job Titles: Project Manager, Owner, Buyer — Customize these based on your specific buyer persona.
- Location: Australia
- Industry & Keywords: Home builder — This helps you narrow the scope to relevant companies. Without this filter, the list may include commercial construction firms, which may not be your ideal clients.
Below is the result using the People filter to search for individuals.
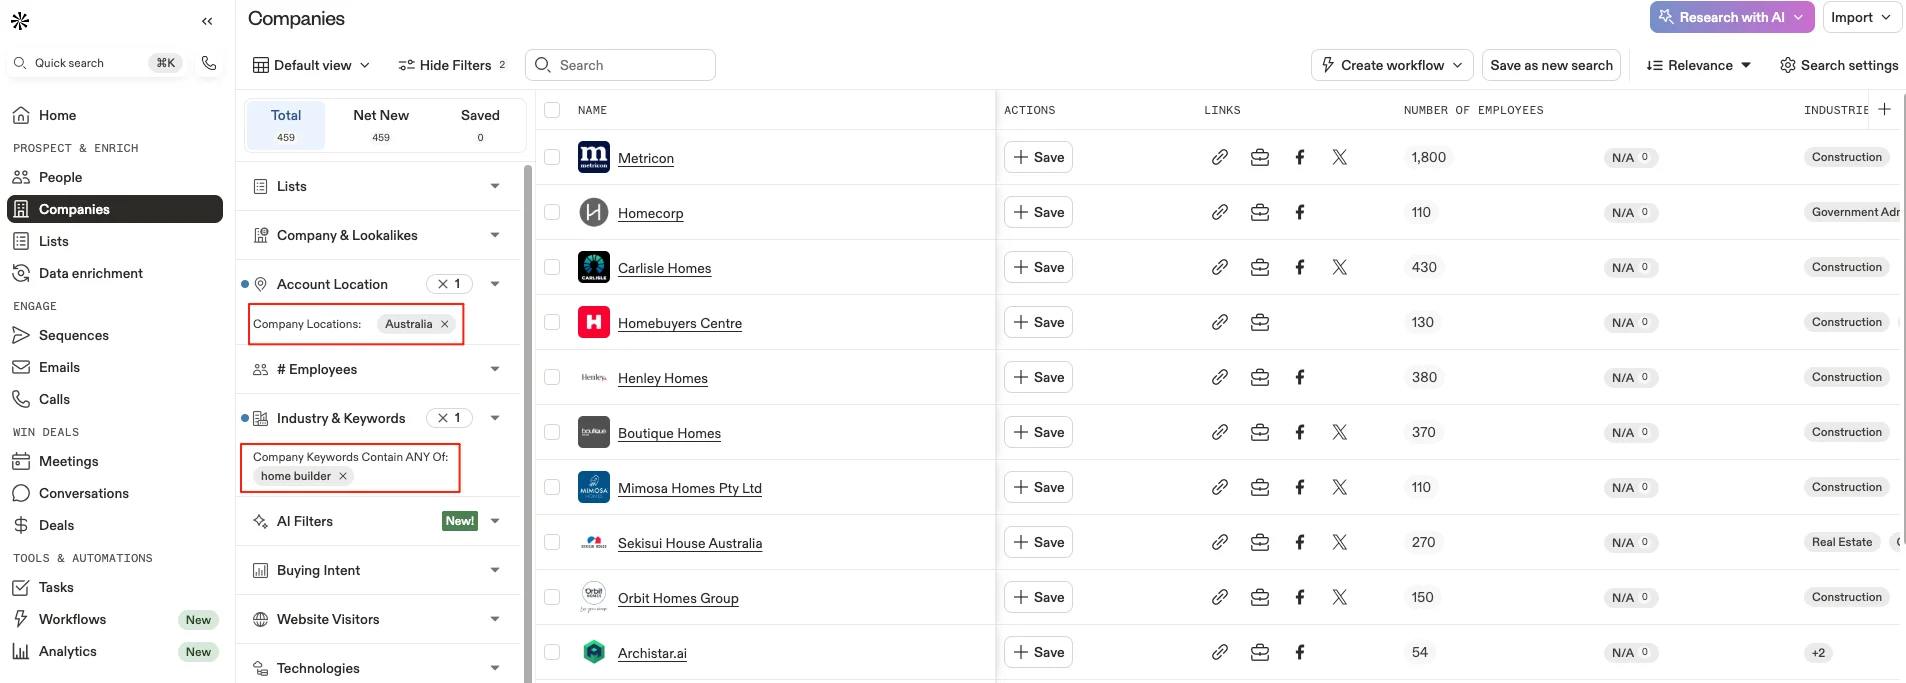
And here is the result using the Company filter to target organizations.
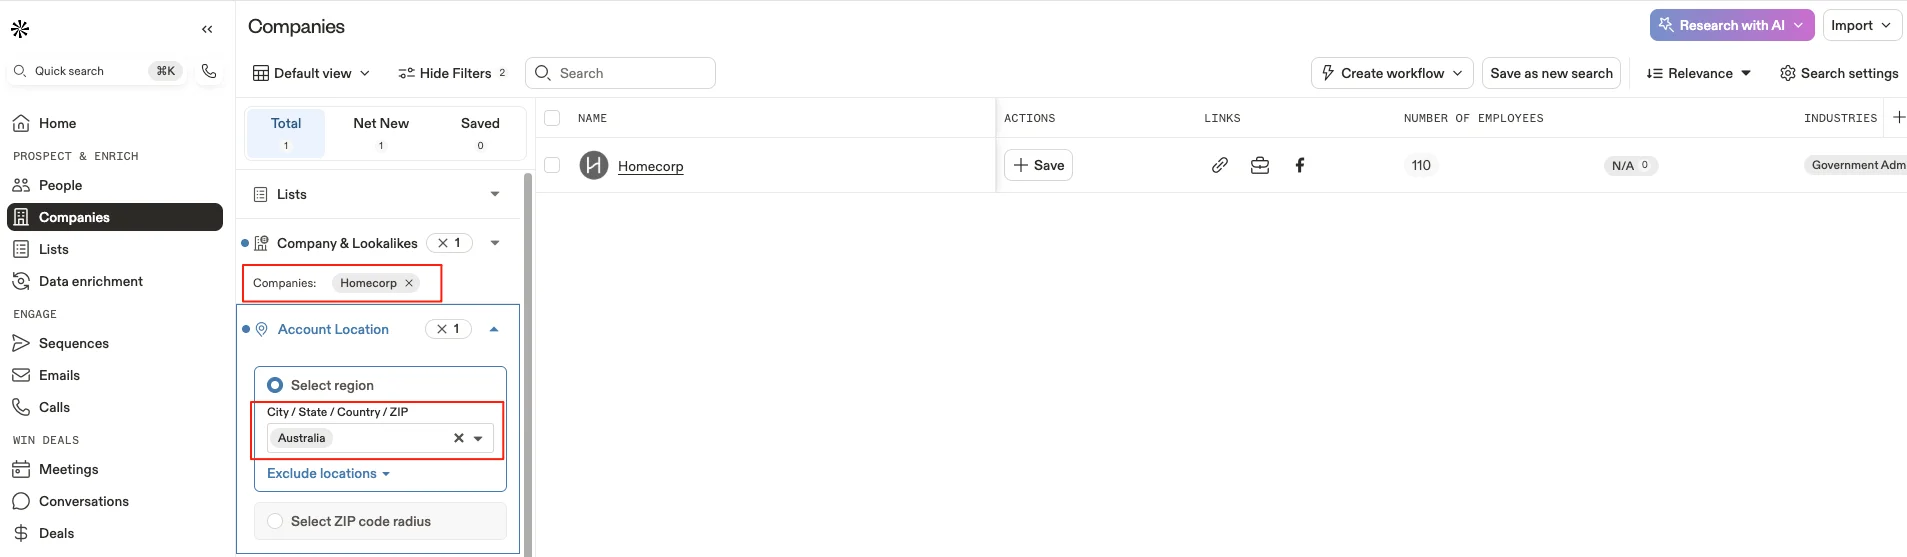
You can also directly search by company name if you already know your target organization.
Once you’ve identified your target contact, click “Access email” to unlock their email address—it will deduct one credit from your Apollo account. Then, click the ➕ icon to add them to a pre-created List. Lists are incredibly useful for organizing contacts by project or region; for instance, I created a list called “Australia home builder.”

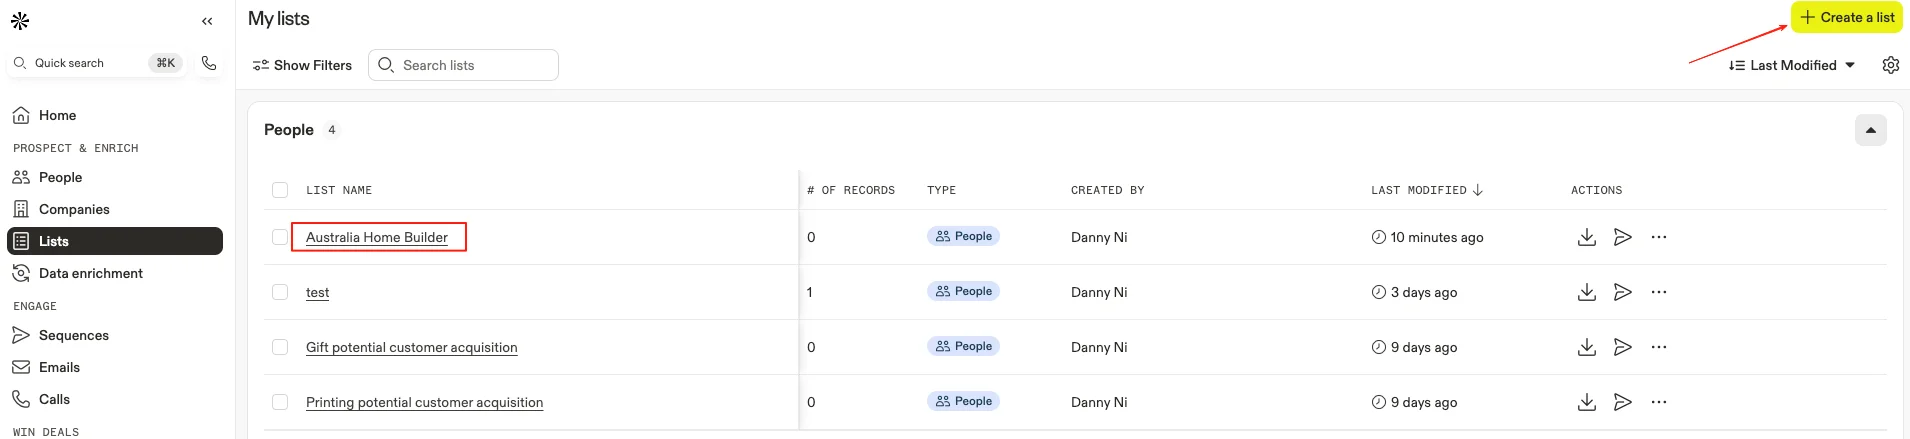
Automated Email Marketing Workflows
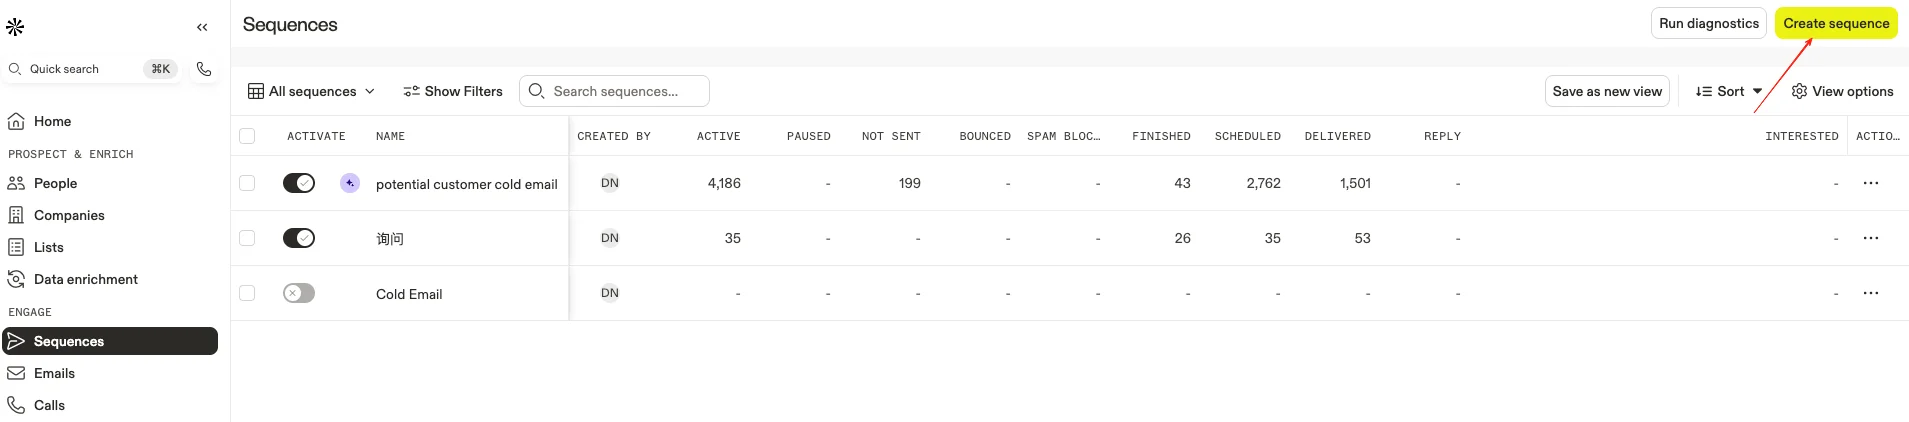
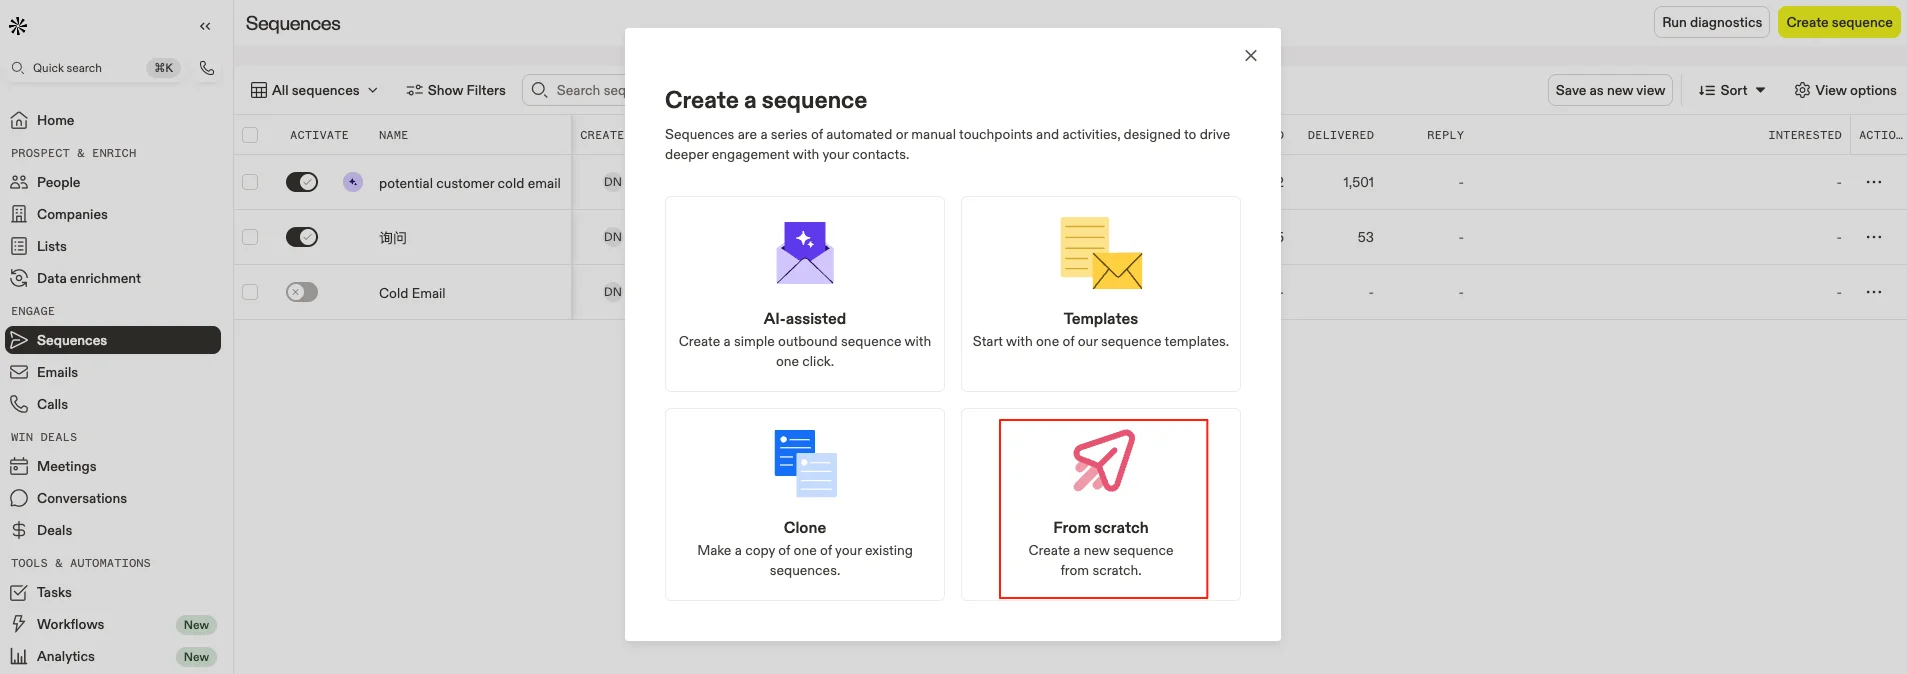
Now let’s build an automated email workflow. Go to Sequences, then click the yellow “Create Sequence” button in the top right corner. In the dialog that appears, choose “Scratch” to start from a blank template.
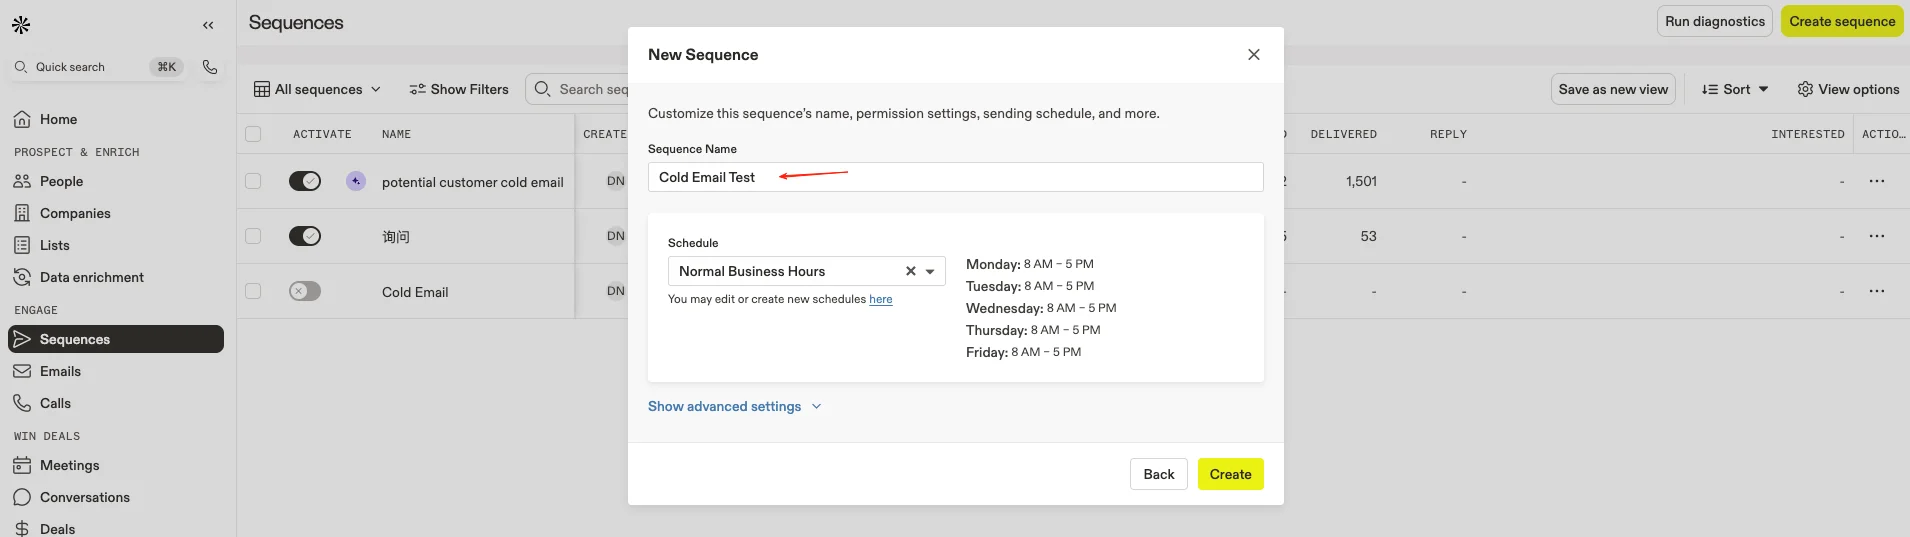
Name your sequence, and under Schedule, leave it set to the default “Normal business hours.” This prevents emails from being sent during weekends or off-hours, which helps maintain a professional impression.
Click to add a step.
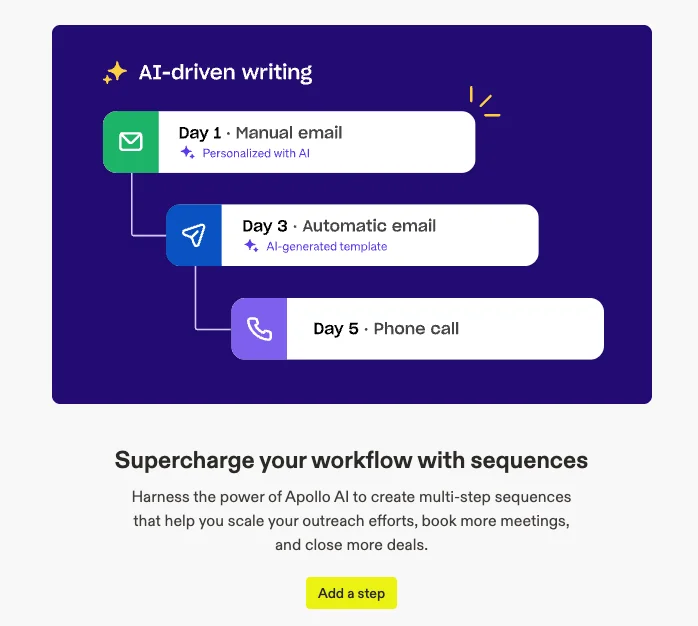
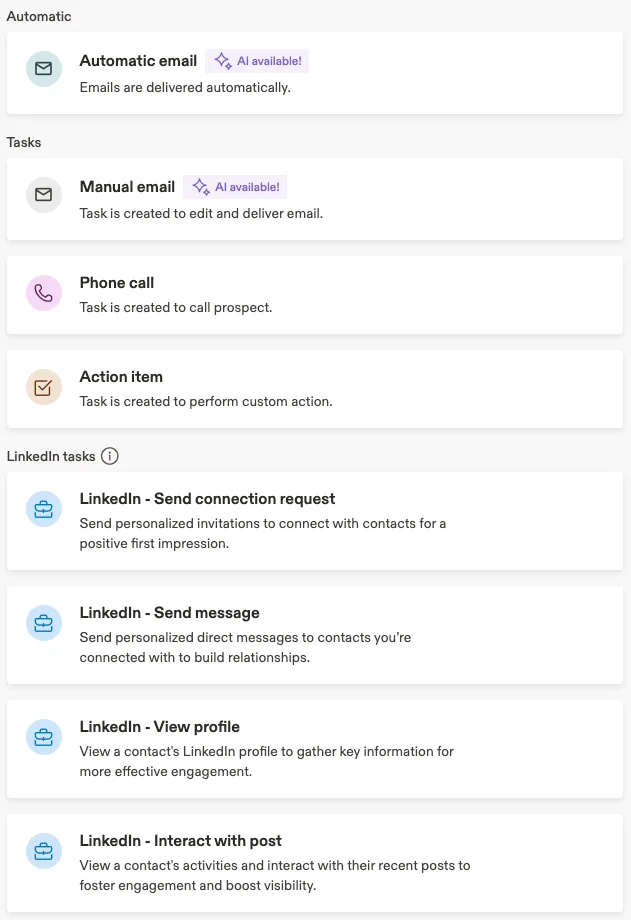
You’ll now see several step types. Here’s the key question: should your first message be an Automatic Email or a Manual Email?
If you’re doing full-scale cold email outreach and the content is mostly standardized, then go ahead and use Automatic Email from the first step onward.
However, if you’re doing warm outreach—say you have a list of people you’ve spoken with before, but never closed—then it’s better to start with a Manual Email. This lets you personalize the first message with references to past conversations or meetings. After that, you can follow up with a series of Automatic Emails.
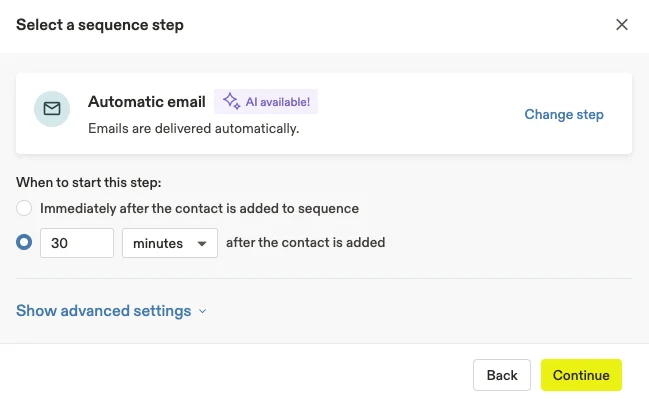
For this example, let’s go with Automatic Email and click “Continue.”
On the left, you’ll find the email template editor. Write your subject line and use the First Name dynamic variable to personalize the greeting—just insert it using the {} menu. Apollo also supports many other personalization tags. Don’t forget to check “Include signature” at the bottom so your emails automatically include your contact info. You can preview your message on the right. Once everything looks good, click “Save” in the upper right corner.
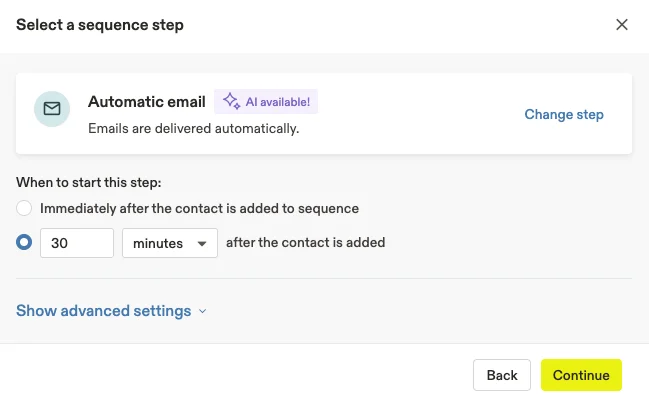
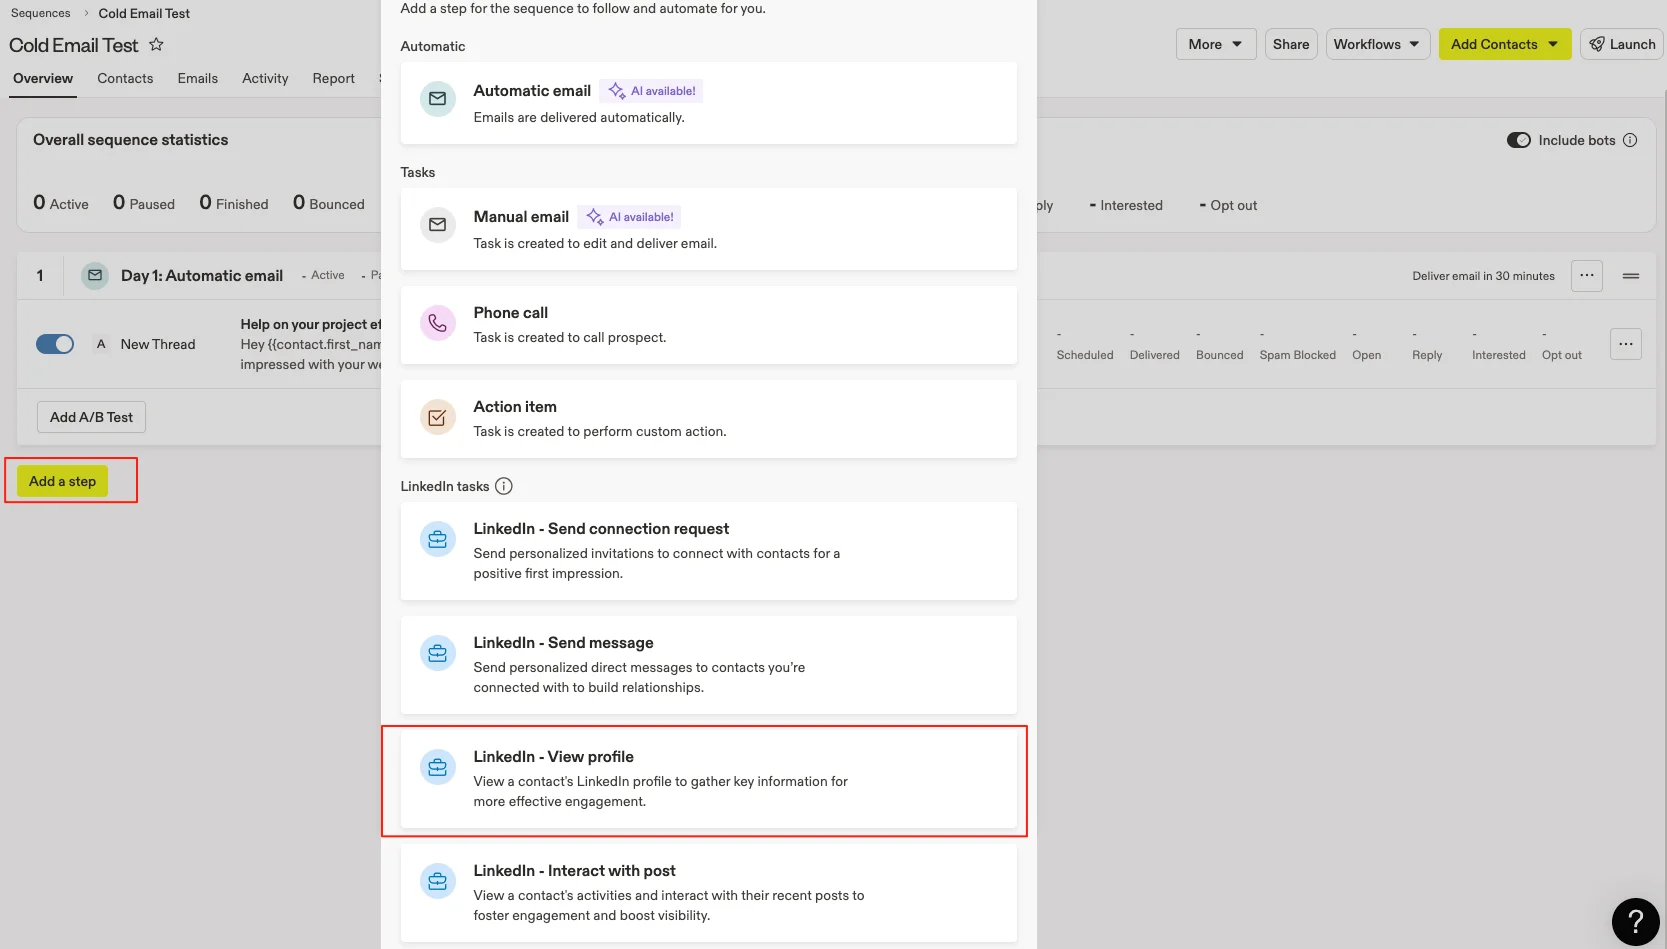
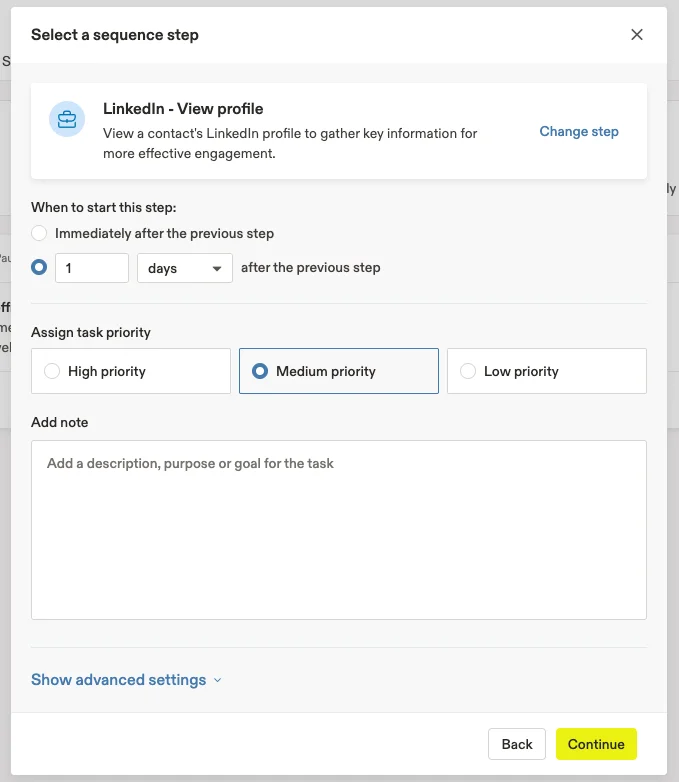
Next, add another step. To reinforce familiarity with your prospect, I recommend using the “LinkedIn – View Profile” step instead of immediately sending a second email. If you’ve used LinkedIn before, you’ll know that users can see who’s viewed their profile. That makes it a subtle but effective touch. Set this step to occur one day after the first email, and then continue with your follow-up message.
This “View Profile” step is not executed automatically by Apollo. Instead, Apollo will create a task that reminds you to manually visit the contact’s LinkedIn page.
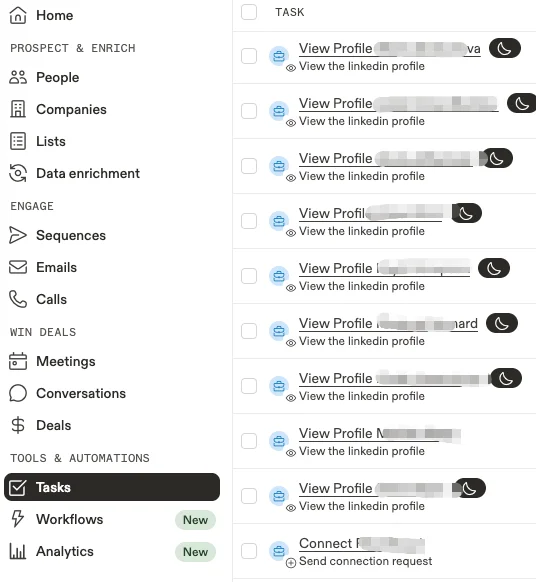
On the scheduled date, you can go to the Tasks section, where you’ll see all the “View Profile” tasks waiting to be completed.
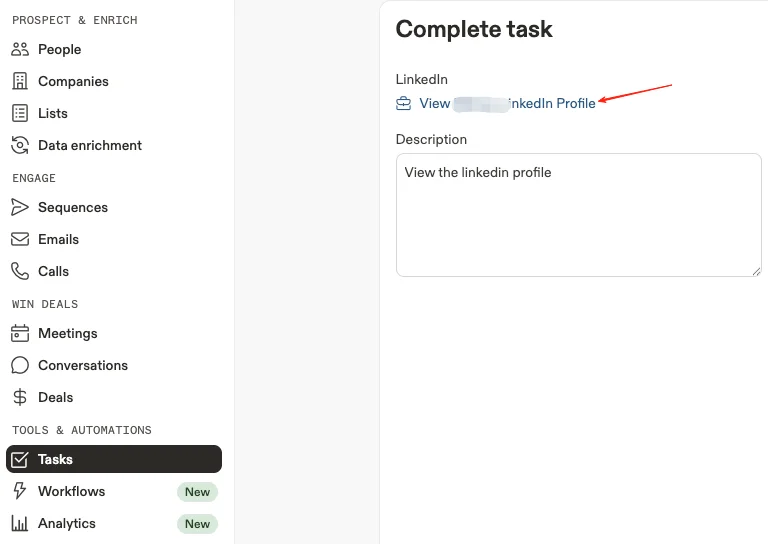
Click on any task to view the detailed instructions. You’ll find a direct link that jumps straight to the contact’s LinkedIn profile. This is also one of Apollo’s strengths—it provides the LinkedIn URL of the contact because a significant portion of Apollo’s lead data is sourced from LinkedIn.
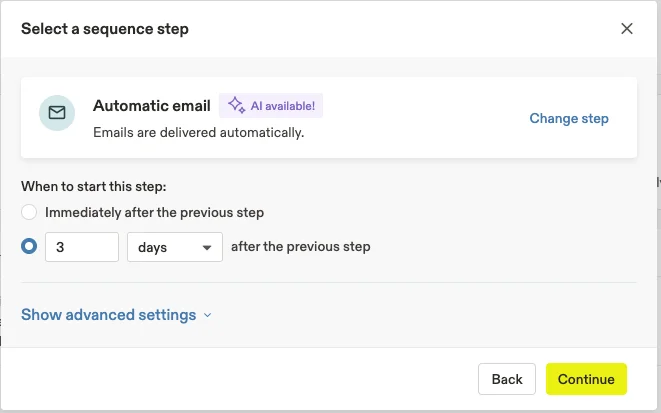
After that, we’ll add the second Automatic Email. Set the timing—for example, 3 days after the LinkedIn view step.
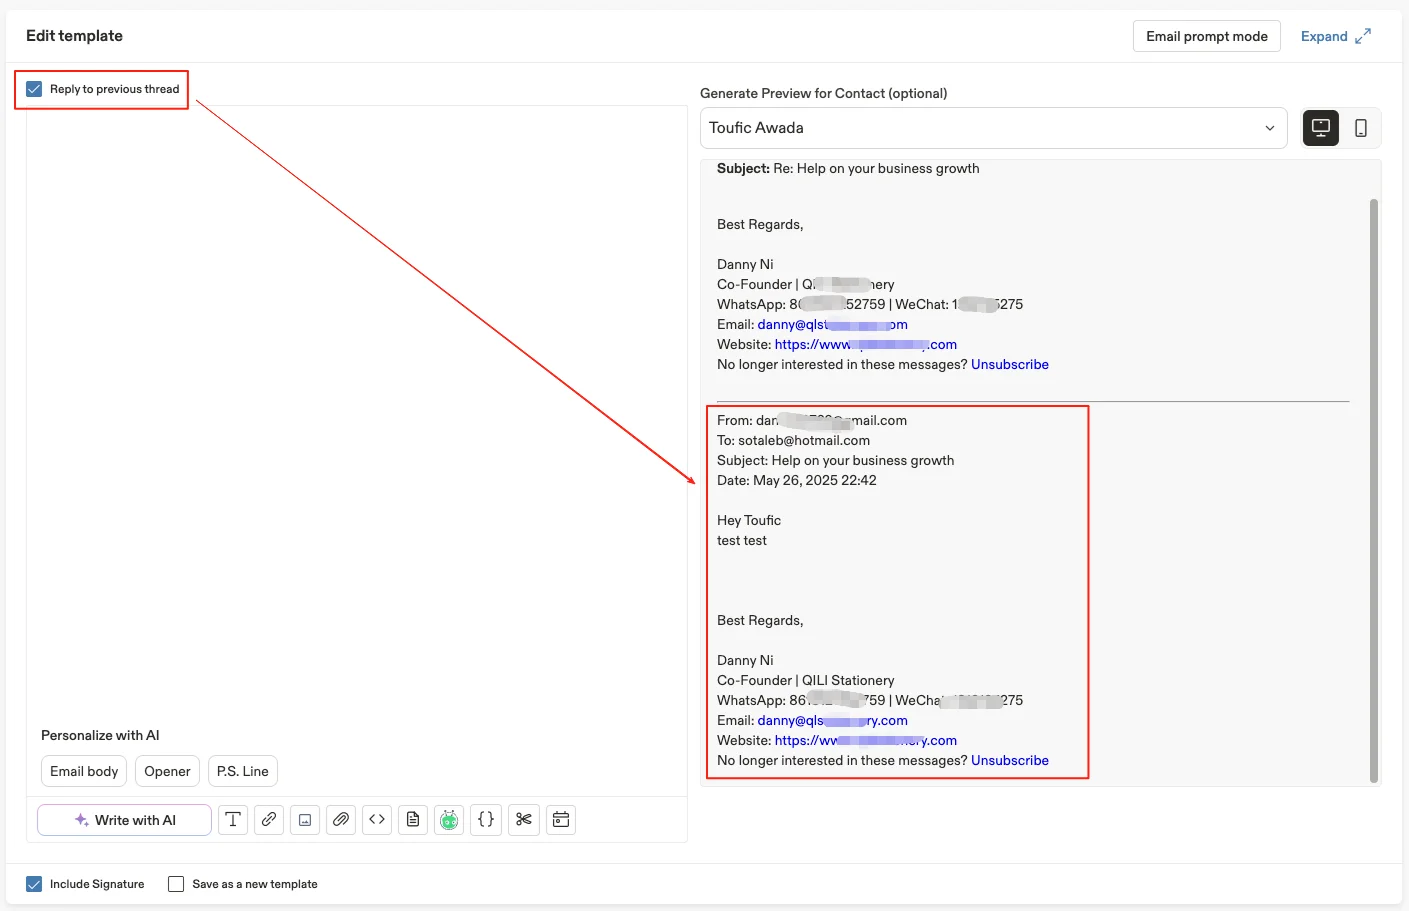
However, starting from the second email, we have a small recommendation: include the content of the first email in the reply thread as a reference. While editing the email, make sure to check “Reply to previous thread.”
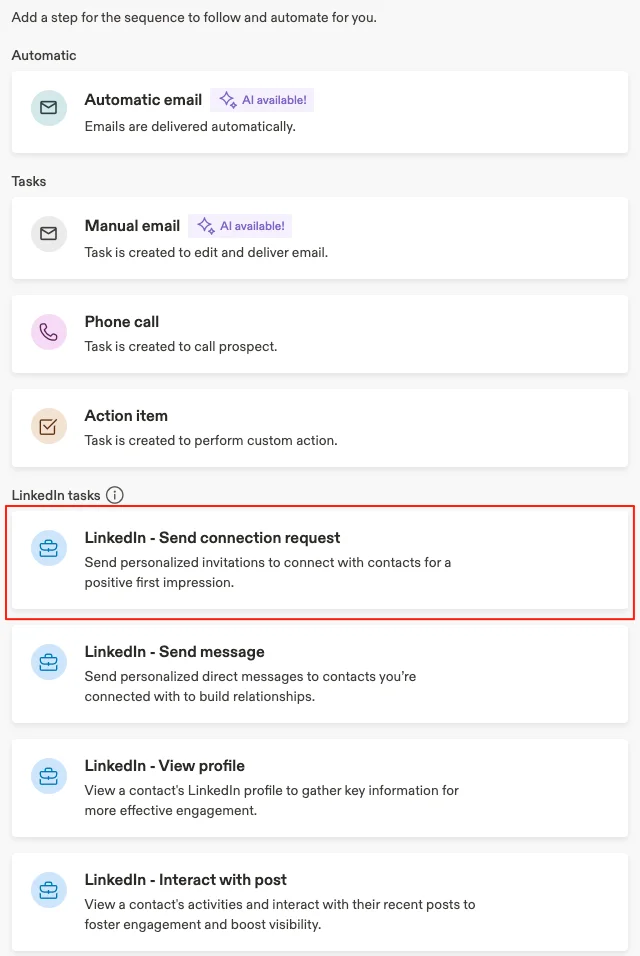
Next, you can add another LinkedIn-related task, such as sending the contact a connection request. Since you’ve already sent two emails and visited their profile, the recipient has likely gained some understanding of who you are and what your intention is. Sending a connection request at this point won’t come across as too abrupt.
Then you can move on to add the third email. We won’t repeat the steps here.
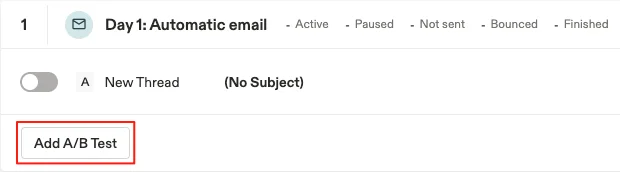
One important thing to mention: for each email step, you can create multiple versions of the message to conduct A/B testing. This allows you to test different subject lines, body text, and CTAs to determine which performs best—helping you optimize your email marketing strategy with real data.
By the end, we’ll have built a 5-step cold email + LinkedIn workflow for outbound lead generation:
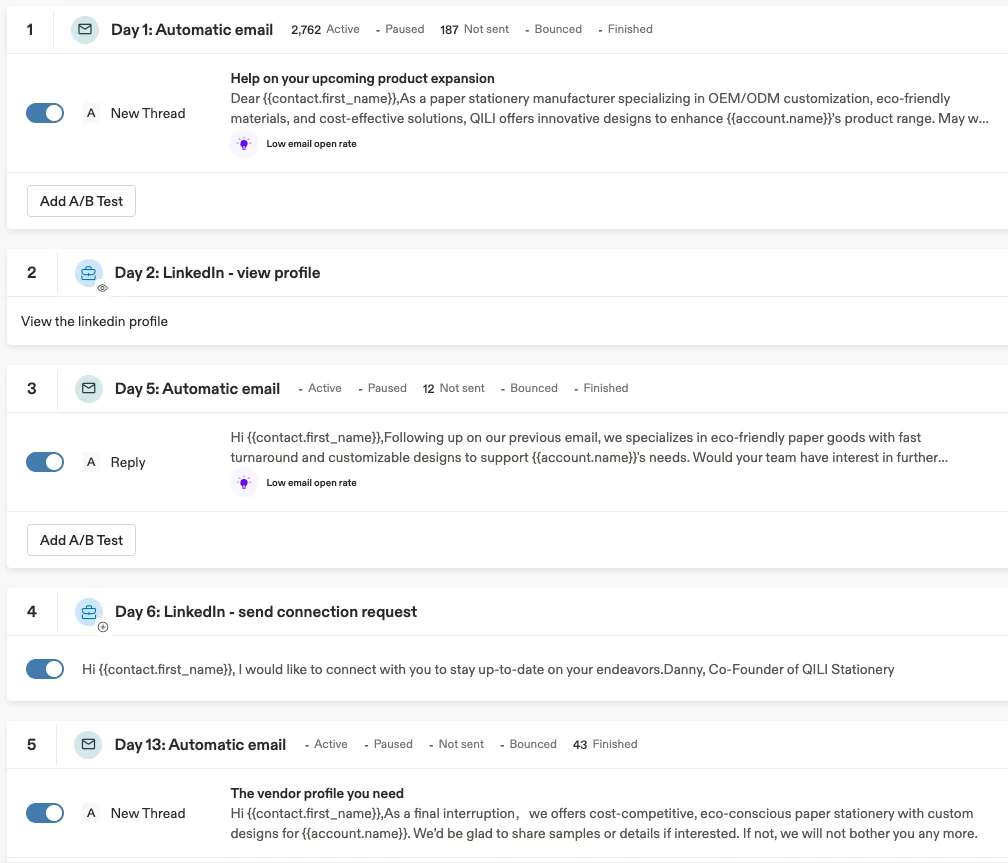
- The first email is sent to let the prospect know your intent.
- You visit the prospect’s LinkedIn profile to slightly increase recognition.
- The second email is sent when the prospect may already remember who you are.
- A LinkedIn connection request is sent—this has a much higher acceptance rate than a totally cold request.
- A third and final email is sent as one last effort to engage. If it doesn’t work—so be it.
This entire sequence will continue to run as long as the recipient doesn’t reply. Once they respond, the workflow stops automatically—because that person is no longer a cold prospect, but an active lead worth handling manually.
There’s no one-size-fits-all standard for how to design a workflow. Each salesperson or marketer should adjust the steps and timing based on their industry, audience, and campaign goals.
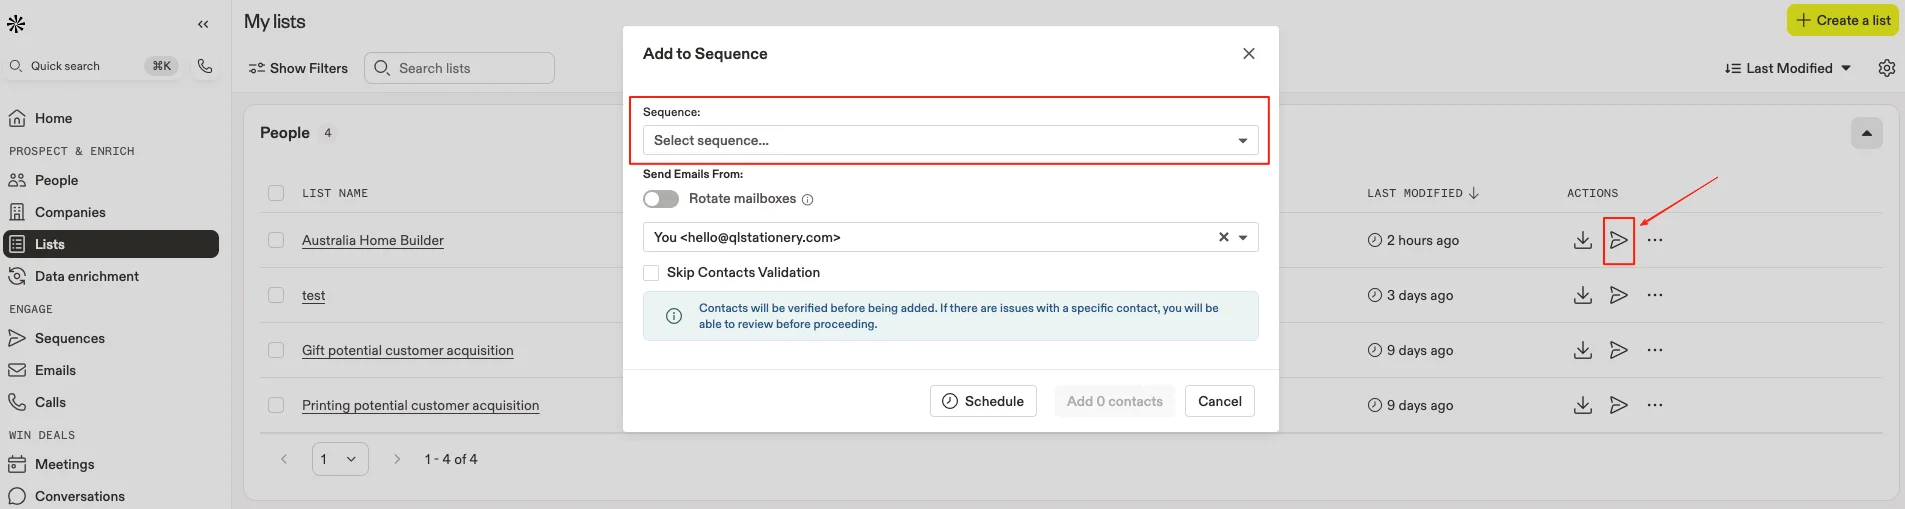
Once the sequence is created, go back to the List you previously built and simply add that list to the sequence. The automated email marketing workflow will then begin running on its own.
So—what do you think? After reading all this, it’s easy to see why Apollo is such a powerful and easy-to-use tool. Its capabilities go far beyond just sending automated emails—from lead discovery and sequence automation, to LinkedIn tasks, phone call integrations, CRM syncing, and contact scoring—Apollo covers nearly every aspect of the modern sales funnel. If you’ve imagined it, Apollo probably already does it. And if you haven’t—it likely still can.
Why not sign up and try it for yourself? Only when you actually start using it will you truly understand why so many sales and marketing professionals consider Apollo their go-to weapon for email marketing and scalable lead generation.