
Google Tag Manager (GTM) is a powerful tool that helps website administrators easily manage and deploy various tags (such as Google Analytics and Google Ads) without modifying the code. Accurate data tracking and analysis are crucial for SEO or digital advertising of your website. With GTM, you can conveniently track user behavior on your site and optimize your marketing strategies. This article provides a detailed guide on how to install Google Tag Manager & install GTM and configure it, helping you get started quickly and enhance your website’s data analysis capabilities.
How to install google tag manager & install GTM?
Step 1: Search for GTM (Google Tag Manager)
Let’s start the first step of learning how to install google tag manager & install GTM – log in to your Google account and search for Google Tag Manager.

Step 2: Create an Account
Log in to your Google account and search for Google Tag Manager.
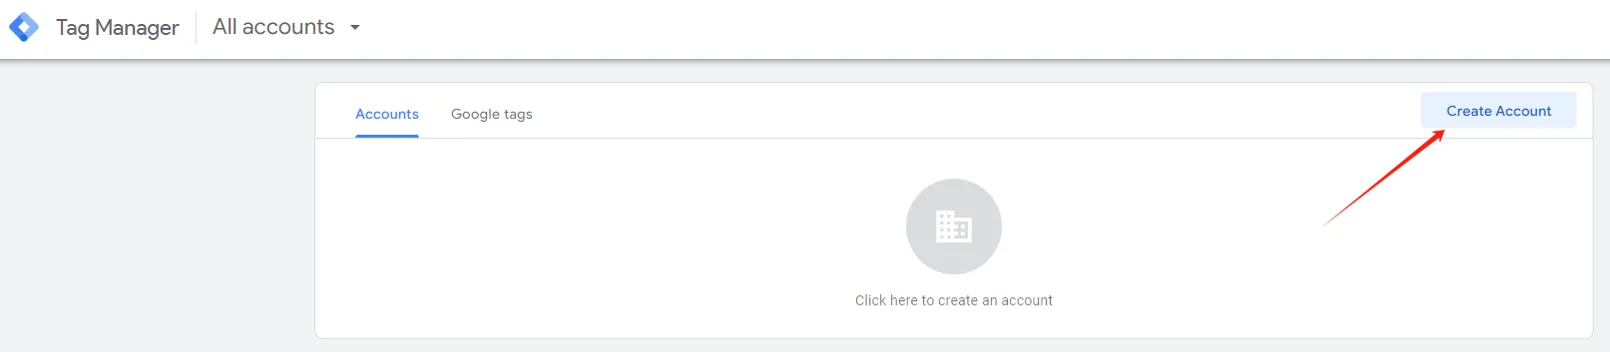
Step 3: Add a New Account
Fill in the account name, country, container name, and platform type. For websites, choose “Web” as the platform type.

Step 4: GTM Service Terms
Agree to the Google Tag Manager service terms.

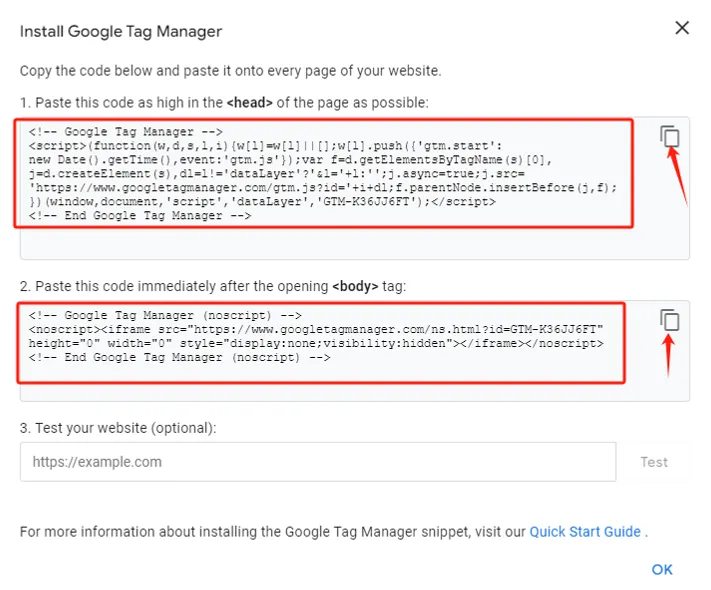
Step 5: Add the Code
Google Tag Manager will provide two snippets of code. Add these to the head and body sections of your website. Don’t worry, it’s simpler than it sounds.
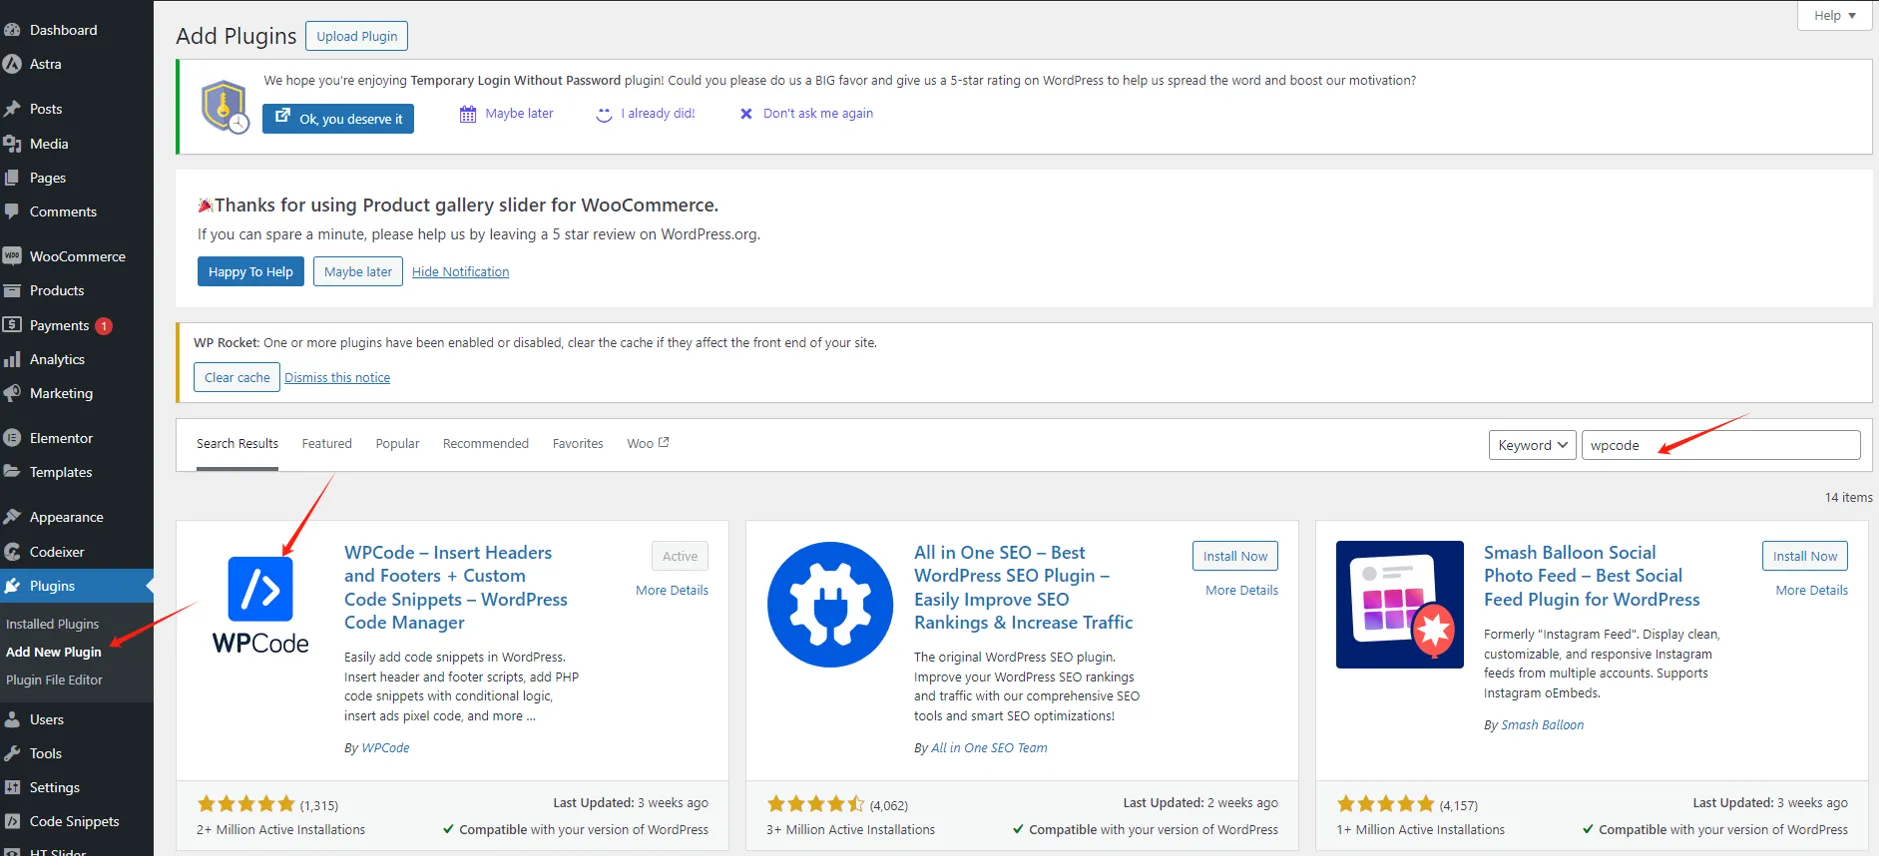
Step 6: Install the WPCode Plugin
In your WordPress site’s backend, add a plugin called WPCode.
Step 7: Add the Code to Header and Body
Once WPCode is installed, go to “Code Snippets” under “Header & Footer” and paste the GTM code into the Header and Body sections, then save.

Step 8: Test
Go back to Google Tag Manager and click on “Test.” If you see a green checkmark on the left, the code has been successfully added. Now we have finished the steps of how to install google tag manager & install GTM. From step 9 we will guide to configure it.

How to configure google tag manager?
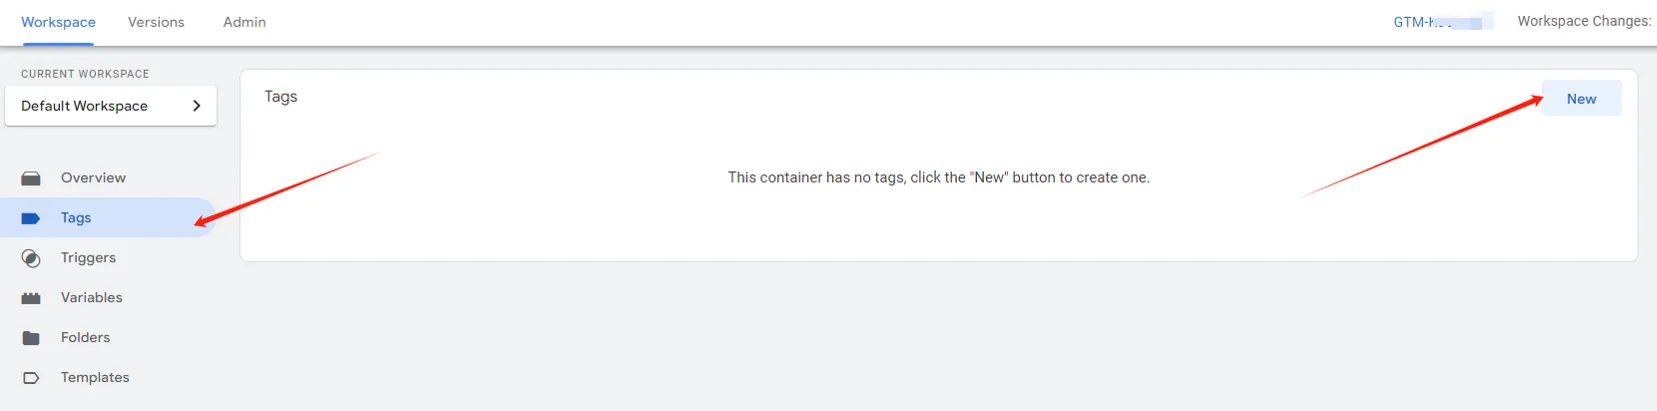
Step 9: Add New Tags
Click “New” to add new tags.
Step 10: Name the Tag
Give your tag a name and click on Tag configuration.

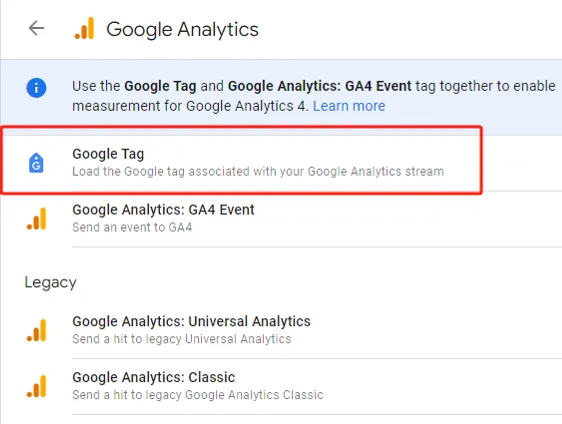
Step 11: Select Tag Type
Choose the tag type and click on Google Analytics.

Step 12: Select Google Tag
Under Google Analytics, choose Google Tag.
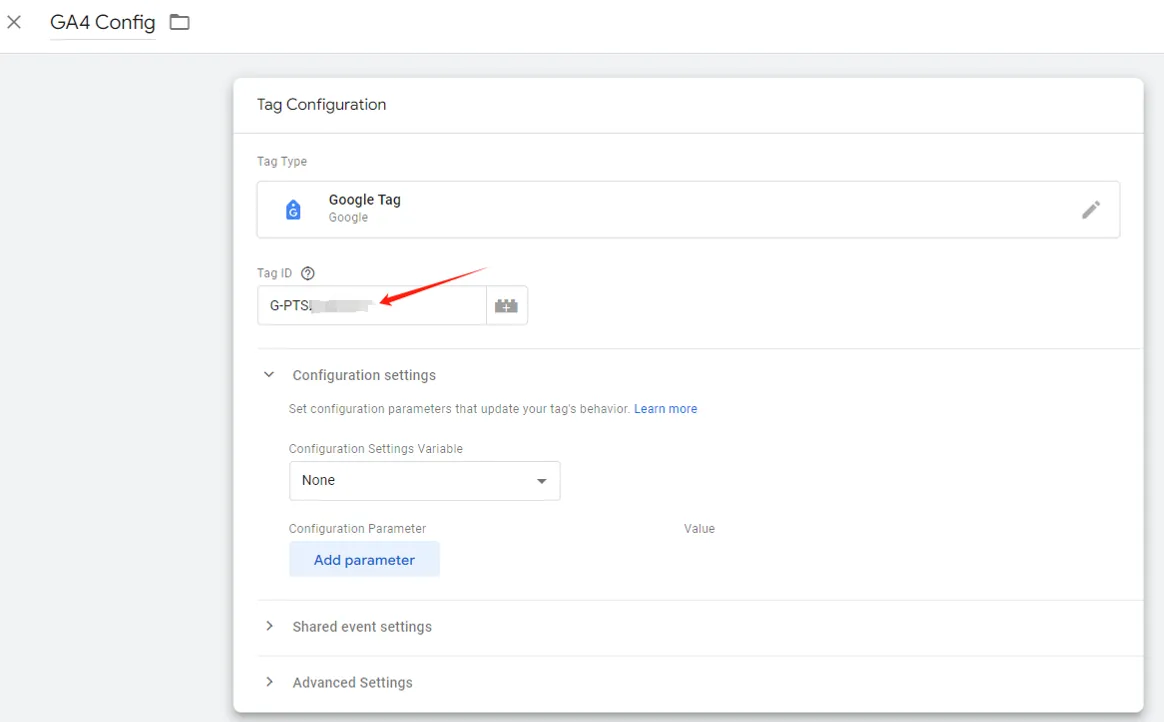
Step 13: Enter Tag ID
Find the Tag ID in your GA4 and enter it into the GTM. Follow the steps below to locate the Tag ID.
Step 14: Find Tag ID
a. At the end of creating your GA4 data stream, click on “Start collecting data” and select your site.

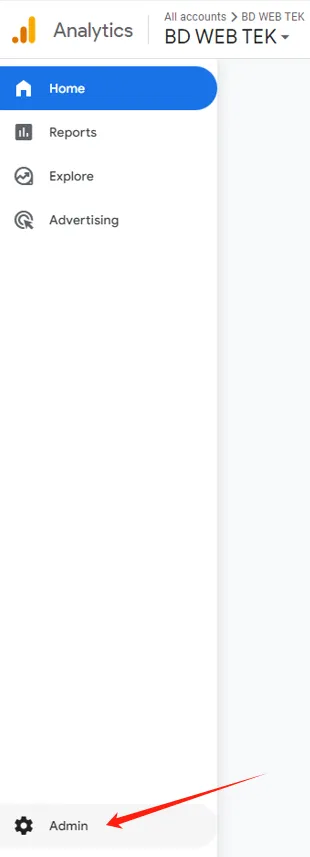
b. If you’ve already created GA4, log in and click on the gear icon in the lower left to enter Admin.
c. Click on Data streams, find your site on the right, and click on it.
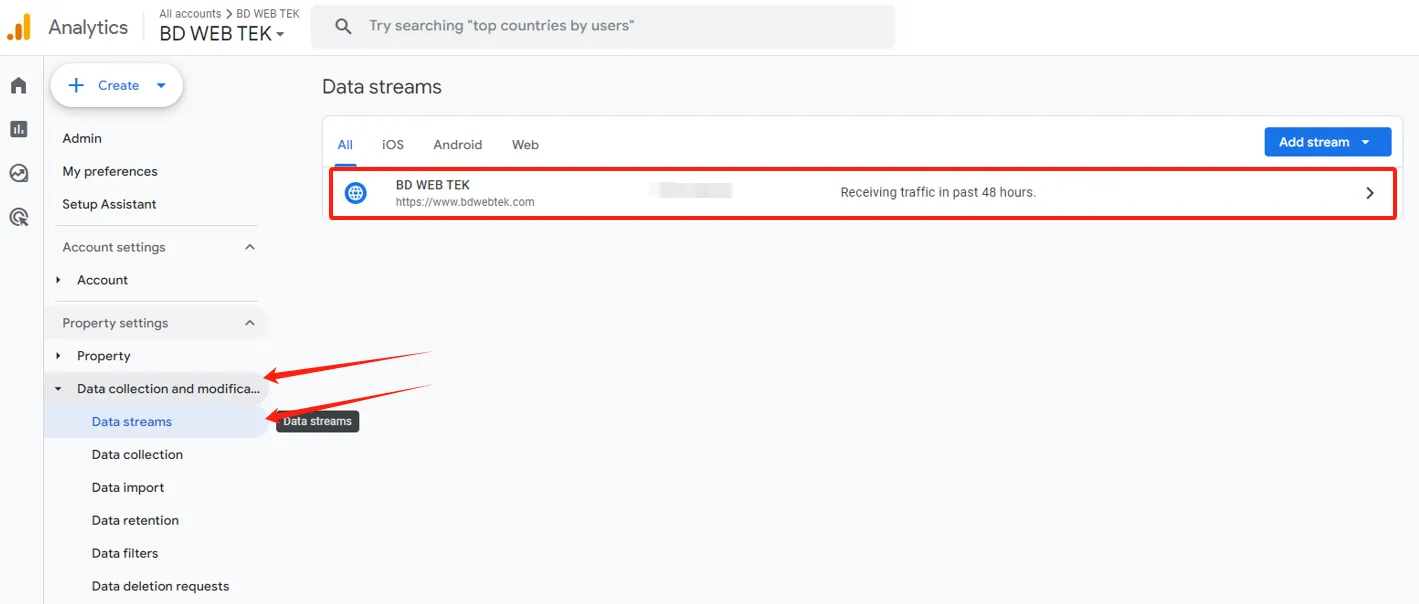
d. In the Web stream details, copy the MEASUREMENT ID and paste it into the GTM Tag ID field.
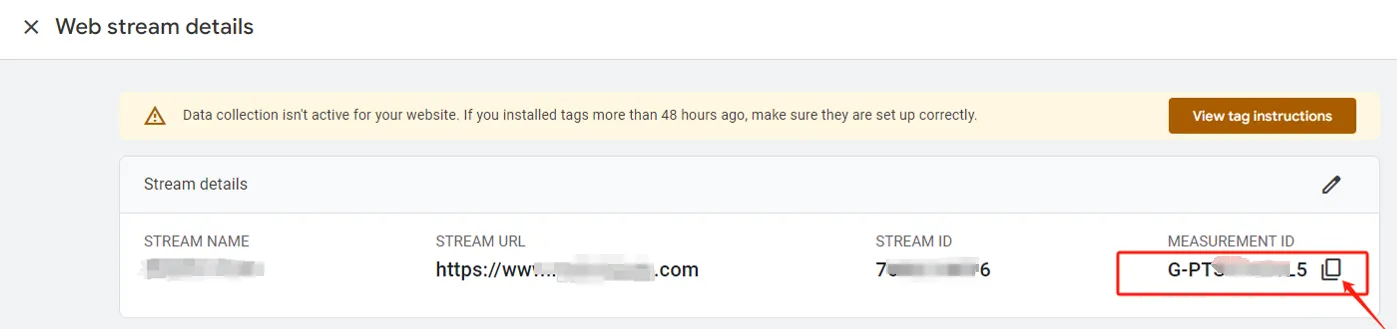
e. Set the trigger condition.
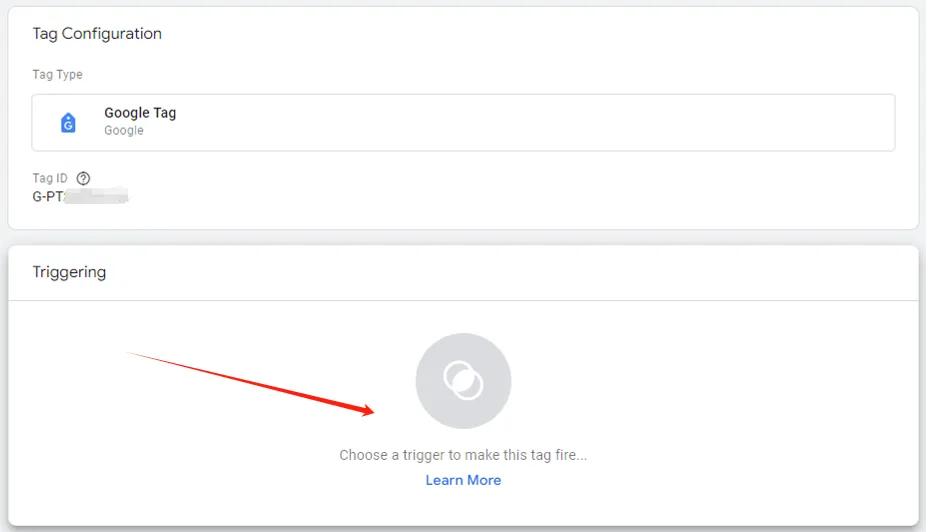
Step 15: Set the Trigger Condition
Return to GTM and click on Triggering.
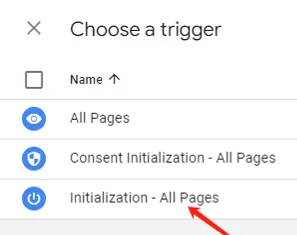
Step 16: Choose Initialization – All Pages
Initialization – All Pages is a basic setting for connecting GTM to GA4, allowing you to track all standard user behavior data on your website.
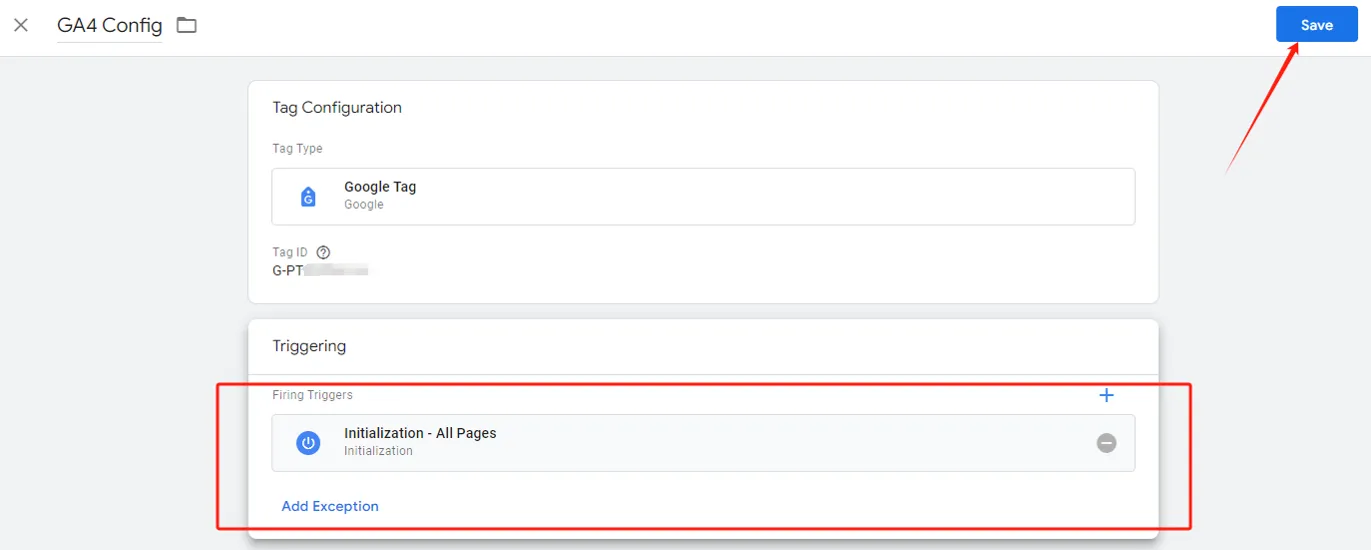
Step 17: Save
Save this GA4 initialization configuration.
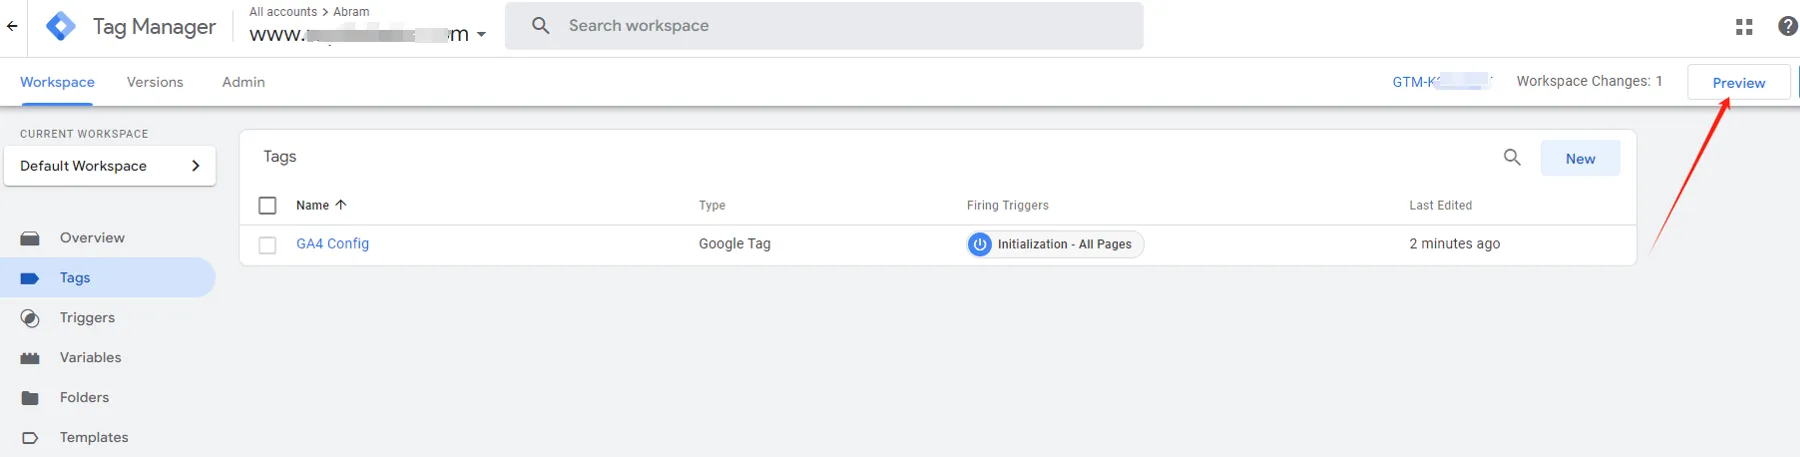
Step 18: Preview
You can preview in real-time to check if the configuration is successful.
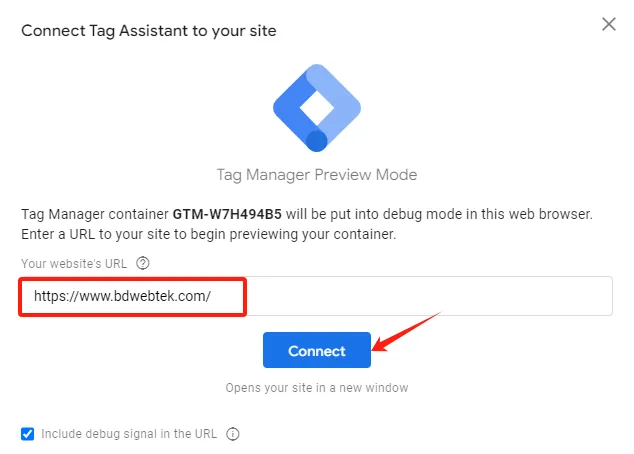
Step 19: Connect Google Tag Assistant
Click on “Connect” to link Google Tag Assistant to your site.
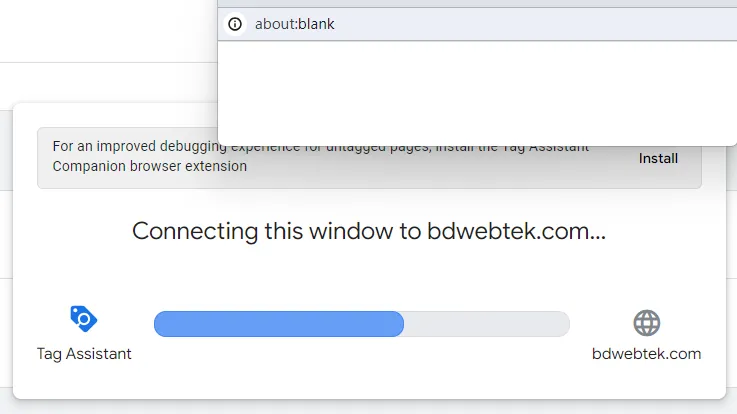
Step 20: Connecting
Wait a moment while it connects.
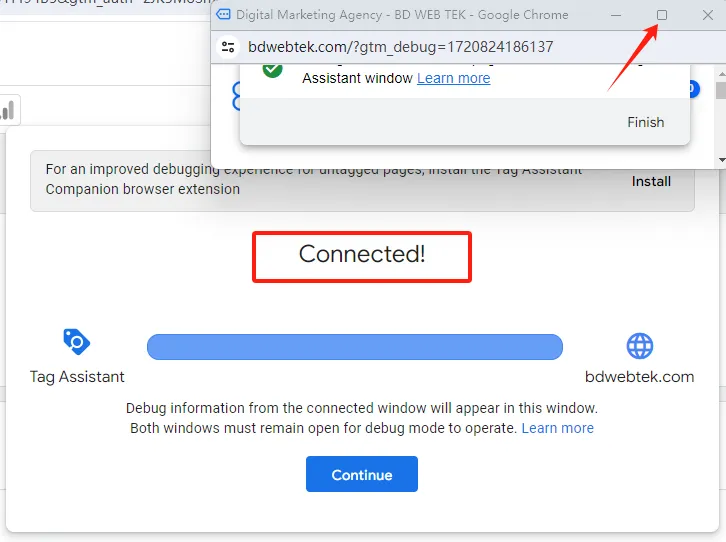
Step 21: Connection Successful
When you see “Connected,” it means the connection is successful. Maximize your site preview window.
Step 22: Browse Your Site
Browse your site and click on various elements. You should see a Tag Assistant connected notification in the lower right corner.

Step 23: Check Page Activity via Tag Assistant
Return to Google Tag Assistant and you’ll see a record of your recent site activities on the left.

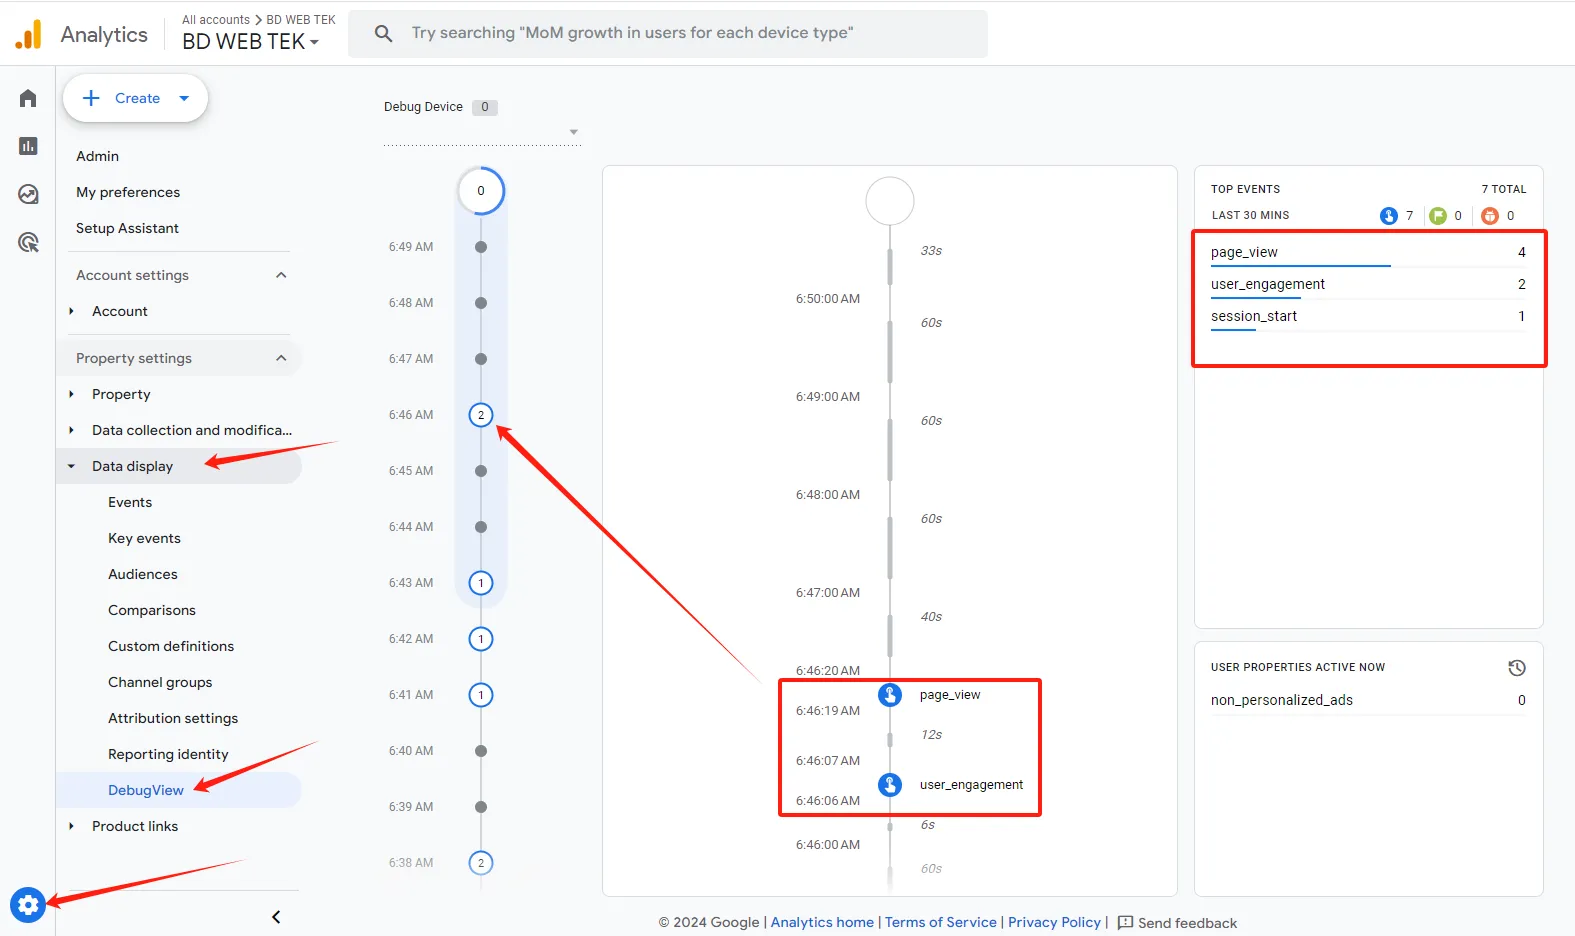
Step 24: Check Page Activity via GA4
Log in to GA4, click on the gear icon in the lower left for Admin, and select DebugView. You’ll see your recent site activities here, confirming the GA4 initialization setup is complete.
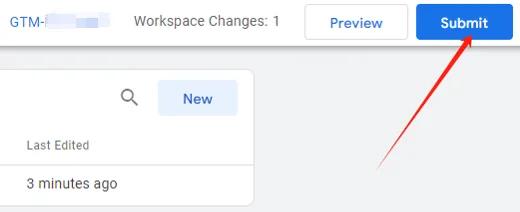
Step 25: Submit
Go back to GTM and click on “Submit” to submit your configuration.
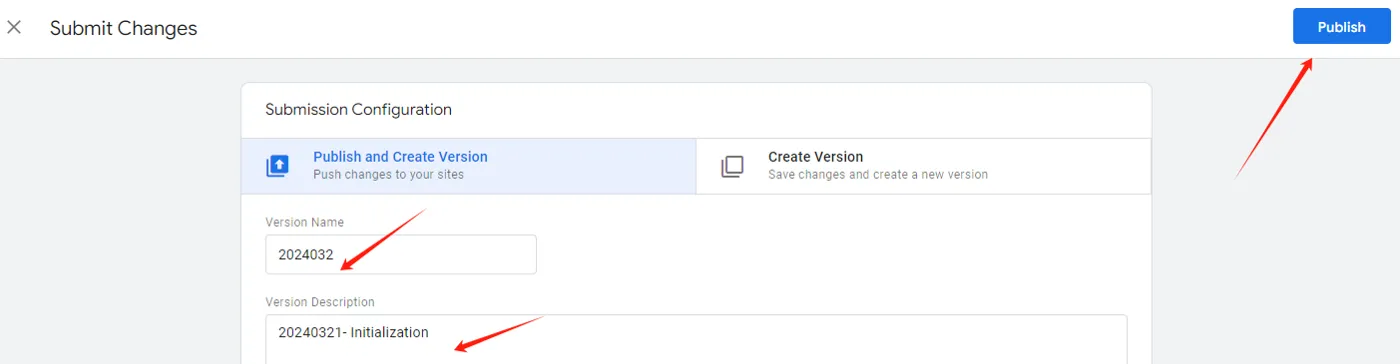
Step 26: Publish
Name and briefly describe the configuration you set up today for future reference.
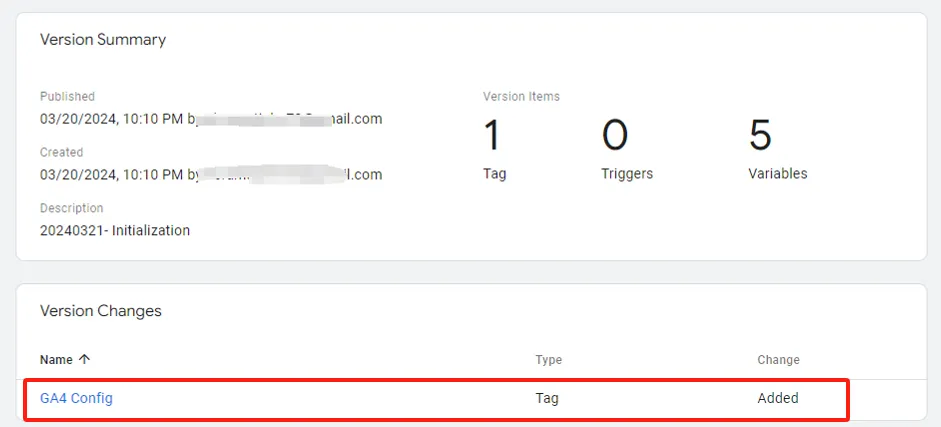
Step 27: Configuration Summary
A configuration summary will show up, detailing the settings you made, for your confirmation.
Learn how to install google tag manager & install GTM and configure it is a crucial step in enhancing your website’s data analysis capabilities. By following this detailed guide, you can easily install google tag manager and use GA4 to track and analyze user behavior on your site, providing reliable data to inform your marketing decisions. If you encounter any issues during the setup process, refer to this guide or seek professional help. Once GTM is configured successfully, you can fully utilize its powerful features to support the successful operation of your website.