So, a pretty big study from Google and SOASTA back in 2017 dropped some serious truth: how fast your website loads is directly tied to how many people bounce right off it.
Think about it:
- If your page goes from loading in 1 second to 3 seconds, your bounce rate jumps by 32%. Ouch!
- Push that to 5 seconds, and it’s a whopping 90% increase in people leaving.
- Hit 6 seconds, and you’re looking at a 106% rise in bounce rate.
- And if your site takes a painful 10 seconds to load? Your bounce rate could skyrocket by an insane 123%!
Basically, before your website even sees the light of day, making it load super fast needs to be your absolute top priority. It’s all about keeping those visitors happy and on your site!
Google Pagespeed Insights


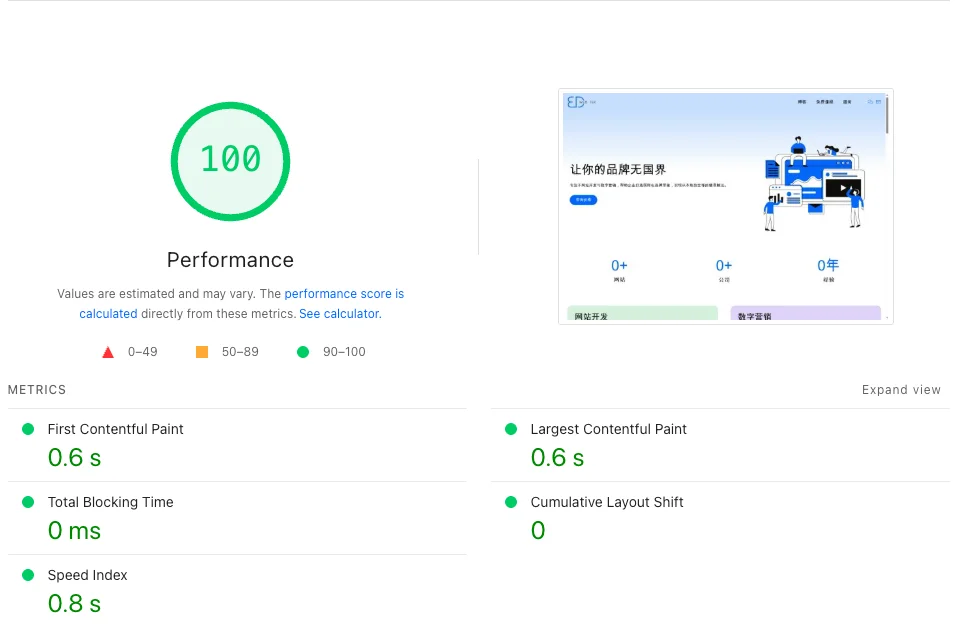
Google PageSpeed Insights (PSI) is a free, official tool from Google that helps you figure out how well your website is performing. It looks at a bunch of different factors like page load speed, how quickly your site responds to user interaction, and how stable the visuals are, then gives you an overall Performance Score. Plus, it dishes out actionable advice to help you make your website even better.
When you check out a PSI report, you’ll see a few key performance metrics that make up that overall score. These include:
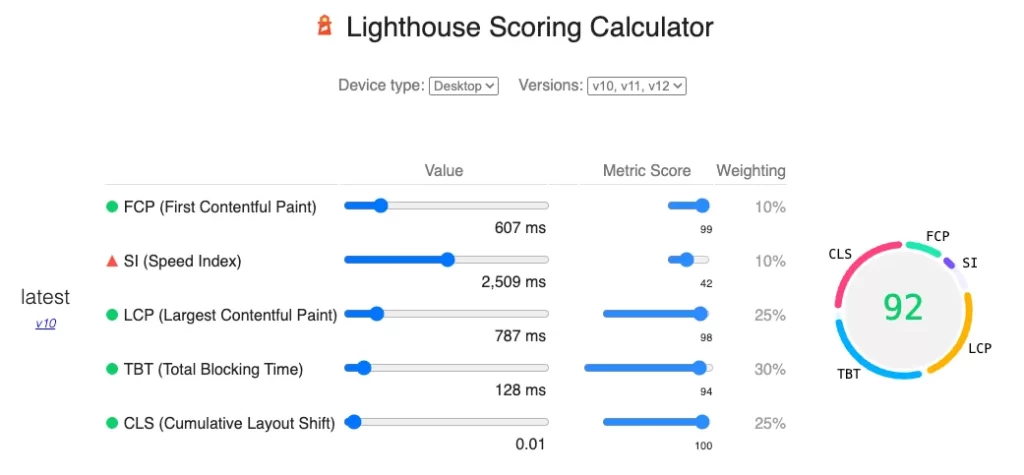
- FCP (First Contentful Paint): This tells you when the first piece of content (like text or an image) pops up on the screen.
- LCP (Largest Contentful Paint): This measures when the biggest piece of content on your page becomes visible.
- CLS (Cumulative Layout Shift): Ever had a button suddenly jump as you’re about to click it? CLS measures how much your page’s layout unexpectedly shifts around.
- TBT (Total Blocking Time): This measures how long your page is blocked from responding to user input, like clicks or taps.
- Speed Index: This shows you how quickly content is visually displayed during page load.
These metrics all come together to give you your site’s Performance Score (from 0 to 100). It’s basically the core benchmark for how good your users’ loading experience is.
Why Google PageSpeed Insights Rocks:
- Focuses on Performance: It directly scores your page’s loading and response speed.
- Real-World User Data (CrUX): PSI actually uses data from real users to see how your site performs out in the wild.
- Actionable Optimization Tips: It doesn’t just tell you there’s a problem; it breaks down every resource and loading issue that’s affecting your site’s performance.
- Crucial for SEO: A high Performance Score usually means a better user experience, which can seriously boost your page’s ranking potential in search results.
How to Use It:
- Head over to https://pagespeed.web.dev/
- Type in your website’s URL.
- Click “Analyze.”
What is FCP/LCP/TBT/CLS/SI?


First Contentful Paint (FCP)
First Contentful Paint (FCP) basically tells you how long it takes for a browser to first render any content on a page after a user clicks on it. This “content” could be anything from text, images, or even SVGs.
| Mobile FCP time | Rating |
|---|---|
| 0-1.8 seconds | Green (fast) |
| 1.8-3 seconds | Yellow (medium) |
| More than 3 seconds | Red (slow) |
| Desktop FCP time | Rating |
|---|---|
| 0-0.9 seconds | Green (fast) |
| 0.9-1.6 seconds | Yellow (medium) |
| More than 1.6 seconds | Red (slow) |
Optimization method:
- Compress and Prioritize Critical CSS
- Use Smaller Image Sizes and WebP Format
- Lazy Load Third-Party JS Scripts
Impact on performance: 10%
Largest Contentful Paint (LCP)
Largest Contentful Paint (LCP) is all about when the biggest piece of visible content on your page actually shows up on the screen. Think of it this way: it’s the moment your eyes land on the most prominent element, like a hero image (that big, eye-catching picture usually at the top in the banner area) or a large headline.
| Mobile LCP time | Rating |
|---|---|
| 0-2.5 seconds | Green (fast) |
| 2.5-4 seconds | Yellow (medium) |
| More than 4 seconds | Red (slow) |
| Desktop FCP time | Rating |
|---|---|
| 0-1.2 seconds | Green (fast) |
| 1.2-2.4 seconds | Yellow (medium) |
| More than 2.4 seconds | Red (slow) |
Optimization method:
- Use preload for Early Loading of Large Images or Main Title Fonts
- Disable Lazy Loading for Above-the-Fold Images
- Reduce Render-Blocking Resources
- Adapt Image Sizes for Mobile Devices (Avoid Loading Overly Large Images)
Impact on performance: 25%
Total Blocking Time(TBT)
Total Blocking Time (TBT) measures the total amount of time that a page’s main thread was blocked, preventing it from responding to user input (like clicks or taps). This time is calculated from First Contentful Paint (FCP) until the page becomes fully interactive.
| Mobile TBT time | Rating |
|---|---|
| 0-200 ms | Green (fast) |
| 200-600 ms | Yellow (medium) |
| More than 600 ms | Red (slow) |
| Desktop TBT time | Rating |
|---|---|
| 0-150 ms | Green (fast) |
| 150-350 ms | Yellow (medium) |
| More than 350 ms | Red (slow) |
Optimization method:
- Delay JavaScript Execution (Delay JS Execution)
- Split Large Files and Remove Unused JavaScript
- Reduce Third-Party Tracking Scripts
Impact on performance: 30%
Cumulative Layout Shift (CLS)
Cumulative Layout Shift (CLS) is basically a score that measures how much content on your page “jumps” or “moves around” unexpectedly while it’s loading. It’s all about visual stability, and its main goal is to prevent frustrating moments where a button or a paragraph suddenly shifts right as you’re about to click or read it.
| CLS score | Rating |
|---|---|
| 0-0.1 | Green (excellent) |
| 0.1-0.25 | Yellow (needs improvement) |
| More than 0.25 | Red (poor) |
Optimization method:
- Set Clear width and height for Images, Videos
- Avoid Size Flashing with Lazy Loading
- Don’t Insert Ads or Iframes Without Reserving Space
Impact on performance: 25%
Speed Index (SI)
Speed Index (SI) is all about how quickly the visible content on your page progressively appears during loading. Instead of focusing on just one specific point in time (like when the first element shows up or the largest one loads), it actually measures how smoothly your page becomes visually complete from the user’s perspective.
| Mobile SI time | Rating |
|---|---|
| 0-3.4 seconds | Green (fast) |
| 3.4-5.8 seconds | Yellow (medium) |
| More than 5.8 seconds | Red (slow) |
| Desktop SI time | Rating |
|---|---|
| 0-1.3 seconds | Green (fast) |
| 1.3-2.3 seconds | Yellow (medium) |
| More than 2.3 seconds | Red (slow) |
Optimization method:
- Prioritize Loading Above-the-Fold Content
- Delay Loading Non-Critical Resources
- Compress and Optimize Image Sizes
Impact on performance: 10%
How to Boost Your WordPress Website's Performance Score
(1) Choose an excellent server environment (Hostinger + LiteSpeed is recommended)
The upper limit of your website’s loading speed is determined by your server infrastructure. A great server isn’t just about “plenty of bandwidth”—you should also pay attention to a few other points:
- Does it have high-performance storage (like NVMe SSD)?
- Does it support object caching (Redis or Memcached)?
- Does it support HTTP/3 + QUIC?
- Does it have good integration with caching plugins?
I recommend Hostinger + LiteSpeed Web Server.
If your server uses LiteSpeed Web Server, you can use the official LiteSpeed Cache plugin for deep caching optimization. It supports:
- Page-level caching (which is more fundamental than what ordinary plugins offer)
- Automatic integration of features like lazy loading for images, delayed JS, and critical CSS
- Seamless compatibility with QUIC.cloud CDN
I recommend using one of Hostinger’s mid-to-high-tier plans. These plans support LiteSpeed Server by default and have built-in acceleration features like Redis, HTTP/3, and Opcache, so no extra configuration is needed.
Of course, if you’re using Nginx or Apache, you can also choose optimization plugins like FlyingPress or WP Rocket. However, when it comes to deep integration and compatibility, LiteSpeed paired with LiteSpeed Cache has the advantage.
(2) Slim Down Your Plugins
WordPress’s plugin library is so rich that it’s easy for developers to get into the habit of searching for and installing a new plugin every time they want to add a feature. After installing dozens of plugins to complete a website, they often find that the site’s performance is hard to improve, no matter how many optimization techniques they use (like compressing images, using a CDN, or enabling object cache). This is primarily due to three reasons:
- Many plugins automatically inject their own CSS, JS, and font files into pages (regardless of whether you’re actually using their features). For example, form plugins, social sharing plugins, and slideshows can add tens of kilobytes of resources to every page. These resources lead to render-blocking, which lowers your FCP, LCP, and Speed Index scores.
- Back-end plugin logic (such as database queries and REST API requests) increases PHP execution time and memory usage. This is especially true for plugins that handle performance monitoring, security, spam prevention, and automatic translation, which slows down your server’s response time.
- Plugins can have resource conflicts or redundancies. For instance, two plugins might load the same type of resource (like two icon libraries or two form libraries), causing resources to be loaded twice, which lowers your Speed Index. Alternatively, CSS/JS conflicts can lead to Cumulative Layout Shift (CLS), where the page jumps around.
Therefore, if you want to optimize your WordPress site’s speed, slimming down your plugins is the easiest and most cost-effective step you can take.
(3) Compress Your Images
You absolutely must strictly control the pixel dimensions and file size of your uploaded images, while also making sure they stay clear. I’d recommend using image editing software, dedicated image compression tools, or WordPress plugins to help you get those image pixels and file sizes just right.
Recommended Image Pixel Dimensions:
- For website banner images, aim for 1600×800 or 1600×900 pixels.
- Website element images should ideally have one side around 800-1000 pixels.
- For product images, a single side of 800-1000 pixels is generally good.
- Your logo should be around 300 pixels on one side.
- For your website favicon (that little icon in the browser tab), keep one side between 50-100 pixels.
- For SVG icons, around 300 pixels on one side is a good target.
Recommended File Size:
Aim for 200KB or less. The smaller, the better, but always keep clarity in mind! This can be tough to achieve with standard JPG, JPEG, or PNG formats, which is why you’ll want to combine this with the next step: converting image formats.
Compression Tool Recommendations:
Many people use WordPress plugins to batch compress images directly on their website. However, this can lead to issues like duplicate filenames or unnecessary file compression, and it often lacks customization. So, my advice is to compress your images locally first, and then upload them to your website. This gives you much more control.
(4) Convert Your Image Formats
Once you’ve got your image pixels and file sizes sorted, the next big win comes from converting them to more efficient formats. The old standbys like JPG, JPEG, and PNG are fine, but they’re not always the most efficient for web use.
You should use image format conversion software to change your JPG, JPEG, and PNG images into WebP format. WebP images keep high quality but are 25-70% smaller than JPG, JPEG, and PNG files, which means much faster loading times for your website.
I highly recommend using software that can both compress image pixels and convert formats at the same time. Do all your compression and format conversion locally on your computer, and then upload the optimized images to your website. This gives you the most control and the best results!
Free online tool that can help you convert and resize you image: Image Tool
(5) Control Image Dimensions on Your Pages
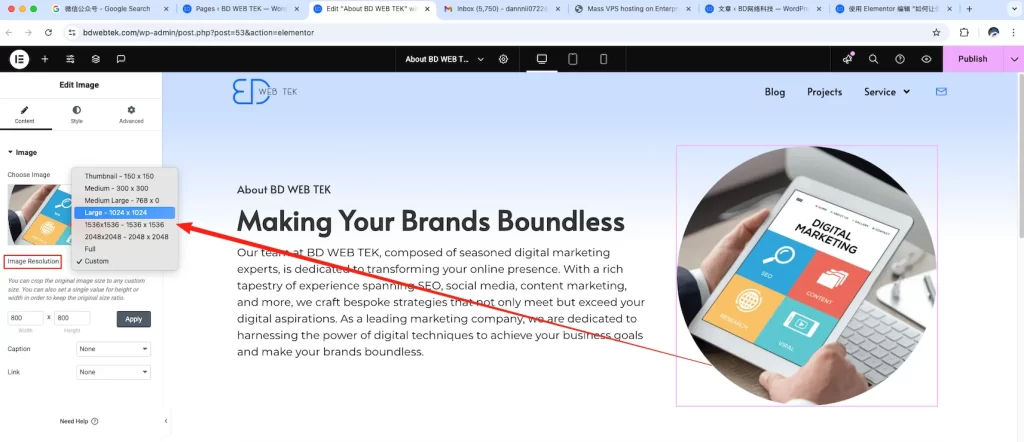
When you’re uploading images to your website, here’s a crucial tip for speed: unless it’s a banner image, always use your editor to set the pixel dimensions to “large,” “medium_large,” or even “medium.” This ensures that no matter how massive the original image file is, it’ll display on your page at the specific, optimized size you’ve set.
For example, if you’re using an editor like Elementor Pro, you can control the displayed image pixels to be “Large 1024 x 1024.” This means even if you uploaded a super high-res photo, the browser only loads the size you’ve specified, saving bandwidth and making your page much snappier.


(6) Stick to Static Images for Your Homepage Banner – Ditch Sliders and Videos
The very first section your visitors see on your homepage – often called the “Hero” area – is absolutely critical for your Largest Contentful Paint (LCP) and Speed Index scores. Many website owners love to use image carousels (sliders), video backgrounds, or even animated elements for their homepage banners. While they might look flashy, the truth is, they will drastically drag down your website’s performance.
Why Slides and Videos Aren’t Recommended:
- Image Carousels (Sliders): These typically load anywhere from 2 to 5 images, which significantly bloats the total image resource size for your initial screen load. Even if only one image is visible, the others are often loading behind the scenes.
- Video Backgrounds: Videos introduce a ton of JavaScript control logic and the video file itself, which can severely block the rendering of your initial screen.
- Even with lazy loading, resources in the first visible area of your page still need to load first, directly impacting your LCP and First Contentful Paint (FCP).
Optimization Recommendations:
- Use a single, static image for your homepage banner. Make sure it’s properly sized, well-compressed, and in the WebP format.
- Exclude this banner image from lazy loading. This ensures it loads immediately, significantly improving the Browse experience and boosting your LCP score.
- Avoid using any slider plugins or background video components in your hero section.
By switching to a static banner, you’ll not only improve your LCP but also reduce JavaScript execution and layout shifts (CLS), making your homepage feel much more stable and lightning-fast.
(7) Localize Your Fonts and Icons
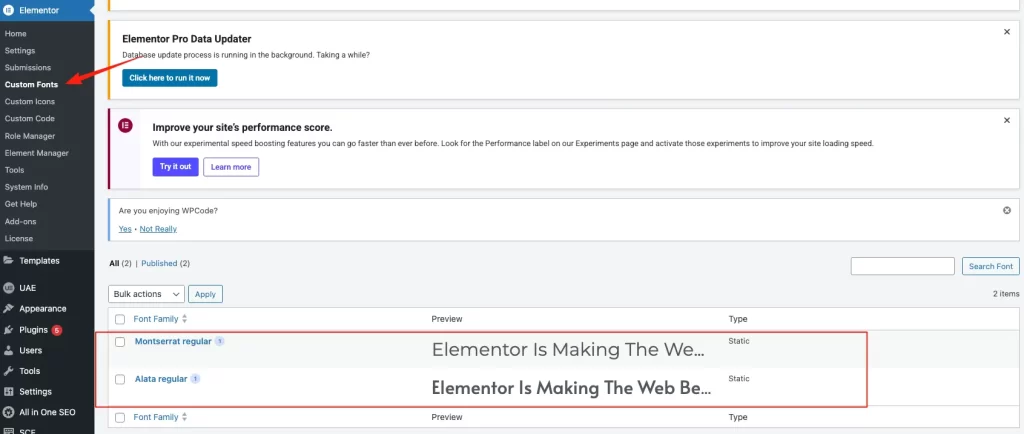
So, for this step, it’s all about taking charge of your fonts! You’ll want to manually download the font files you need, upload them directly to your website server, and then make sure to disable Google Fonts.
For example, if you’re using an editor like Elementor Pro, you can easily upload your font files right into their “Custom Fonts” section. This way, your site loads fonts straight from your own server, cutting out those extra external requests and giving you a big boost in loading speed and reliability.


For icons, you should manually download various SVG format icons, making sure to control their dimensions when you download them. Then, upload them directly to your website’s media library and call them from there, instead of using your editor’s built-in icon library.
Both of these methods help to reduce the loading of external resources, thereby improving loading speed.
(8) Object Cache
Object caching basically saves the results of your WordPress database queries. So, the next time someone visits your site, that data can be pulled directly from memory instead of having to run the same database operations again. This really speeds up how fast your website responds. For example, every time WordPress loads a page, it asks the database for things like “post content, settings, and user information.” With object caching enabled, these results get temporarily stored in Redis or Memcached, and reading from there is much, much faster.
How to Set It Up
First off, you need to make sure your cloud server supports Redis or Memcached. Redis is usually the top choice.
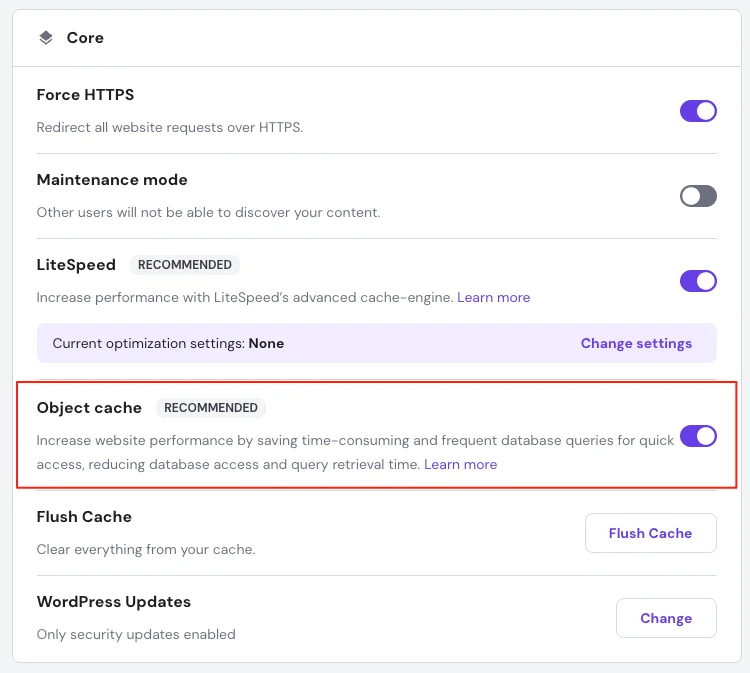
Then, you’ll need to log into your cloud server’s backend. If you’re using something like Hostinger, log into your dashboard, and in the “Overview” section, make sure that “Object Cache” is already turned on, like you see in the image below:


Next, you’ll log into your WordPress dashboard, install the LiteSpeed Cache plugin. Once installed, click on Cache, then Object, and finally select Enable Redis. After that, use Query Monitor to check and make sure that Object Cache is indeed enabled.
Alright, let’s talk about SiteGround now. If you’re with them, you’ll log into your server’s backend and make sure Memcached is enabled there. Afterward, hop into your WordPress dashboard, install SiteGround’s very own Speed Optimizer plugin, and then just activate Memcached through that. Easy peasy!


If you’ve gone and set up your server with your own control panel , then you’re going to need to manually install the Redis extension yourself.
(9) Opcache
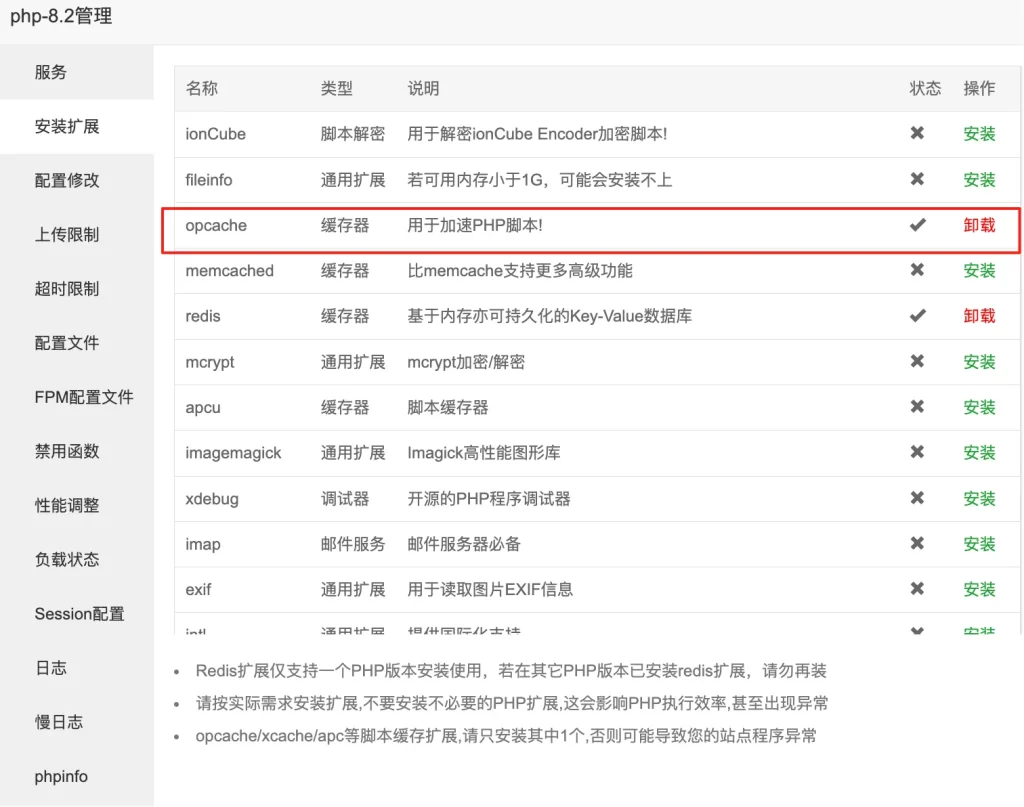
WordPress runs on PHP, and that’s where Opcache comes in! It’s a PHP-level caching tool that stops your PHP files from being parsed over and over again, which really boosts loading efficiency. Lots of hosting providers, like Hostinger and SiteGround, usually have Opcache enabled by default when you do a one-click WordPress install. But, if you’ve set up your own server panel, you’ll need to manually install and enable the Opcache extension yourself, as you can see in the image below:


(10) CDN
A CDN (Content Delivery Network) works by copying your website’s static stuff—like images, CSS, and JavaScript files—to servers all over the world. So, when someone visits your site, those resources load from the server closest to them. This really speeds up loading times, and it’s super noticeable for people accessing your site from overseas.
How to Get It Going:
- Many popular WordPress hosts, like Hostinger and SiteGround, actually offer free CDN plans. You can usually just turn them on right in the Performance section of your hosting dashboard.
- You could also go with the free Cloudflare CDN plan. To set this up, you simply change your domain’s nameservers to Cloudflare’s.
- For more advanced needs, it’s worth checking out options like BunnyCDN, KeyCDN, or Quic.Cloud (which is specifically for LiteSpeed users).
- If you’re running an e-commerce site (think WooCommerce) or a site with content that changes a lot, you can set up CDN cache exclusion rules. This helps keep dynamic pages from being cached, so your visitors always see the freshest version of your site.
(11) Image lazy loading
Lazy loading means that when your page first loads, only the images in the visible area are actually loaded. Any other images further down the page will only load when a user scrolls to that spot. This significantly cuts down on the resources needed for your initial page load, speeding up how fast the first part of your page shows up, and boosting your First Contentful Paint (FCP), Largest Contentful Paint (LCP), and Speed Index scores.
How to Make It Happen:
- Good news! WordPress versions 5.5 and above automatically have image lazy loading turned on by default.
- If you’re using Elementor, you can switch image lazy loading on or off right in the editor settings.
- A pro tip: It’s best to only enable lazy loading for images that aren’t in your initial view. You definitely don’t want your main homepage banner or hero image to be lazy-loaded, as those should appear instantly for the best user experience.
(12) Page Cache
Page caching works by saving the fully rendered HTML of your entire webpage right into your server’s memory. This means that the next time a user visits that page, your server doesn’t have to go through the whole process of running PHP and doing database queries again. Instead, it just serves up the pre-saved, cached content directly. This dramatically boosts how fast your site responds.
How to Get It Set Up:
- I highly recommend using plugins like WP Rocket, LiteSpeed Cache, or FlyingPress to enable page caching on your site. They make it super easy.
- For the best results, combine page caching with object caching. They work together to give you maximum speed.
- You can also set rules to exclude certain pages (like your shopping cart or user account areas) from being cached. This is important to prevent any caching errors on pages that need to be dynamic and unique for each user.
(13) CSS Minify
Optimizing your CSS files is a big deal for speed. It helps cut down on render-blocking, which basically means your page can show up faster.
How to Do It:
- Combine CSS Files: You can merge multiple CSS files into one. This reduces the number of requests your browser has to make, speeding things up. (Just a heads-up: don’t go overboard with combining, as it can mess with lazy loading and how much control you have over individual page elements.)
- “Delay CSS” Feature: Use a feature like “Delay CSS” (you’ll find this in plugins like WP Rocket). This tells your browser to load less critical CSS later, so the visible parts of your page can appear quicker.
- Remove Unused CSS: This is super important! Your theme and plugins might load a lot of CSS that’s not actually used on a particular page. You can use tools or plugins like PurgeCSS to automatically detect and delete these unnecessary CSS styles. Getting rid of that redundant code makes your files smaller and faster to load.
(14) JS Minify
Optimizing your JavaScript files is a key step in boosting your Total Blocking Time (TBT) and Interaction to Next Paint (INP) scores.
How to Do It:
- Enable Delayed JavaScript Execution: This means pushing back the loading time for JavaScript that isn’t needed for the initial view of your page.
- Enable “JS Defer”: This ensures that your JavaScript doesn’t block your HTML from rendering. Essentially, the browser loads the HTML first, then the JavaScript.
- Exclude Critical Scripts: Make sure to exclude essential scripts, like
elementorFrontendConfigif you’re using Elementor, from any deferring or delaying. This prevents important interactive features from breaking. - Reduce Third-Party Scripts: Try to cut down on calls to third-party scripts. Things like heat map trackers, ads, and chat plugins can add significant bloat and slow down your site.
(15) Preload Cache
Preloading is a cool feature that basically gets your page’s cache ready before a user even visits. That way, when they do show up, there’s no waiting around, and their initial load time is super fast.
How to Get It Going:
- You can turn on the “Preload” feature in plugins like WP Rocket or LiteSpeed Cache.
- It’s a good idea to pre-load things like your fonts, main images, and the JavaScript for your initial screen using preload or preconnect tags.
- You can even manually point to your sitemap.xml file. That way, your system will automatically pre-cache your core pages on a regular basis.
Website performance optimization is a systematic undertaking, especially for sites using WordPress paired with Elementor. To truly achieve load times under 1-2 seconds—and in turn, boost user experience and SEO performance—you need to combine smart use of performance optimization tools (like WP Rocket, LiteSpeed Cache, or Perfmatters) with excellent image resource management and caching strategies.