TikTok, Facebook, or Instagram operations keep hitting slow speeds and bans? This guide covers the dual-hop setup: a CN2 GIA entry node plus a local ISP residential exit IP, with Shadowrocket and Xray configuration, step by step.
The Core Problem: Running social accounts on TikTok, Facebook, Instagram, or LinkedIn from behind a firewall means solving your network setup first, otherwise you’ll hit slow speeds, registration failures, reduced reach, or account bans. The fix isn’t just “get a fast VPN”: a fast node with a data-center exit IP still reads as a bot to these platforms. This guide covers why, and how to build a dual-hop setup that’s both fast and looks like a genuine local user.
If you’re operating content or running live promotions on global social media platforms like TikTok, Facebook, Instagram, and LinkedIn, sorting out your network environment is the very first thing you need to tackle. Without it, you’ll constantly face issues like slow speeds, registration problems, reduced reach, or even account bans.
While we can’t know the exact risk control and review mechanisms these platforms use, our practical experience points to a few widely validated core principles:
- A fast and stable network connection
- A localized, authentic IP address
- No more than 3 devices simultaneously online per IP address
In this article, we’ll dive into detailed solutions for each of these challenges.
Why Regular VPN Nodes Don’t Cut It for Social Media Operations
We’ve talked in another post about how to set up a dedicated high-speed node using a CN2 GIA VPS line. These nodes are fantastic for users in mainland China who want to access overseas websites, especially because they offer clear advantages in speed and stability.
But it’s important to understand that while these nodes are fast for entering the internet from China, they’re not suitable for social media operations as an “exit” point. The reason is simple: their outgoing IP addresses still belong to the VPS provider’s data center, and those IPs get flagged as “non-genuine user behavior,” triggering the platform’s risk control mechanisms.
| Data Center IP | Residential IP | |
|---|---|---|
| Source | Cloud providers, VPS, VDS | Assigned by a real ISP |
| How platforms read it | Bot, automation tool, or proxy node | Typical real user’s network environment |
| Risk on login/register/post/ads | Flagged as “data center IP” or “abnormal login”, reduced reach or suspension | Passes risk assessment normally |
In short: these nodes are great for speeding up your access to overseas content, but they simply can’t “masquerade as a normal social media user.”
What Is a “Front High-Speed, Back Local” Dual-Hop Setup?
So how do we build a network environment that actually works for social media operations? We need a system with a high-speed entry point (accessible from China) and a localized exit point (looking like a normal user from the target country).
This requires a dual-node configuration: a CN2 GIA node as the entry point, then routing through an overseas ISP residential line as the exit point. That’s the “front-end acceleration + back-end localization” combined solution. Here’s the flow:
Chinese User → CN2 GIA Node (Entry) → Overseas Local ISP Socks5 (Exit) → Social Media PlatformPractical Steps
Step 1: Import the Node
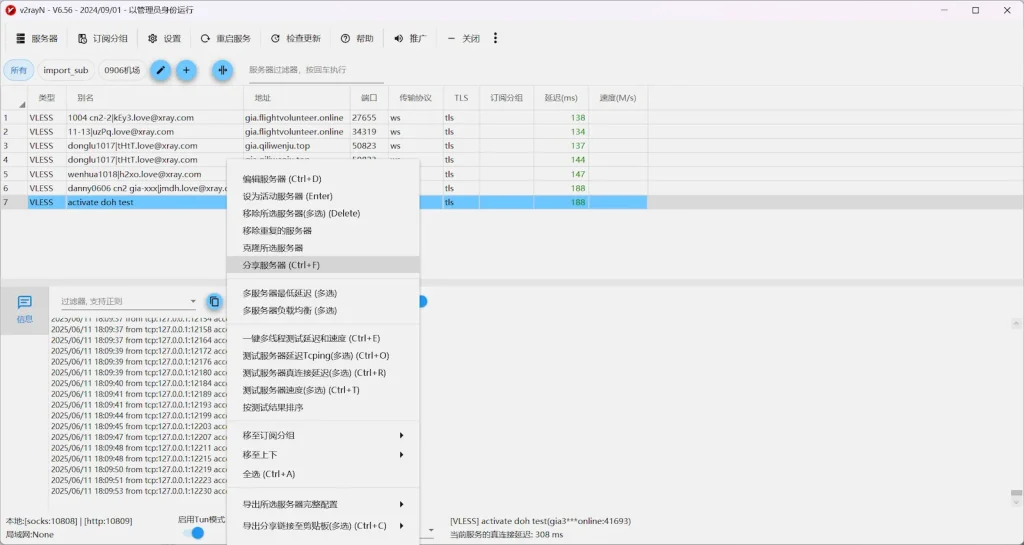
We won’t go into the details of setting up the node itself here. Once you’ve got your node imported into V2RayN, right-click the node you want to use and select “Share server.” A QR code will pop up.
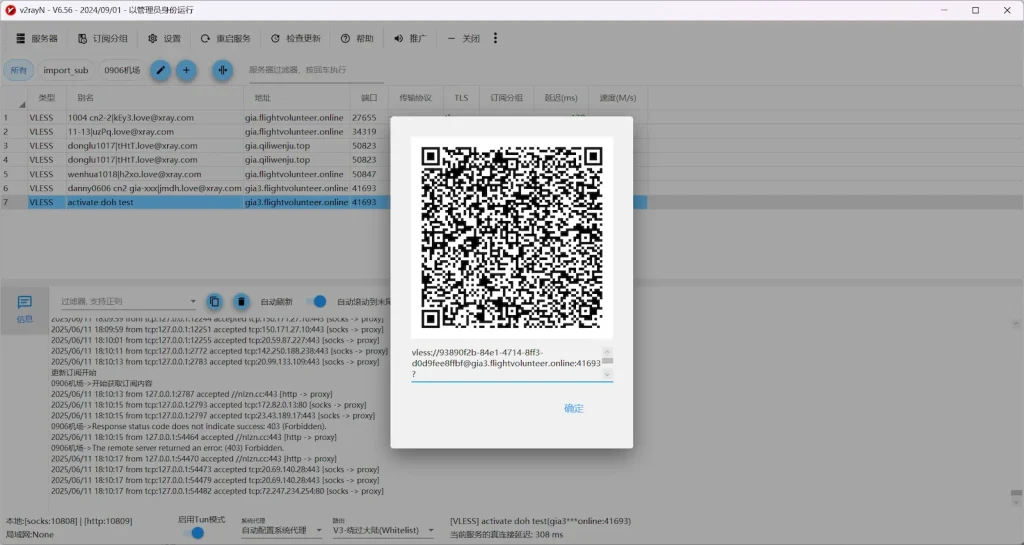
To get that node onto your iPhone, open the Shadowrocket app and use its built-in QR code scanner to scan the code, it imports the node directly into your phone.
Step 2: Purchase the Local IP
This step covers the “localized exit”, making your phone look like a normal user from your target country. Head over to Proxy-Seller [click here to visit directly] and register an account. This platform usually has a steady supply of IPs from dozens of countries worldwide.
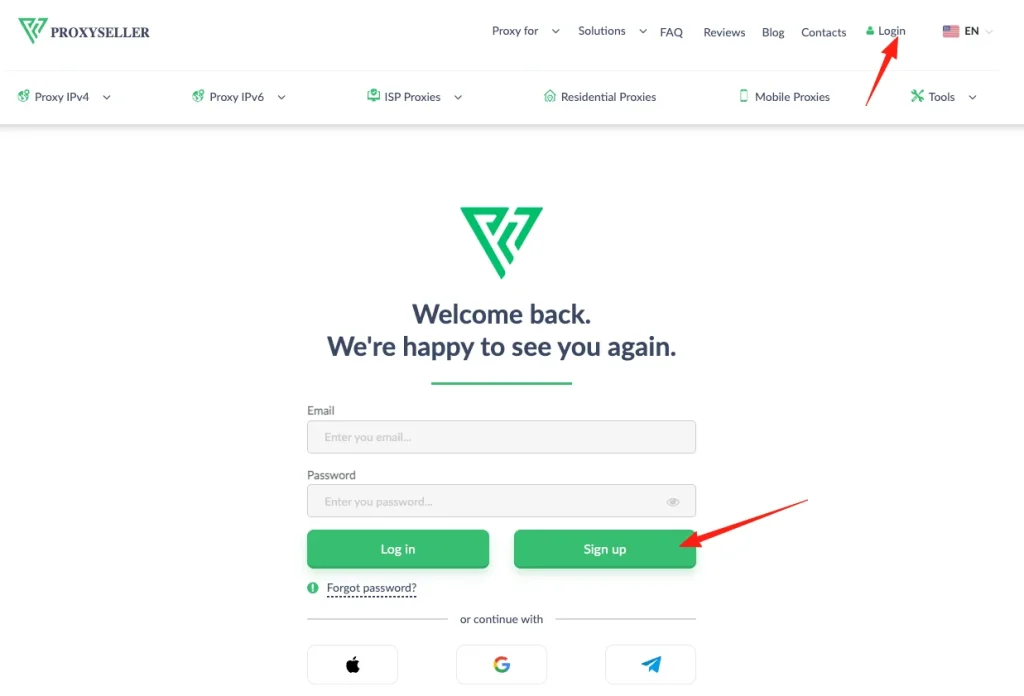
Choose ISP Proxies, Not Data Center Proxies: You must select ISP Proxies specifically, this is the residential-style IP category that avoids the data-center flagging problem covered above. Picking the wrong proxy type here defeats the entire point of this setup.

Choose the country you want your IP address to be in, select the quantity of ISP Proxies you wish to purchase, and complete your order.
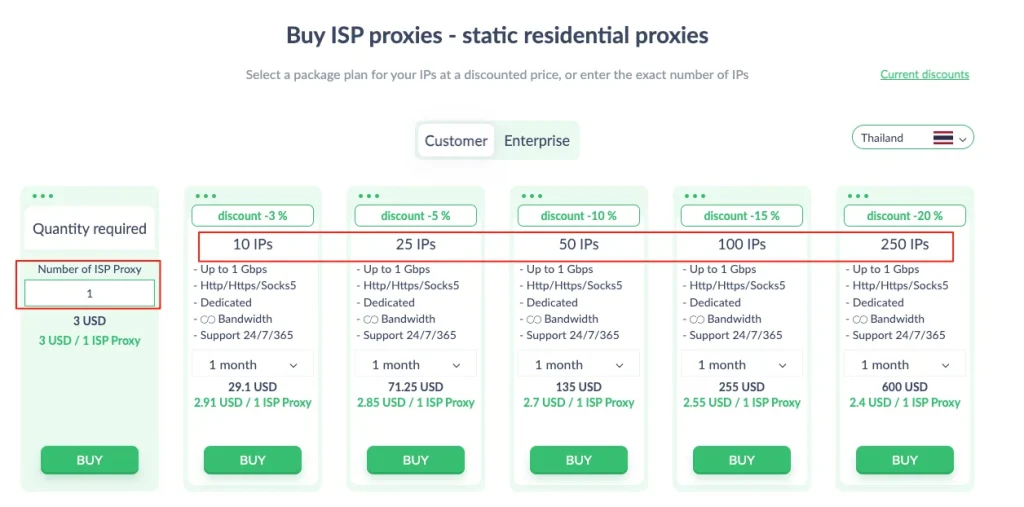
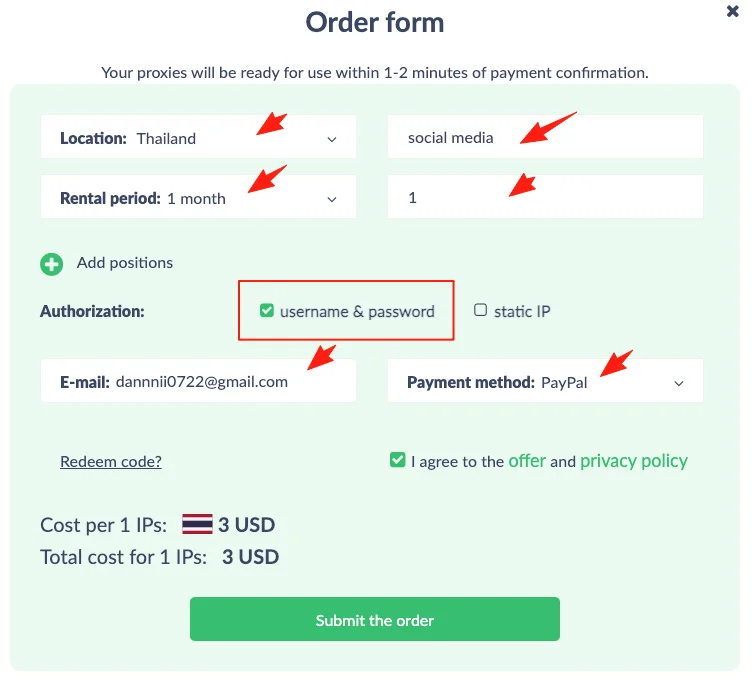
Once your purchase is complete, scroll down and click “Personal Dashboard” at the bottom of the site (log in again if prompted), then click “Orders” to see your order details.
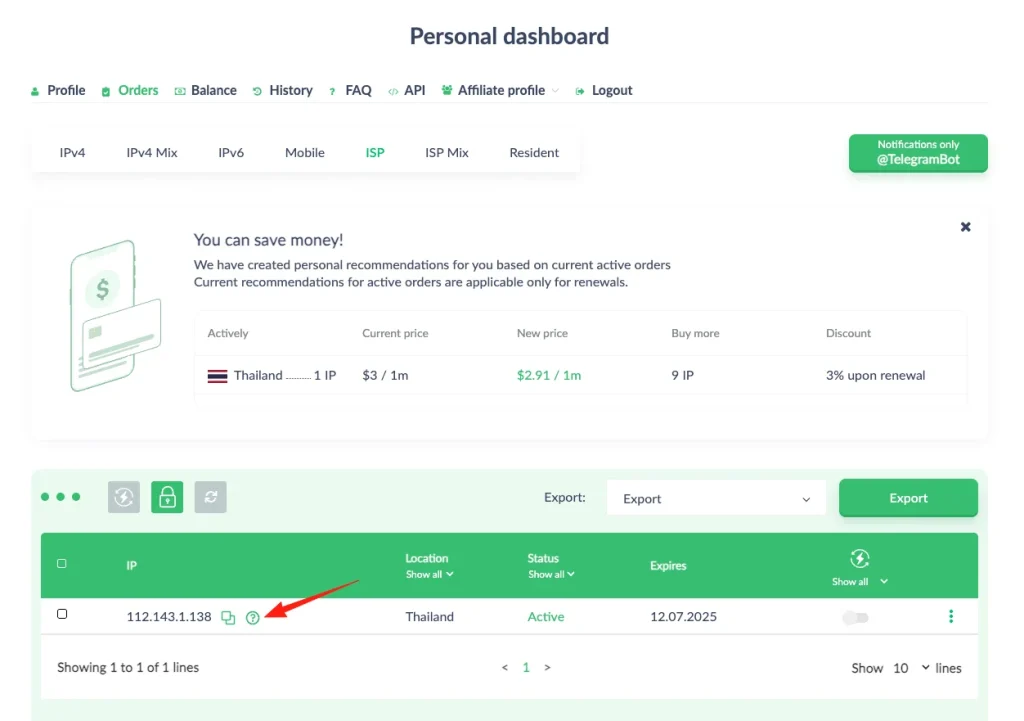
Hover over the question mark icon to see the Socks5 port, login, and password, you’ll need all three for the next step.
Step 3: Configure the Exit Socks5
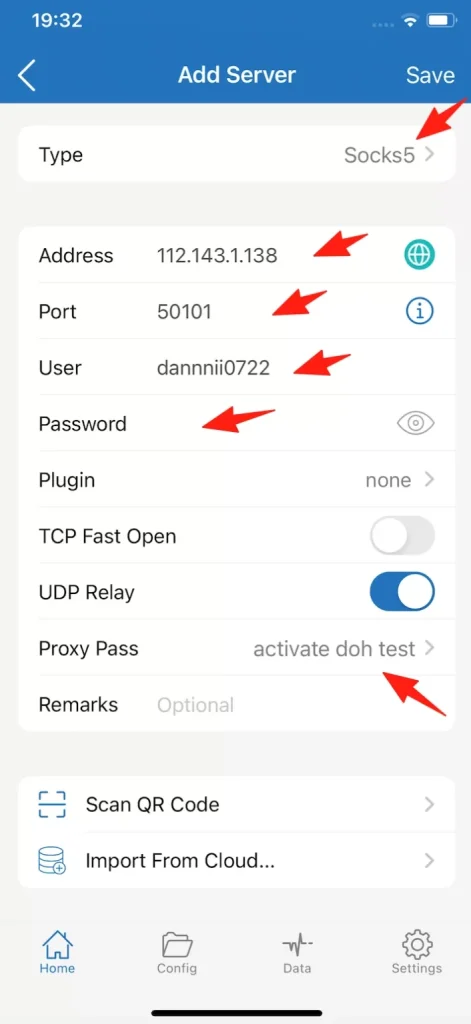
Open Shadowrocket on your iPhone and tap the plus (➕) sign in the top right corner.
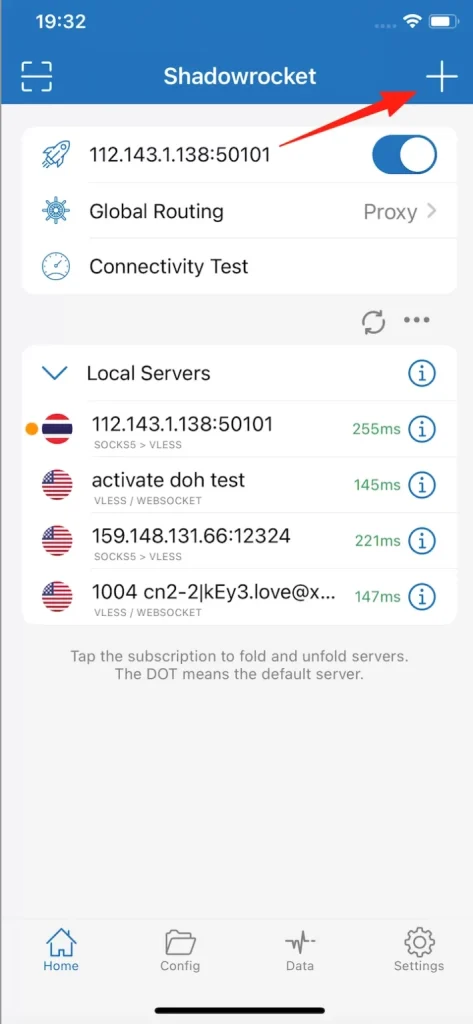
For “Type,” select Socks5, then fill in the details:
- Address, the IP address you purchased
- Port, the number you saw next to “port socks5”
- User, the information after “login”
- Password, the information after “password”
Once filled in, tap “Proxy Pass” and select the node you imported earlier, then hit “Save” in the top right corner.
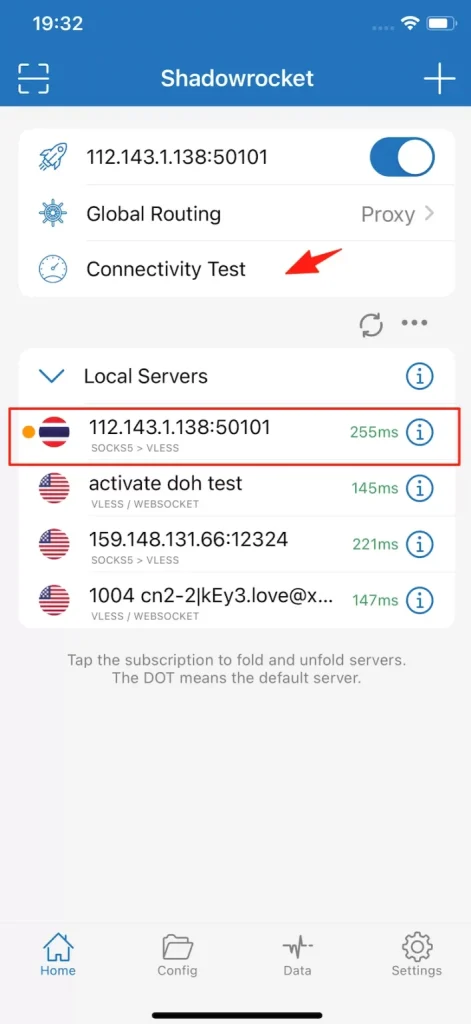
Tap “Connectivity Test” and switch to using this new node. That’s it.
Step 4: Other Necessary Settings
(1) Enable DoH (DNS over HTTPS)
Open your Xray panel, click “Settings” in the left sidebar, then click “Xray Config.”
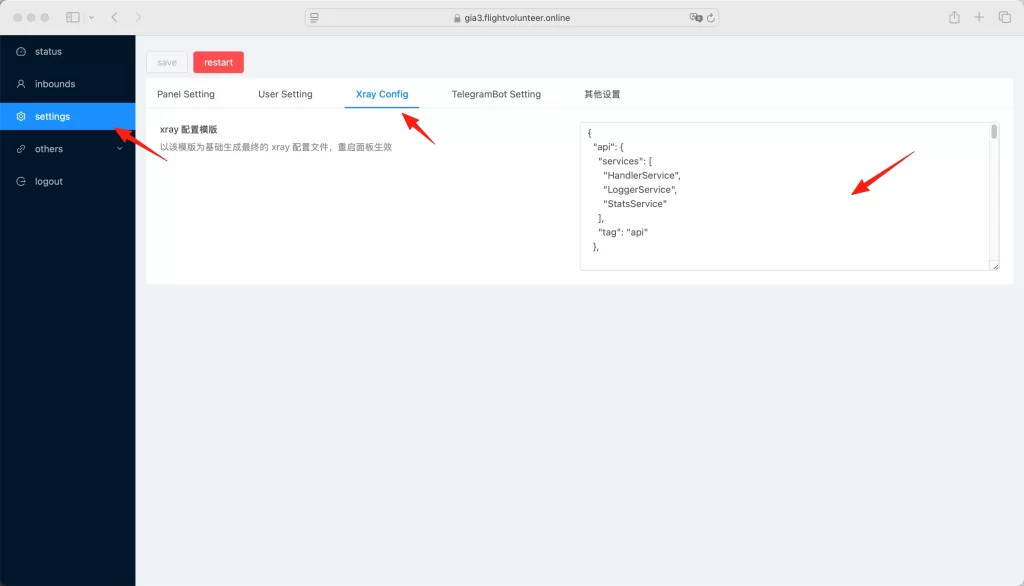
You’ll see some code there. In the first section, look for this block:
{
  "api": {
    "services": [
      "HandlerService",
      "LoggerService",
      "StatsService"
    ],
    "tag": "api"
  },
After the final “}”, press Enter for a new line, add two spaces, then paste in:
"dns": {
  "servers": [
    {
      "address": "https://dns.google/dns-query",
      "domains": ["geosite:geolocation-!cn"],
      "expectIPs": ["8.8.8.8", "8.8.4.4"]
    },
    "8.8.8.8",
    "1.1.1.1",
    "localhost"
  ]
},
Press Enter once more, click “Save” in the top left corner of Xray, then restart it to apply the changes.
(2) Mobile Phone Selection and Settings
- Use an international-version iPhone for overseas social media, with no SIM card installed. Adjust language, time zone, and region to match your target country.
- Configure DNS on your Wi-Fi connection: go to your connected Wi-Fi network, tap the information icon (❗) next to the signal, scroll to “Configure DNS,” select “Manual,” delete all default DNS servers listed, then add
8.8.8.8and8.8.4.4as your two new DNS servers.
Why This Combination Works: With this “front high-speed + back local” dual-hop setup, you maintain fast access from home while simulating a genuine user environment in the target country. That combination is what significantly boosts your account’s stability and security compared to running everything through a single data-center node.
every Thursday.
Hosting reviews, builder comparisons, performance tips, and plugin picks — curated weekly for WordPress site owners and builders.