A must-read for cross-border e-commerce and foreign trade: build a dedicated high-speed overseas node with a CN2 GIA VPS. From purchasing the VPS, KiwiVM console, FinalShell connection, domain SSL, Xray panel to BBR acceleration, seven steps with full screenshots.
Important Disclaimer: The content in this article regarding setting up dedicated overseas network connections is purely for technical discussion and exploration. We strongly urge everyone not to use any of the skills or information learned herein to engage in activities that violate laws or harm national interests.
What You’ll Build: This guide walks through building your own dedicated overseas network connection from scratch: buying a CN2 GIA VPS, setting up SSL, installing an Xray panel, enabling BBR acceleration, and configuring your first node. The full video walkthrough is below.
Are you a cross-border e-commerce or foreign trade professional struggling with any of these frustrating issues?
Slow loading times for essential tools like Google, Gmail, and Notion during your daily work.
Frequent freezing during Zoom video conferences.
Constant delays even with simple document collaboration.
Trouble setting up your Shopify store, including registration failures, backend access issues, or difficulties with checkout tests.
WordPress website woes, like themes failing to load, plugins refusing to update, and severe backend lag, all delaying your launch.
Repeated rejections or account bans when trying to register on major overseas social media platforms like TikTok, LinkedIn, Facebook, and Instagram.
Managing multiple social media accounts and getting flagged as a “bot” due to consistent browser fingerprints or abnormal IP addresses.
And various other problems stemming from unstable network connections or IP issues.
These problems typically arise from two main reasons:
Not using a dedicated overseas network connection.
Relying on shared node collections provided by “airport” service providers. These shared nodes are neither secure nor effective at bypassing the risk control systems of major social media platforms.
So, what’s the solution?
This article will guide you step-by-step on how to build your own dedicated overseas network connection. Such a dedicated line offers several key advantages:
Ensures data security because you maintain control.
Provides stable speed and a dedicated IP address.
Ideal for daily office work and long-term social media operations.
Let’s dive into the practical steps!
1. Purchase an Overseas VPS
VPS, which stands for Virtual Private Server, is simply understood as: taking a high-performance server and dividing it into multiple “independent spaces,” with each space being a VPS. You have complete control over it, just like remotely using a computer in a foreign country. With a VPS, you can operate it like your own computer:
Install proxy services (e.g., Xray, V2Ray).
Deploy websites, run scripts, and configure an internet access environment.
Have an independent public IP address, not shared with others, making it more secure and less likely to be identified as an abnormal device by major social media platforms.
In this article, we will purchase a VPS located in the United States. Here are the operating steps:
(1) Visit the BandwagonHost official website [Click to visit]. In the menu bar, find CN2 GIA. This is one of the premium international network lines launched by China Telecom, fully named: China Telecom Next Carrier – Global Internet Access. It is the highest quality and lowest latency line within China Telecom’s CN2 (ChinaNet Next Carrier) system, primarily used for high-end government and enterprise clients and international dedicated line services.

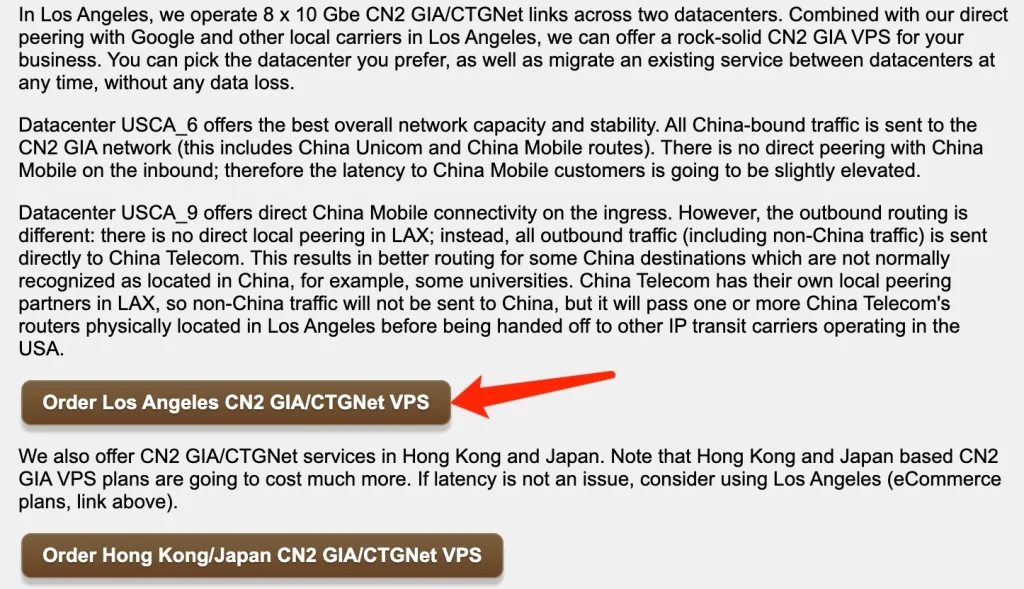
(2) Scroll down to the bottom of the page and click on Order Los Angeles CN2 GIA/CTGNet VPS.
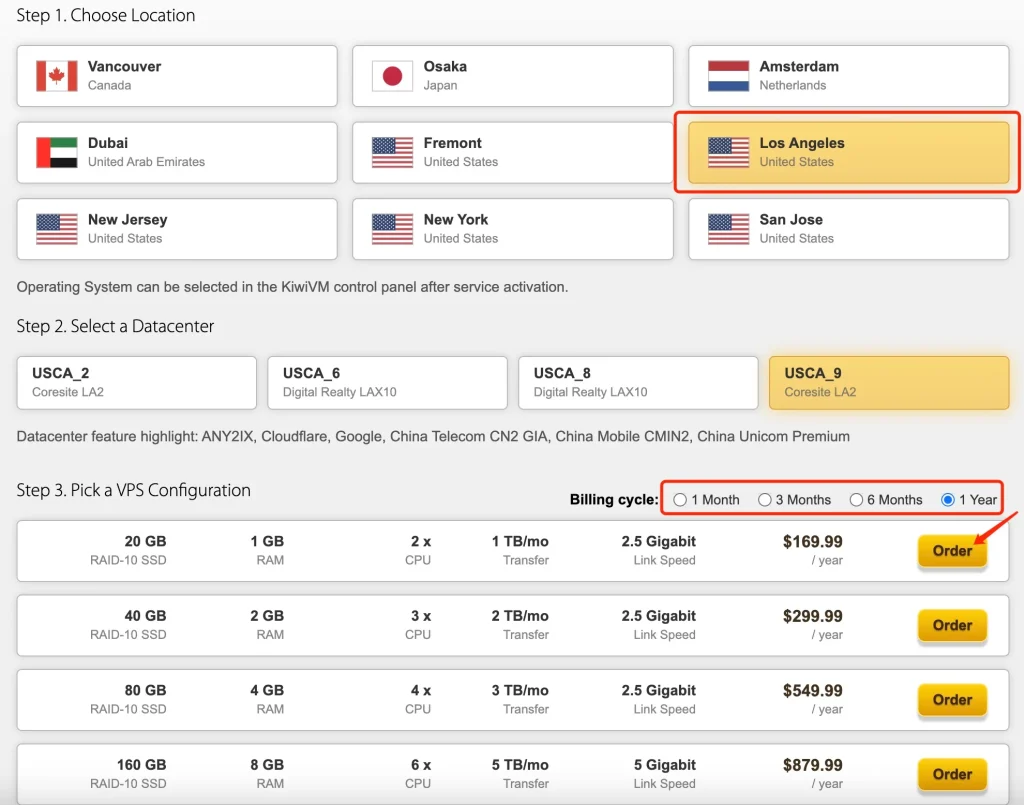
(3) After confirming the region is Los Angeles, choose your desired duration. You’ll have three options: 3 months, 6 months, or 1 year. Considering that the 1-year plan offers the lowest monthly cost, I’ll go with that.
Next, you’ll pick your VPS configuration:
For personal use, the first tier with 20GB SSD will be more than enough.
If you’re a 2-5 person studio, I recommend the 40GB option.
For businesses, you might consider the higher-tier plans.
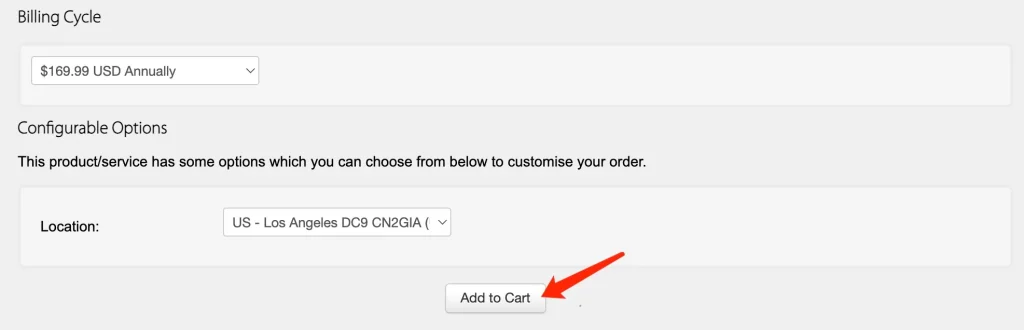
(4) Add the VPS you’ve just selected to your cart.
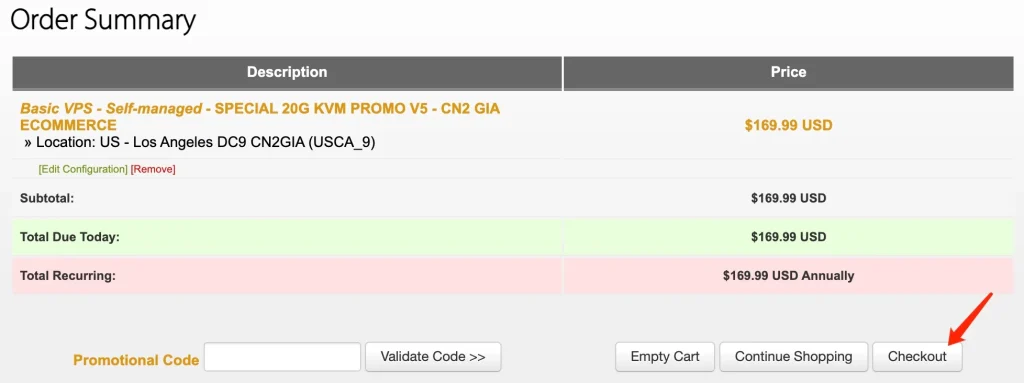
(5) Click Checkout to proceed with payment. I highly recommend doing a quick Google search for “bandwagon promo code” to see if you can find any discount codes. You might also want to check valuecom; they often have BandwagonHost coupon codes available from time to time.
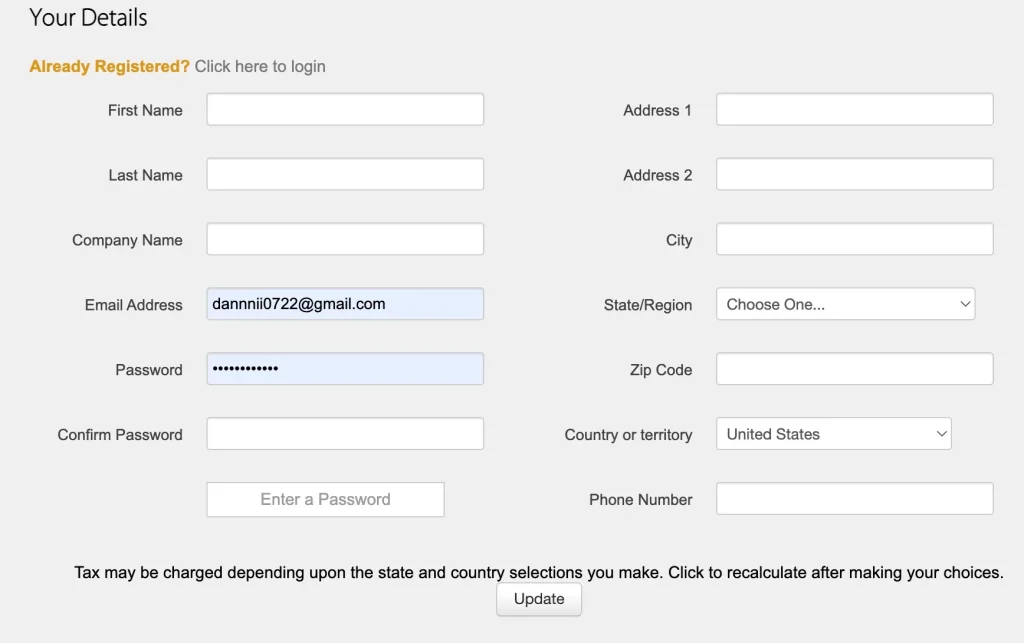
(6) The page will then redirect you to the account registration interface. Fill in your personal information to create your account. While your name and email address must be accurate, feel free to enter arbitrary information for the rest of the fields if you wish.
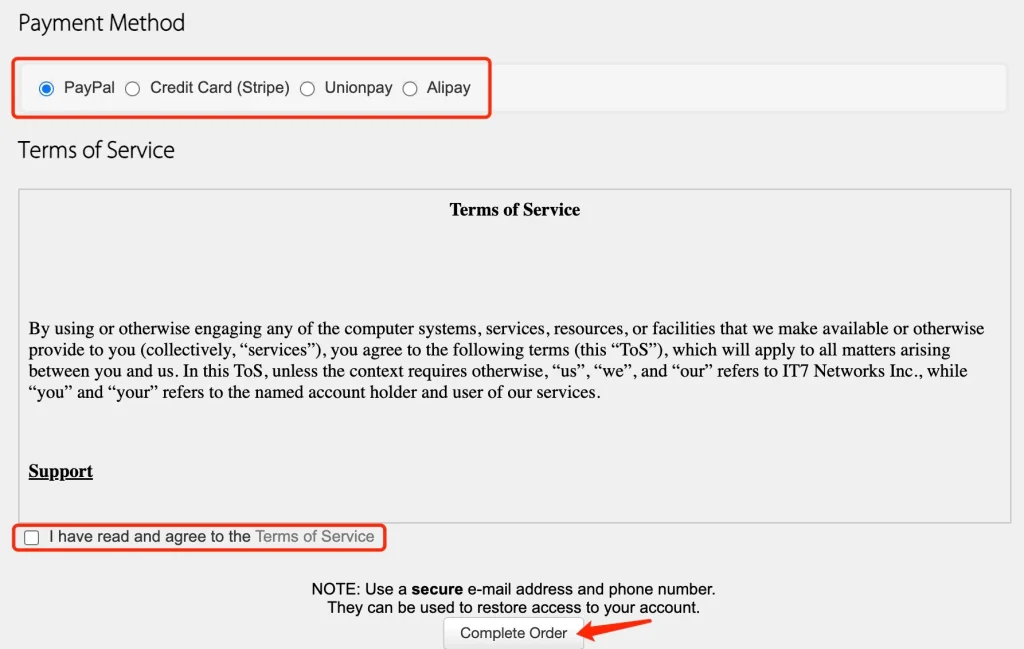
(7) After checking the box to agree to the terms, complete your payment. You’ll have several payment methods to choose from, including PayPal, credit card, or Alipay.
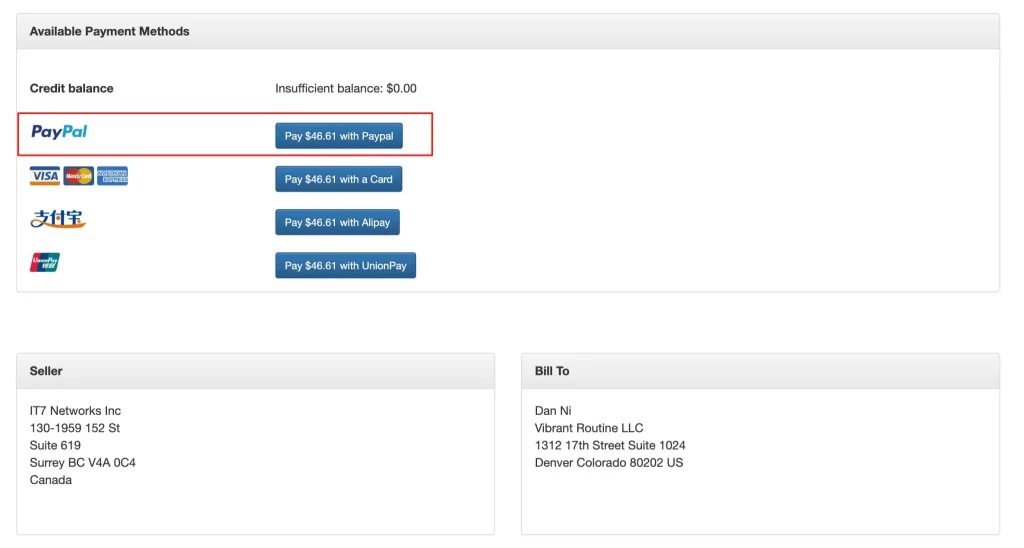
I opted to pay with PayPal for the 3-month plan at $49.99. Thanks to a promo code I found on Valuecom, I was able to snag a 6.77% discount!
2. Setting Up KiwiVM Admin Controls
(1) After your purchase is successful, click on Client Area in the top right corner of the homepage.

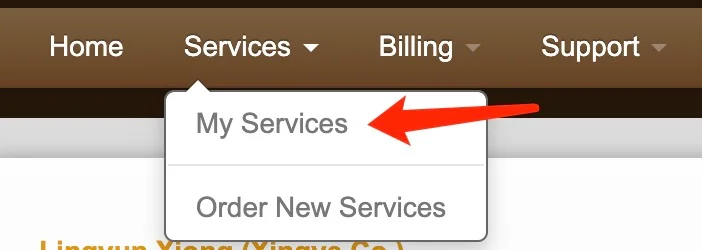
(2) Next, find Services in the middle of the page and click on My Services from the dropdown menu.
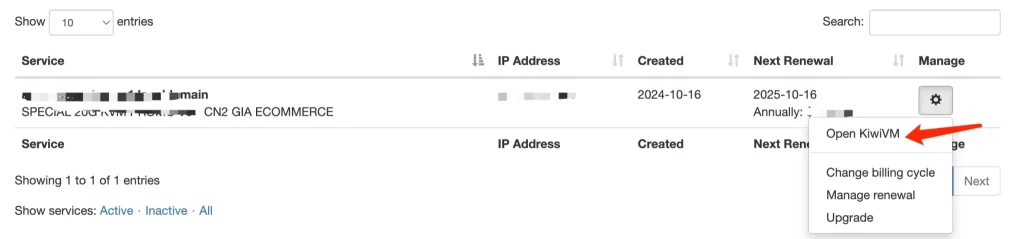
(3) Click the small gear icon on the far right to go into Settings.
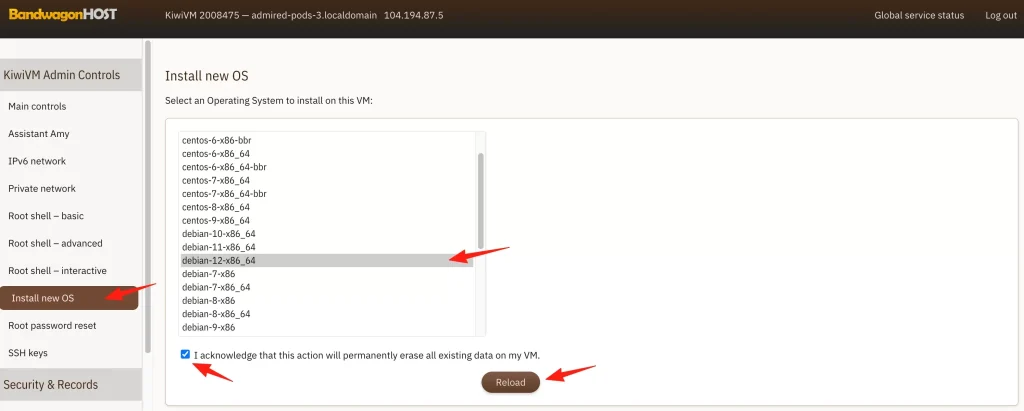
(4) This is the KiwiVM Admin Controls backend interface. From the left sidebar, select Install new OS. Then, choose debian-12-x86_64, check the box to agree to the terms, and click Reload.
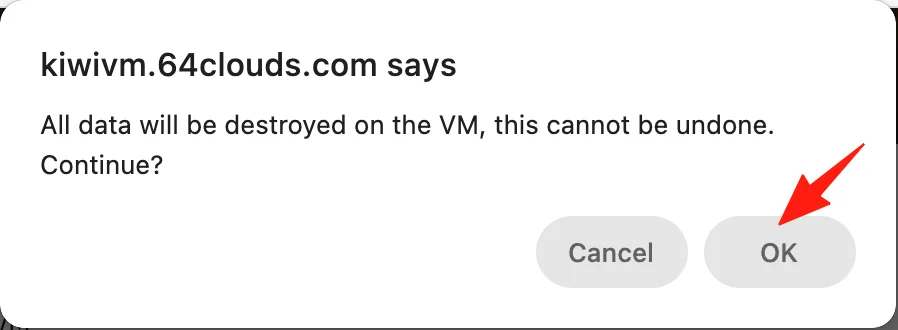
Click OK on this dialog box.
(5) Create a simple TXT document and save both the root password and the SSH port information in it. We’ll be using this information later.
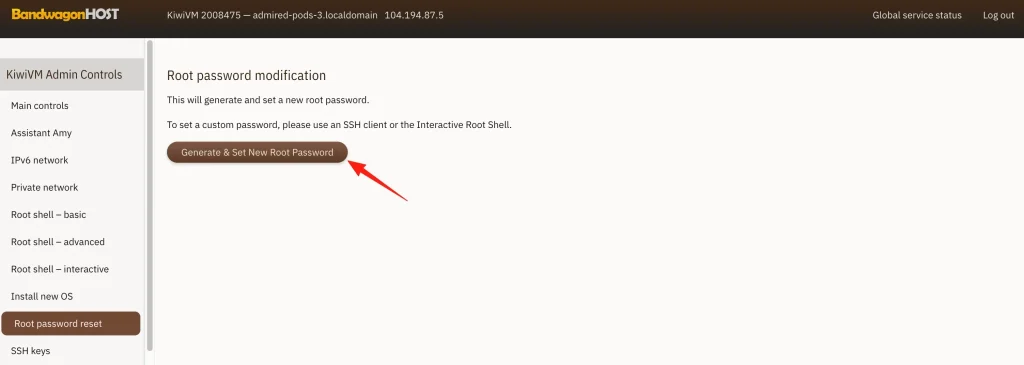
If you ever happen to lose your root password, don’t worry! You can easily reset it by clicking on “root password reset” in the left sidebar.
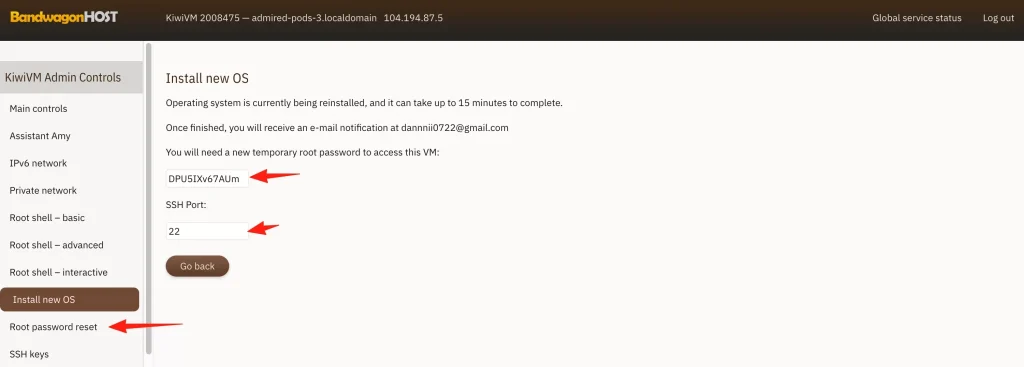
Here, under root password reset, you can click “generate” to create a new root password.
3. Connect to Your VPS and Set It Up Using FinalShell
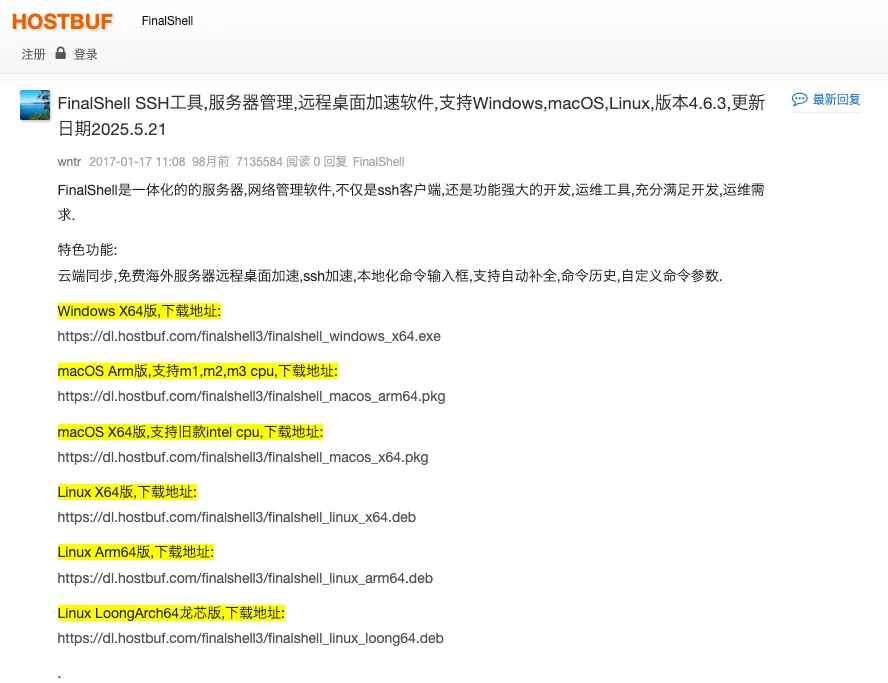
(1) Click to download FinalShell, then select the appropriate version based on your computer’s operating system and install it.
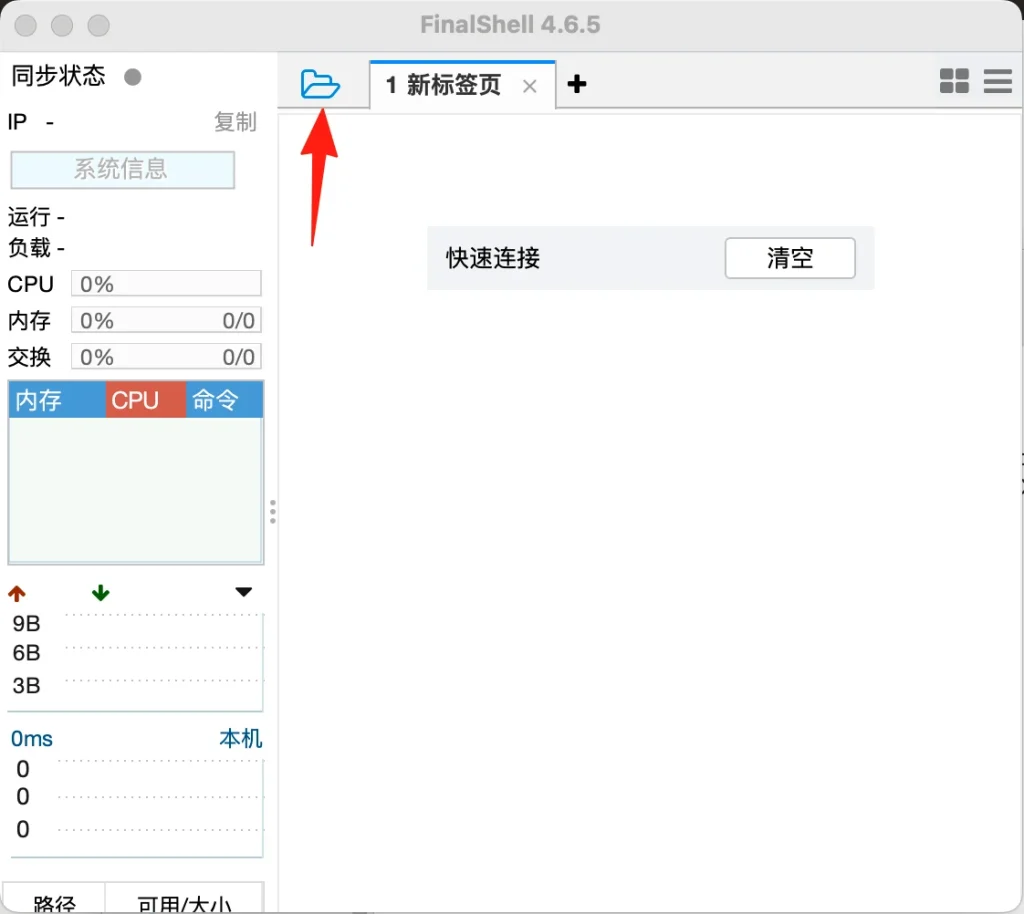
(2) Open FinalShell, then click the blue folder icon.
(3) Click the first plus (➕) sign. This will bring up connection options; click the SSH connection option.
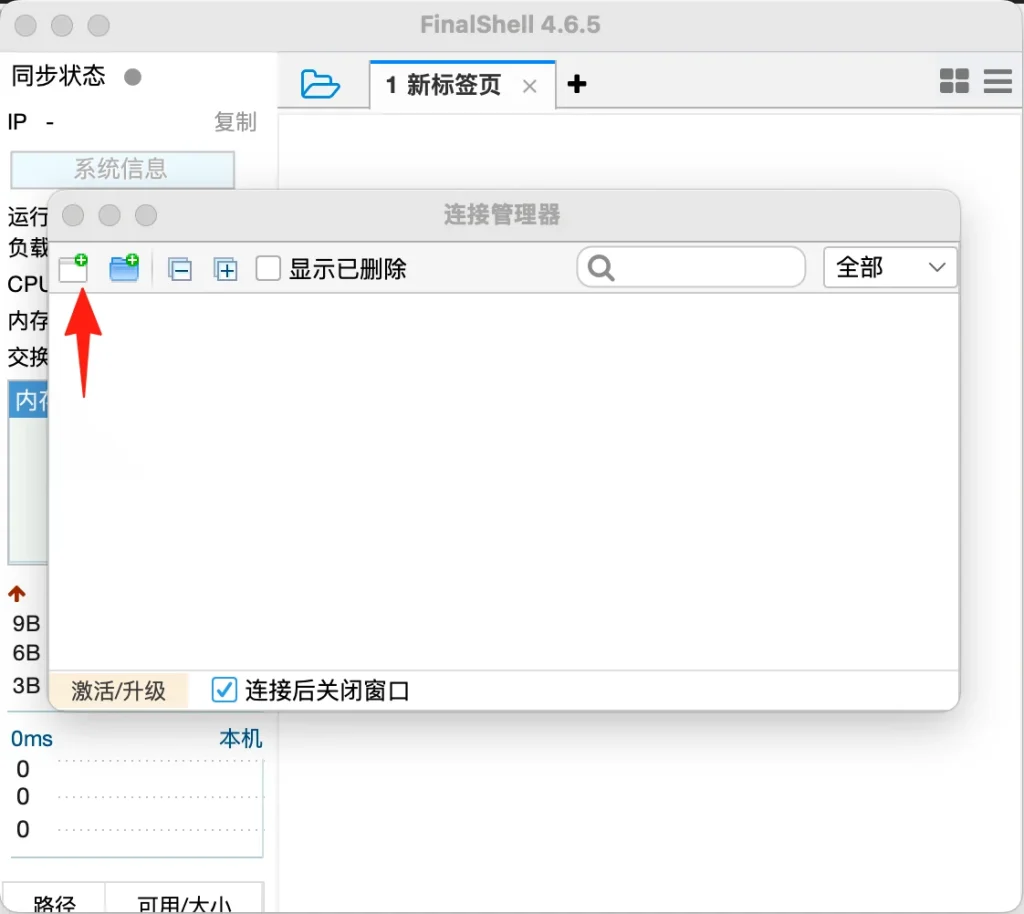
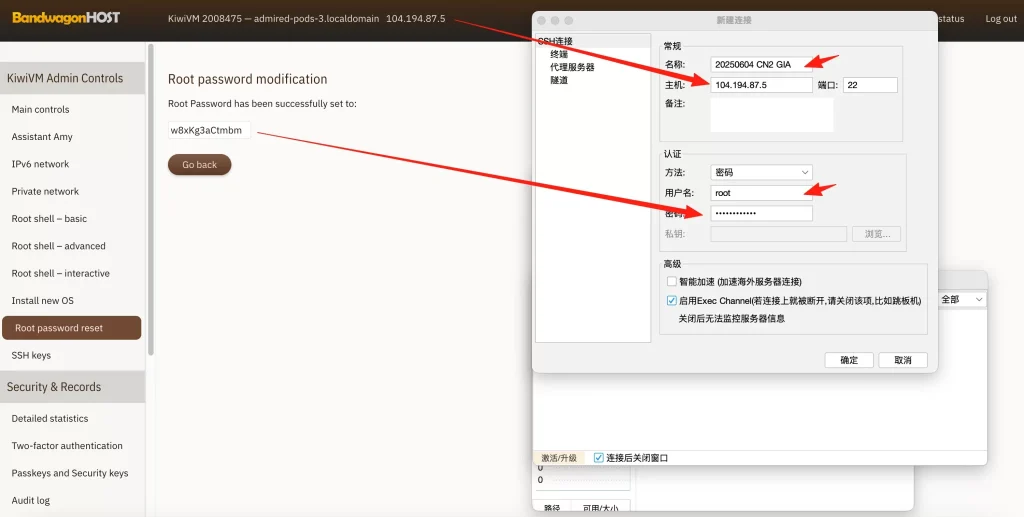
(4) On this screen, fill in the details as follows:
Name: Give it a custom name here (e.g., “My US VPS”).
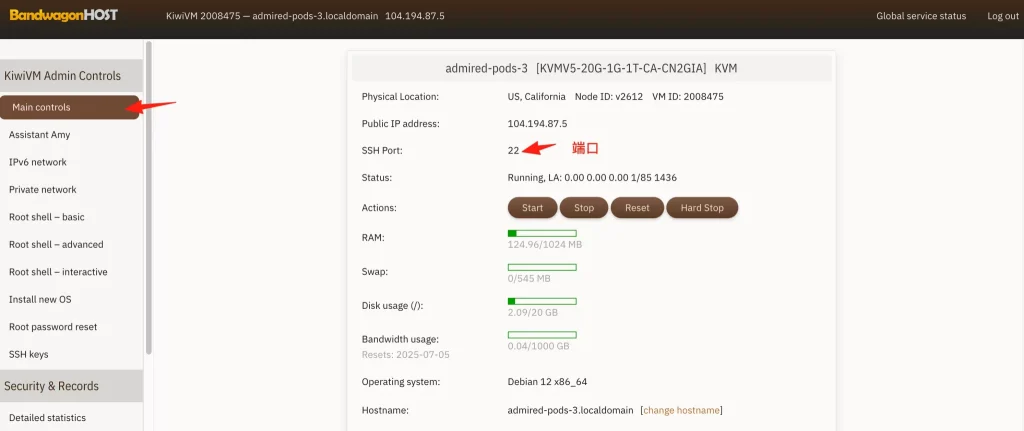
Port: Enter the SSH Port from your KiwiVM Main Controls interface.
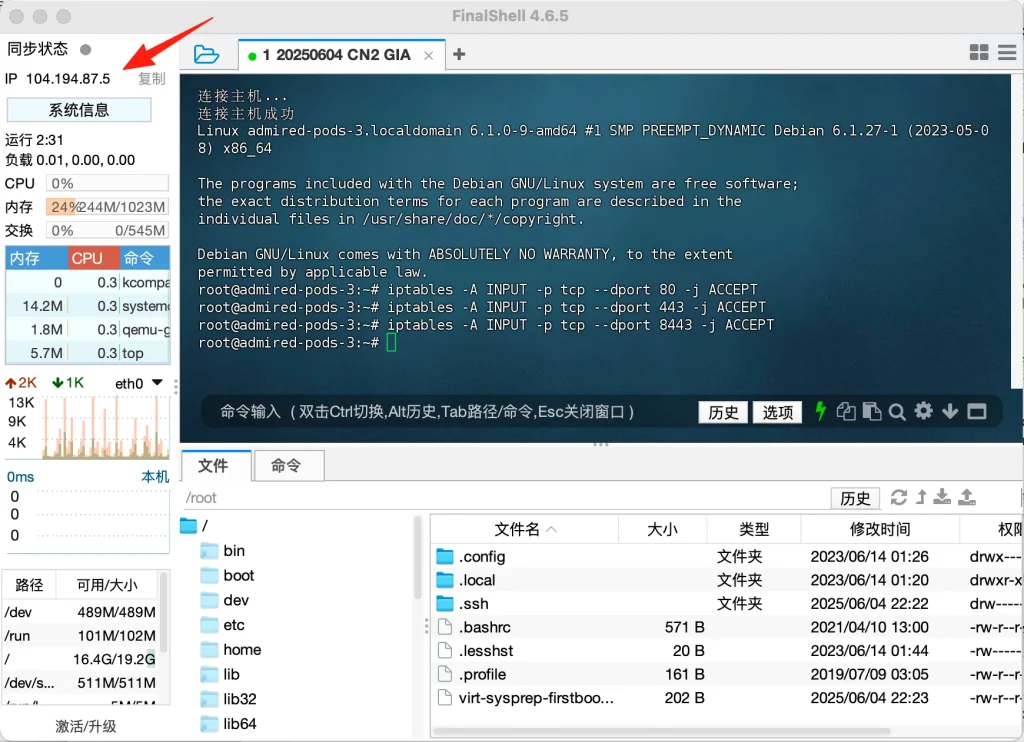
Host: Enter the IP address from your BandwagonHost KiwiVM interface. This is your server’s IP address.
Username: Type in
root.Password: Enter the root password generated in the KiwiVM interface.
After correctly filling in all this information, click OK.
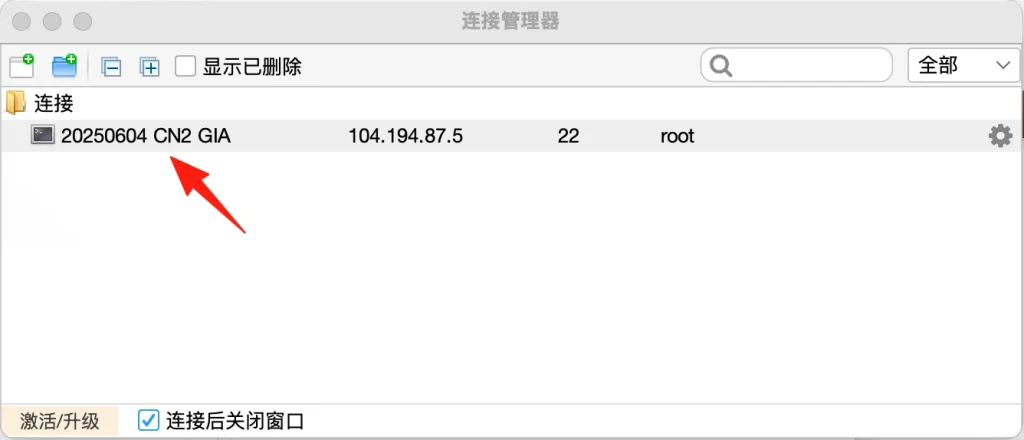
(5) On this screen, double-click to open this CN2 GIA connection.
Accept and Save
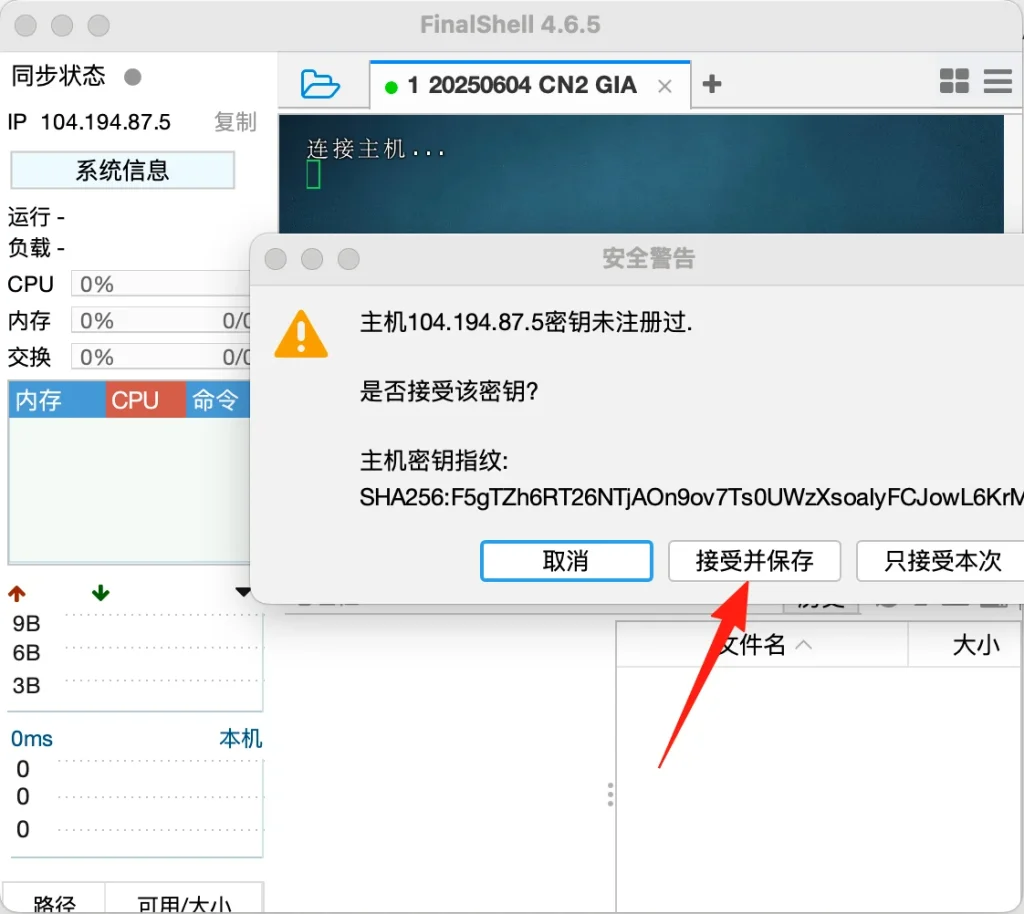
When you see this interface, it means you’ve successfully connected to your host!
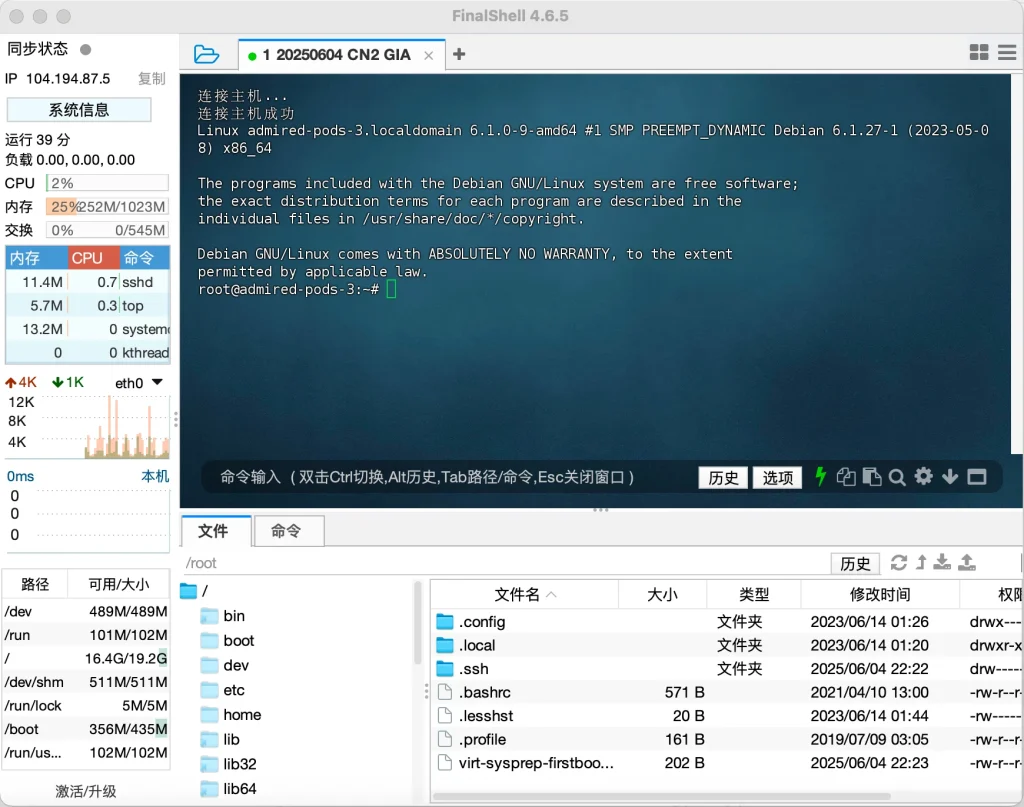
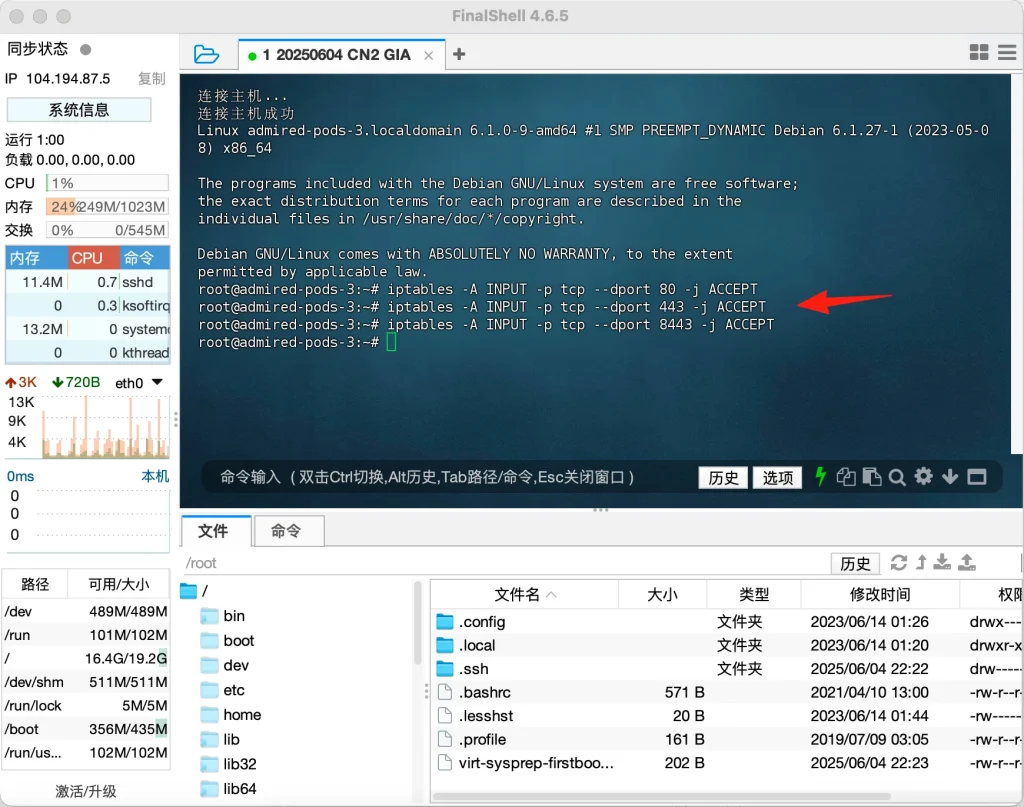
(6) Open Ports: We need to allow traffic through specific ports: 80, 443, 8443, and your node’s port (we’ll open the node port later, if needed).
Copy these three lines of commands:
iptables -A INPUT -p tcp --dport 80 -j ACCEPT
iptables -A INPUT -p tcp --dport 443 -j ACCEPT
iptables -A INPUT -p tcp --dport 8443 -j ACCEPT
Paste these three lines of commands into FinalShell and press Enter to execute them and open the ports.
(7) Apply for and install a certificate using the free SSL certificate website: freessl.cn.
Register an account on the website and log into the backend. Find “域名授权” (Domain Authorization) in the left sidebar and click “添加域名” (Add Domain).
This step requires you to prepare your own domain name and have it hosted on Cloudflare.
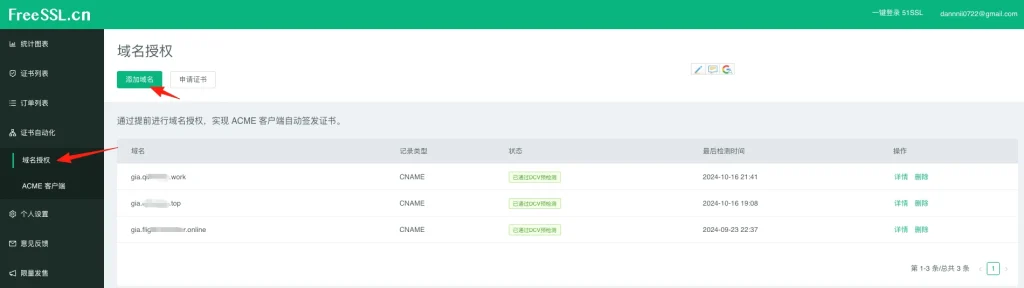
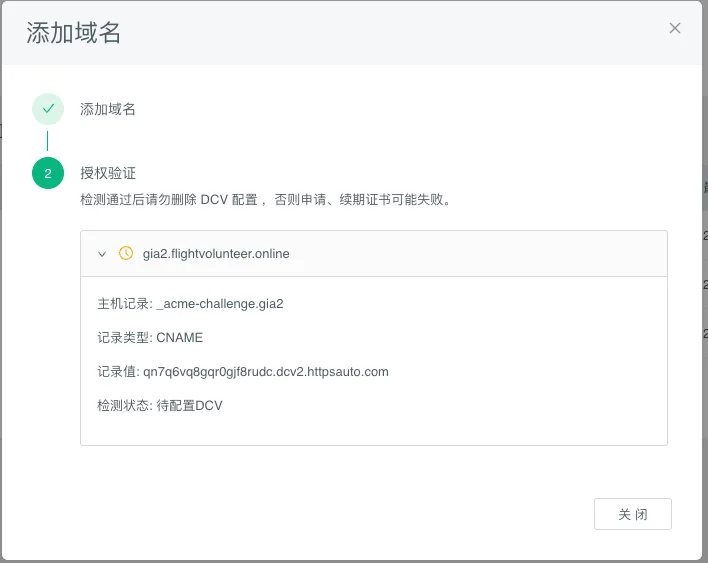
When the “Add Domain” interface appears, I’ll use a domain hosted on Cloudflare to create a subdomain. My main domain is flightvolunteer.online, and here I’m creating the subdomain gia2.flightvolunteer.online. For the record type, select CNAME, then click Next.
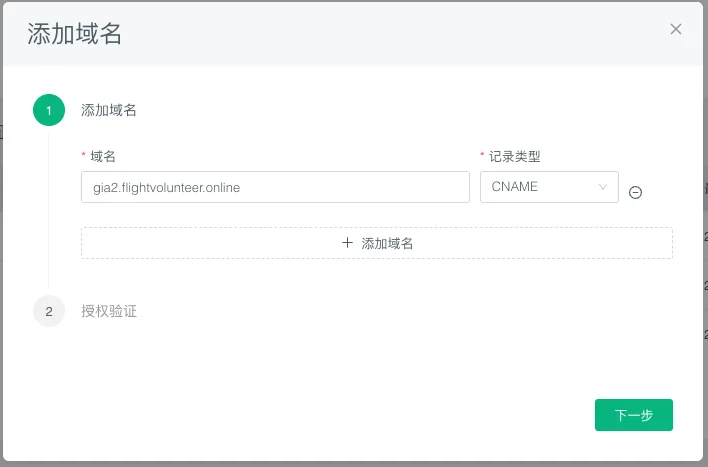
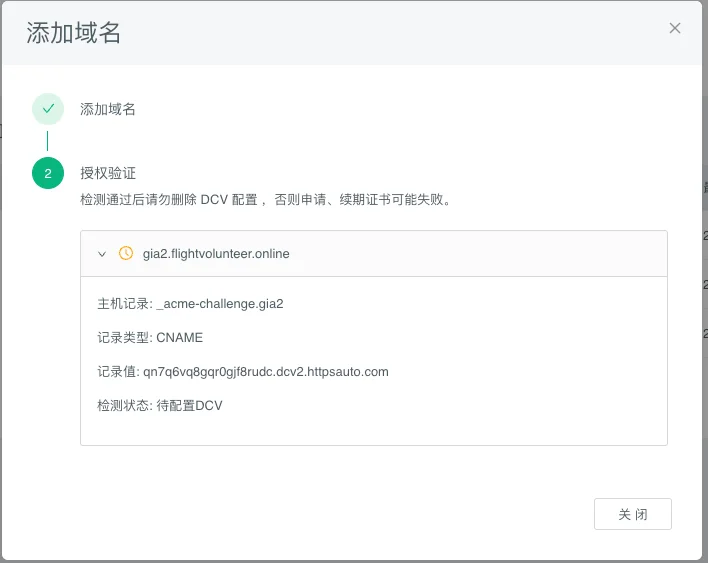
You’ll see that a resolution record has been generated. Let’s keep this page open for now; we’ll need to come back and copy this information later when we add the CNAME record.
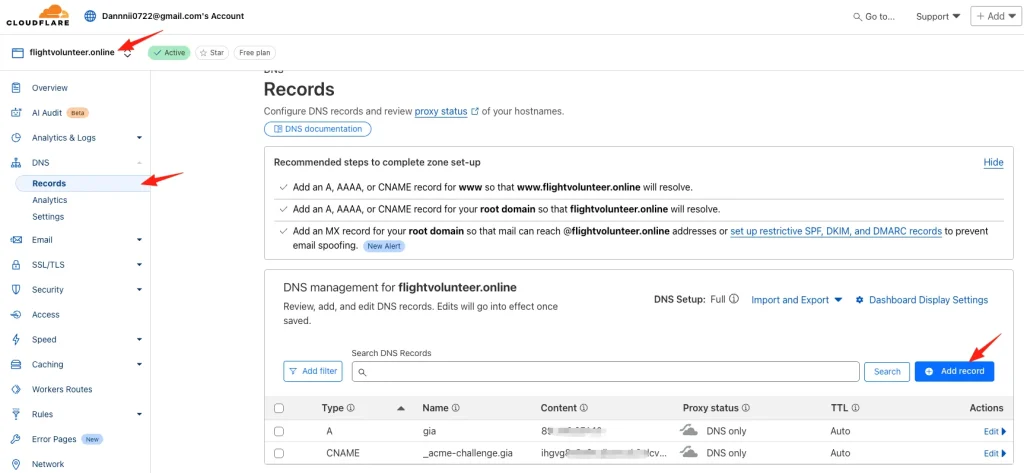
Now, log in to your Cloudflare dashboard and add a DNS record for your main domain, flightvolunteer.online.
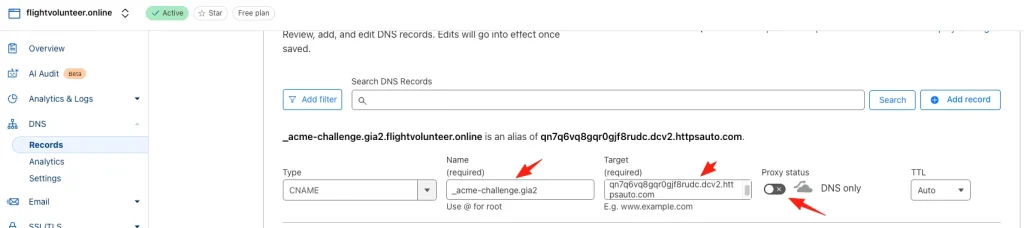
Type: Choose CNAME.
Name: Copy the information after “主机记录” (Host Record) from the freessl.cn “Add Domain” interface.
Target: Copy the information after “记录值” (Record Value) from the freessl.cn “Add Domain” interface.
Proxy status: Make sure to turn this off (it should be “DNS only” or a grey cloud).
After you click Save in Cloudflare, head back to the freessl.cn website and click Close on the “Add Domain” interface.
Click Close.
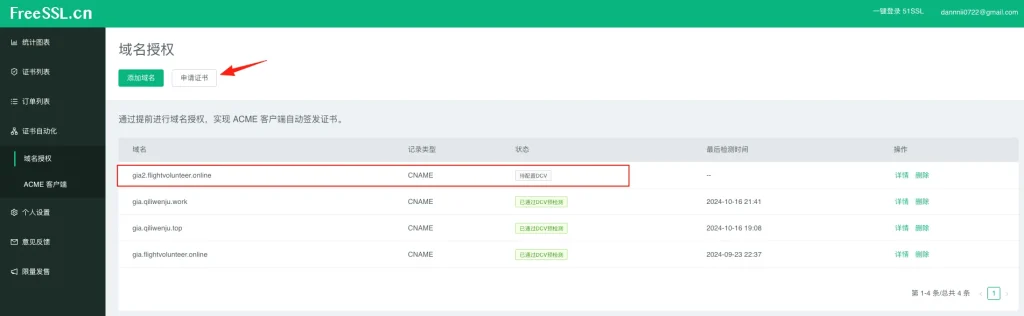
Here, we can see that gia2.flightvolunteer.online, which we just added, is listed, but its status shows as “Pending DCV configuration” (待配置DCV).
Let’s click “Apply for Certificate” (申请证书).
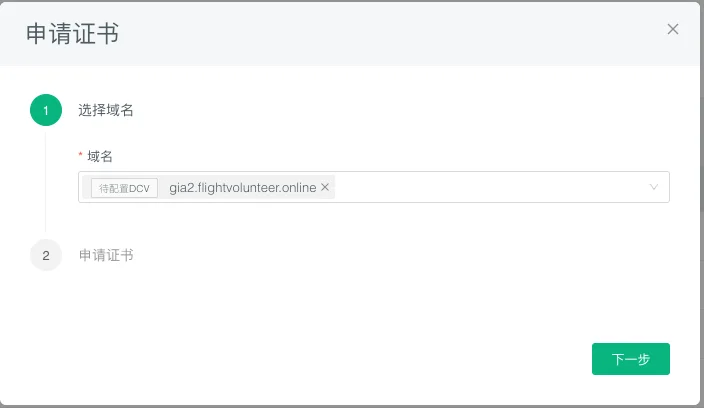
Select the subdomain we just added, gia2.flightvolunteer.online, then click Next.
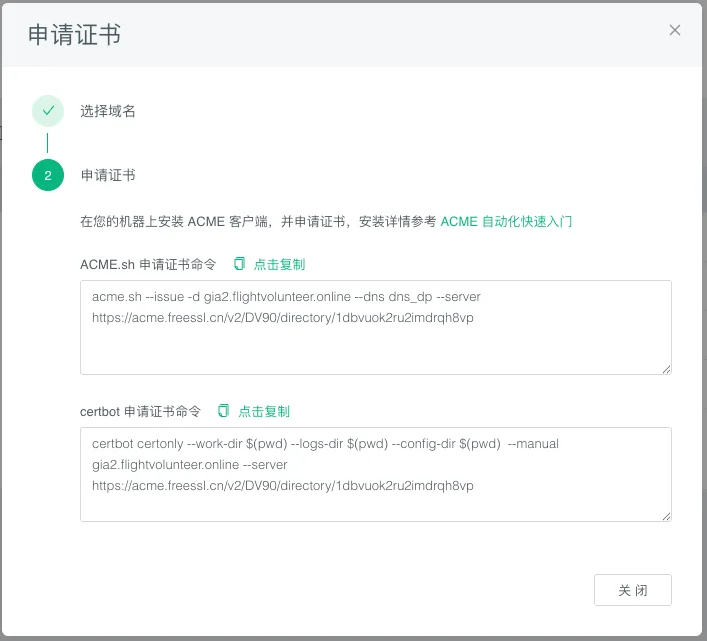
Great! You should now see the certificate information displayed. We’ll be needing this information later, so for now, just keep this page open.
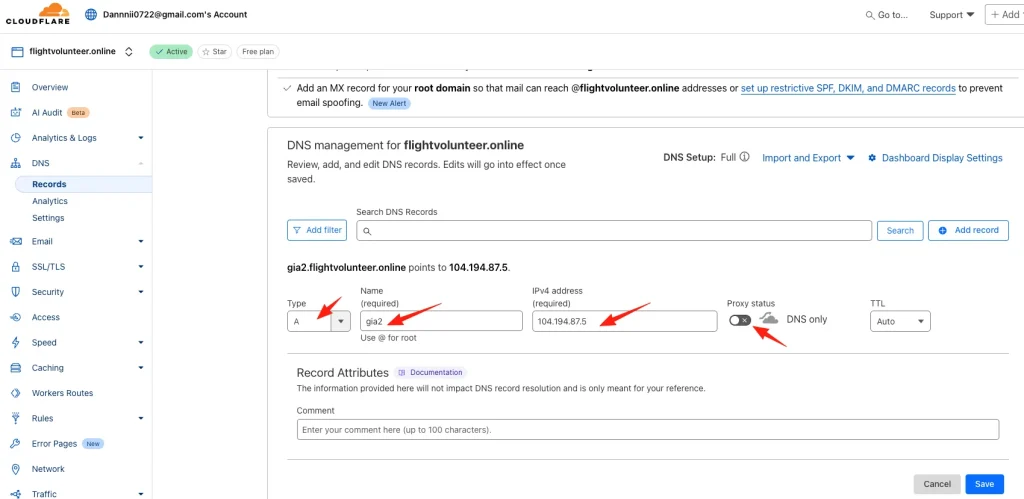
Okay, let’s add another record:
Type: Choose A.
Name: Enter gia2. This is the prefix of the subdomain we set up, gia2.flightvolunteer.online.
Target: This will be your server’s IP address.
Proxy status: Make sure to turn this off (it should be “DNS only” or a grey cloud).
Click Save.
(8) Deploy the Certificate on Your Server
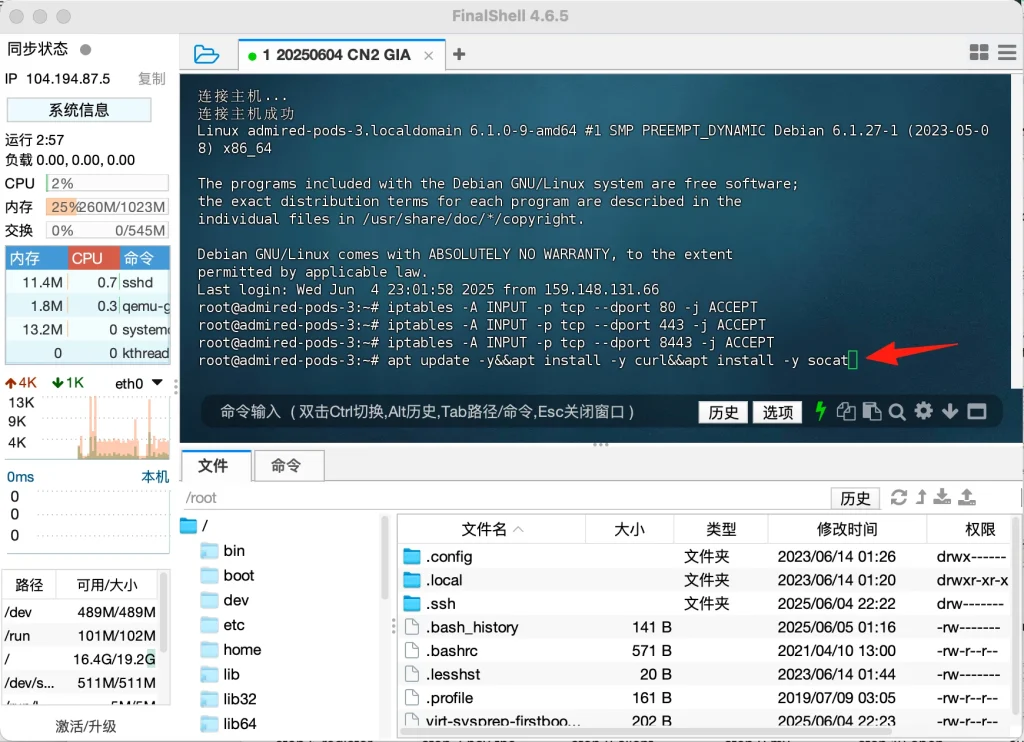
Install Dependencie ,copy the command below:
apt update -y&&apt install -y curl&&apt install -y socatPaste it into FinalShell, press Enter, and you’ll see the installation process begin. Just give it a moment to complete.
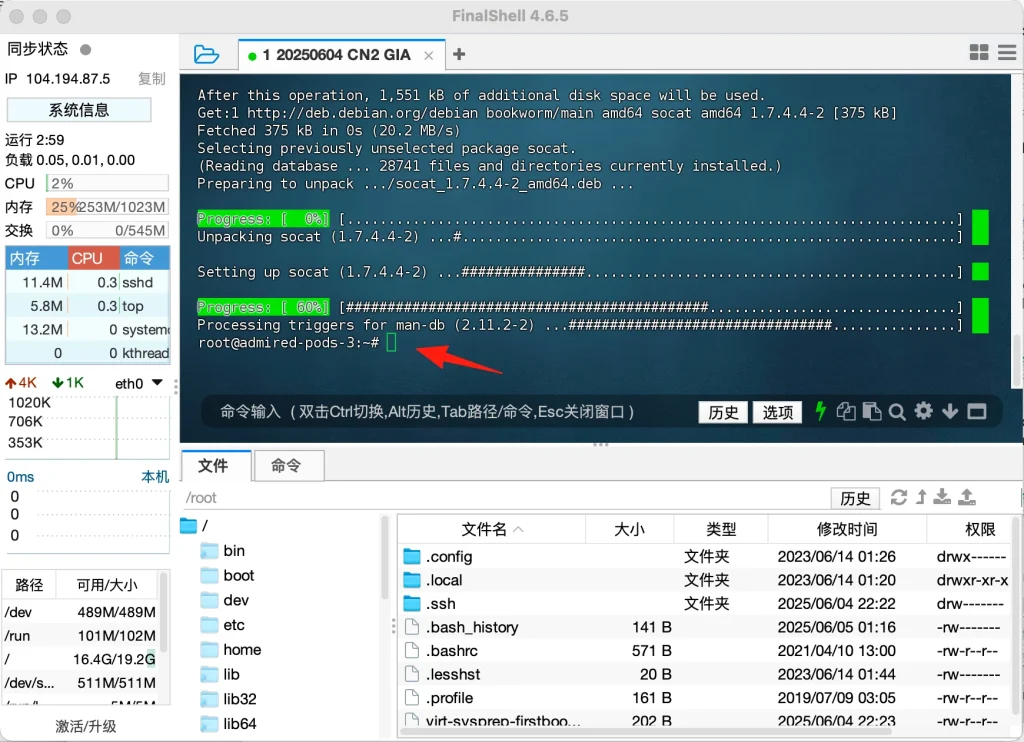
When you see this interface, it means the installation was successful!
Install the certificate application program. Copy the command below:
curl https://get.acme.sh | sh -s [email protected]Paste it into FinalShell again, press Enter, and the installation progress will be displayed. When you see this interface, it means the installation was successful.
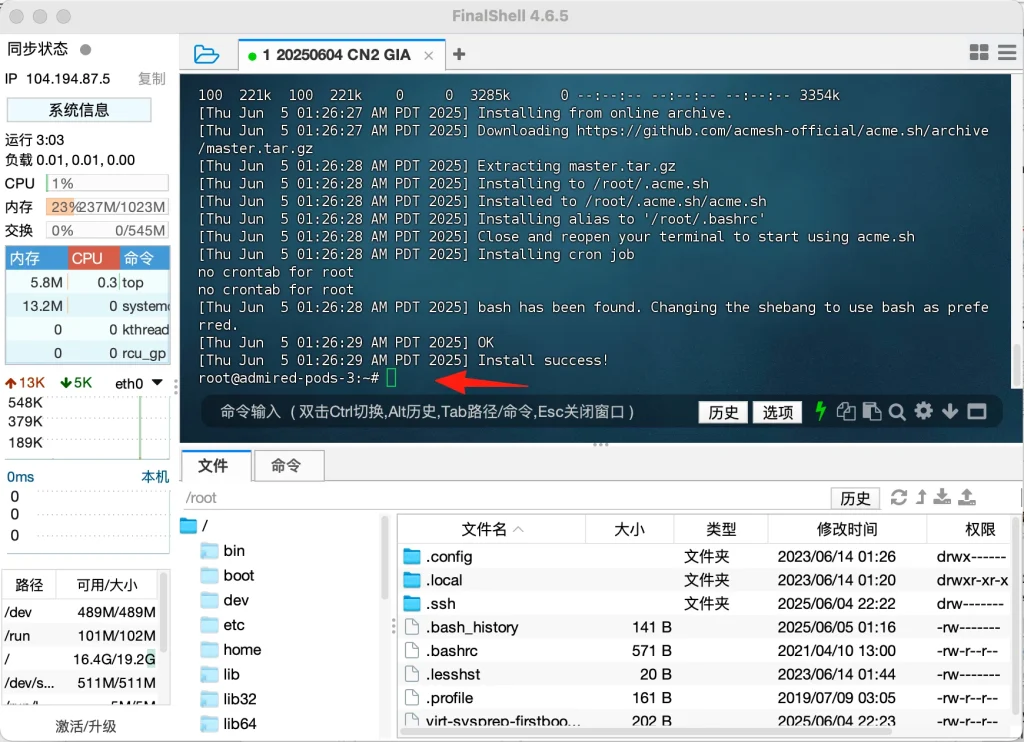
Update it. Copy the command below:
source ~/.bashrcPaste it into FinalShell and hit Enter.
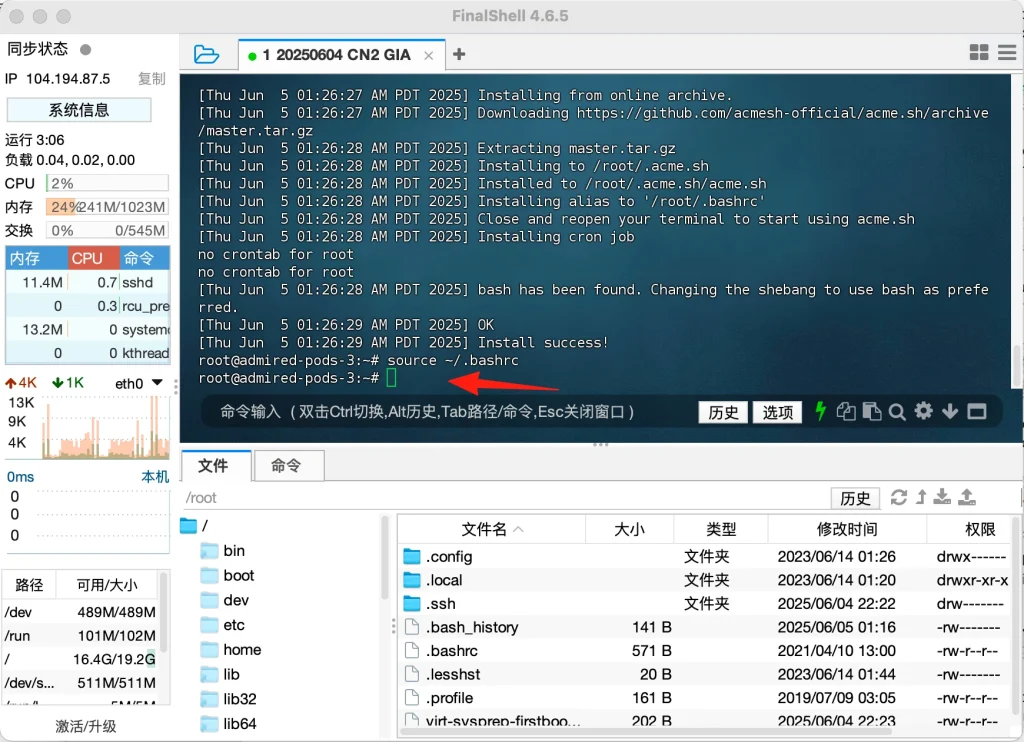
Okay, let’s deploy the certificate now. Go back to the “Apply for Certificate” page on the freessl.cn website and copy the command provided there.
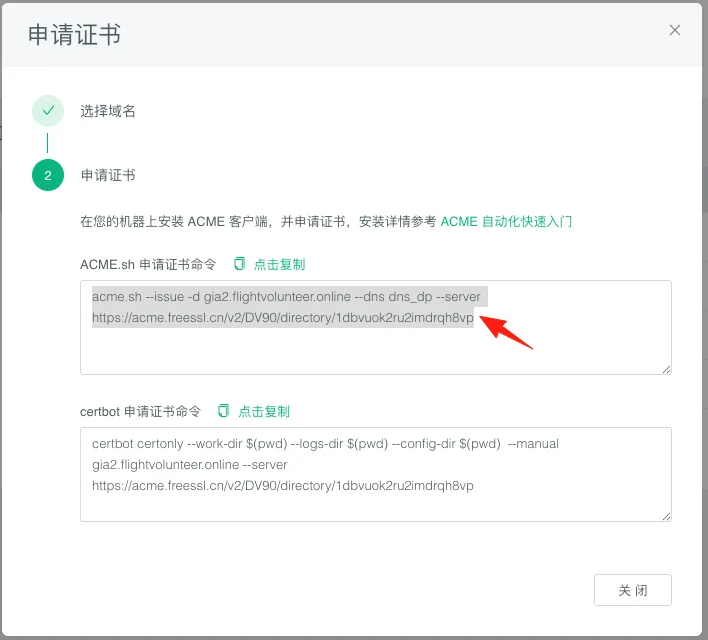
Paste it into FinalShell, press Enter, and you’ll see the installation process. It will take a moment, and once you see this interface, it means the installation is complete.
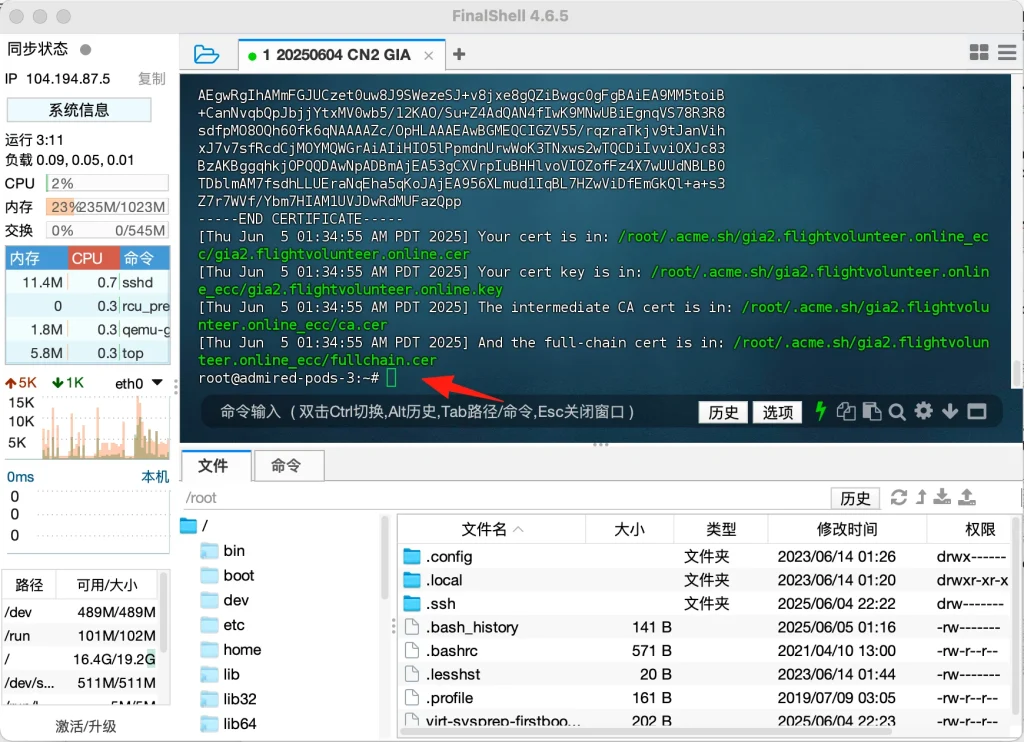
4. Install the New Xray Panel
Copy the command below, paste it into FinalShell, and press Enter. The installation process will appear, and you’ll need to wait a moment for it to complete.
bash <(curl -Ls https://raw.githubusercontent.com/slobys/x-ui/main/install.sh)When you see this interface, type y and press Enter.
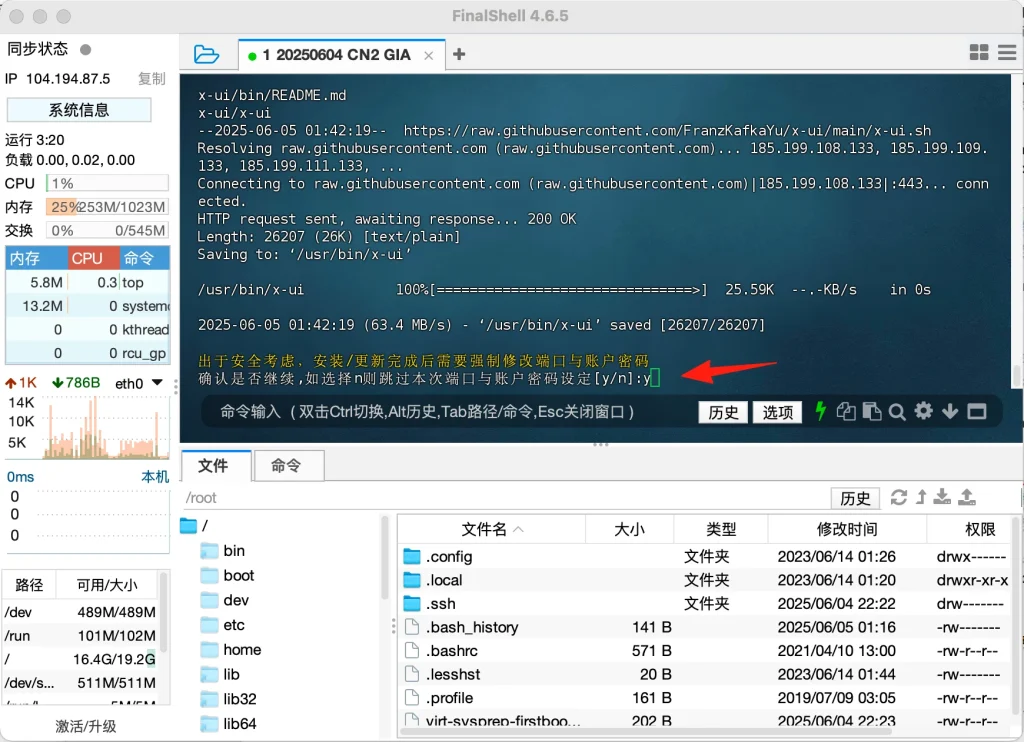
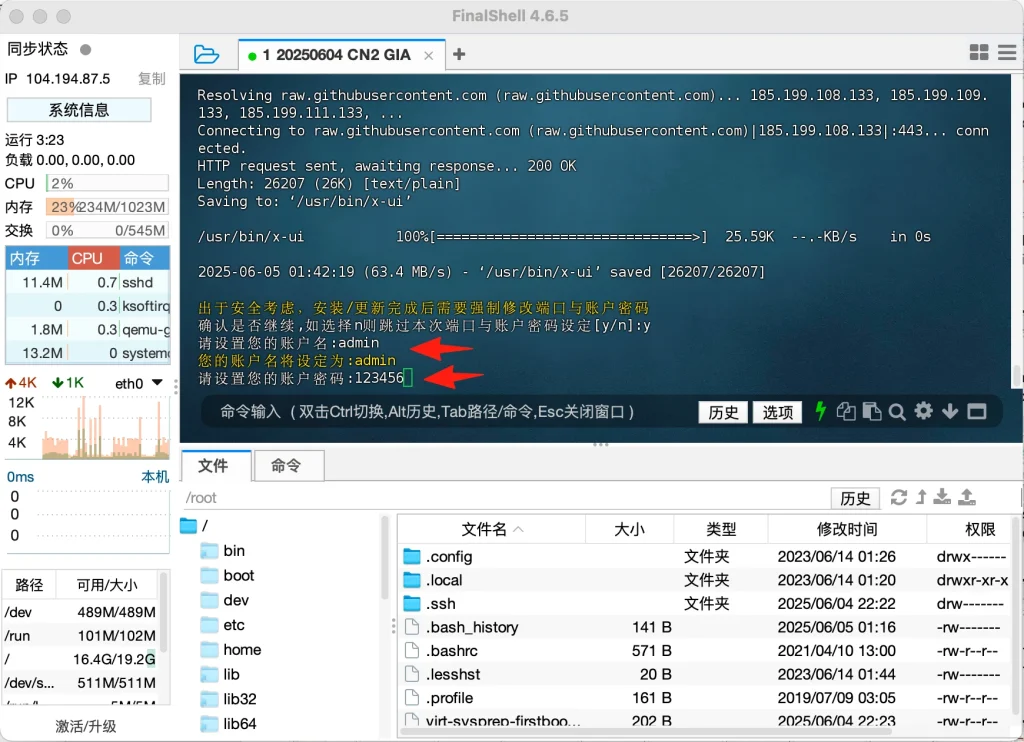
Now, set a username and password for yourself. Make sure to keep them safe and remember them!
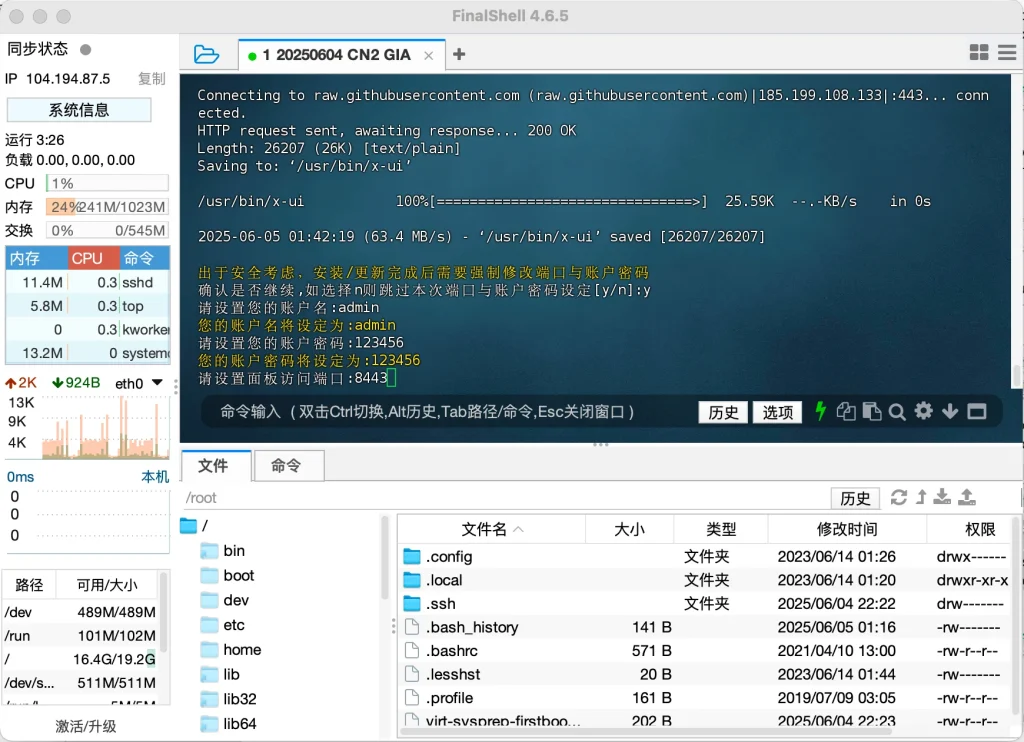
The ports we opened earlier were 80, 443, and 8443. Here, we'll enter 8443, then press Enter. Please wait a moment.
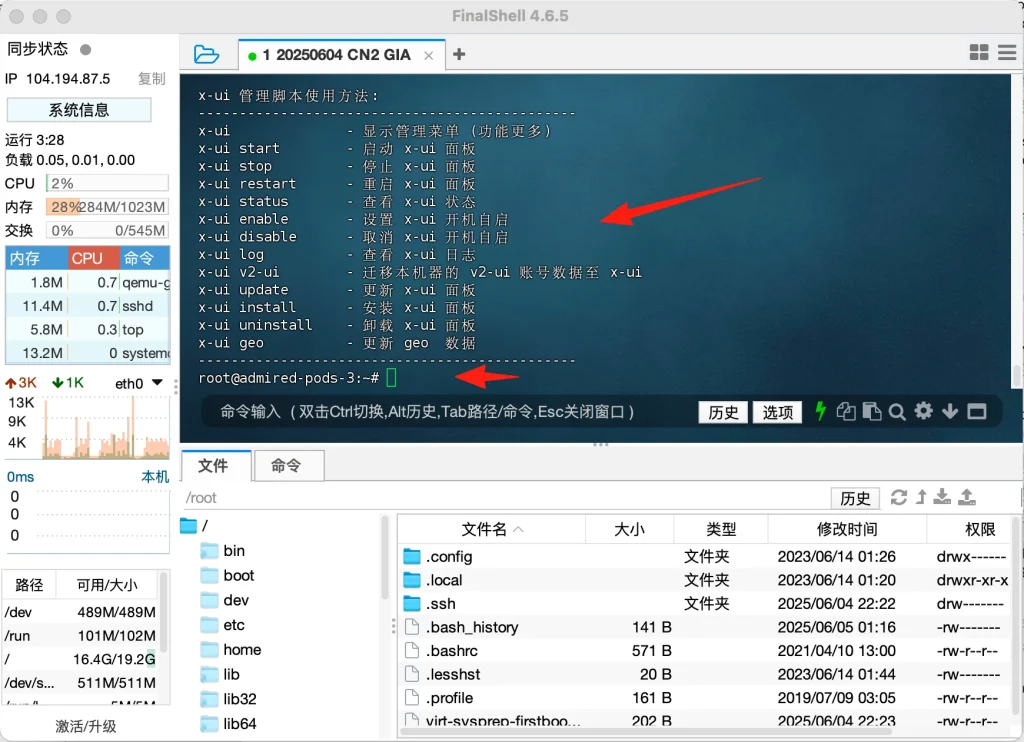
When you see this interface, it means Xray has been successfully installed!
5. Install BBR Acceleration
Copy the command below, paste it into FinalShell, and press Enter.
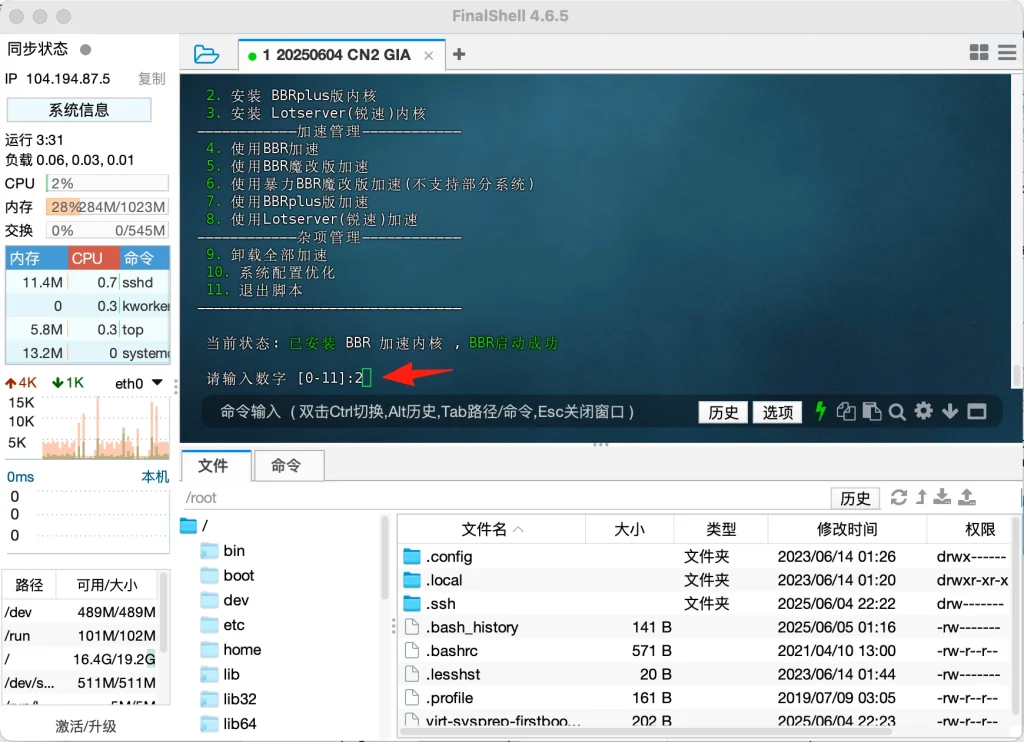
wget -N --no-check-certificate "https://raw.githubusercontent.com/chiakge/Linux-NetSpeed/master/tcp.sh" && chmod +x tcp.sh && ./tcp.shWhen you see this interface, type 2 and press Enter. The installation process will appear, and you'll need to wait a moment for it to complete.
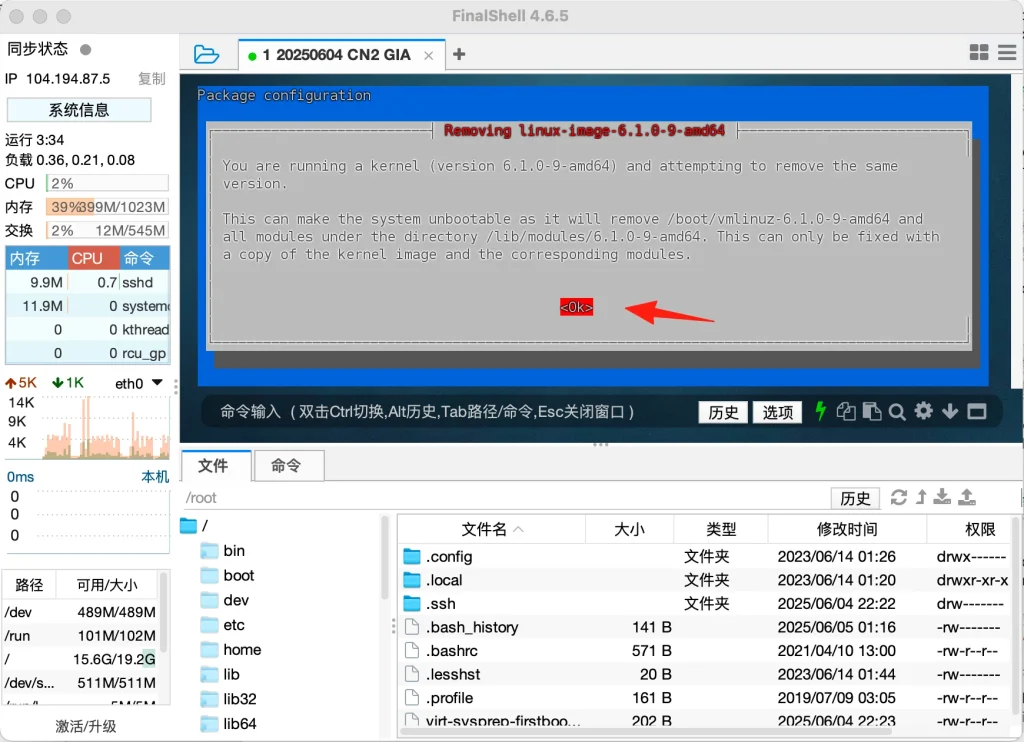
When you see this interface, use your mouse to click on the dialog box. Then, use the arrow keys on your keyboard to navigate and select "OK," and finally, press Enter.
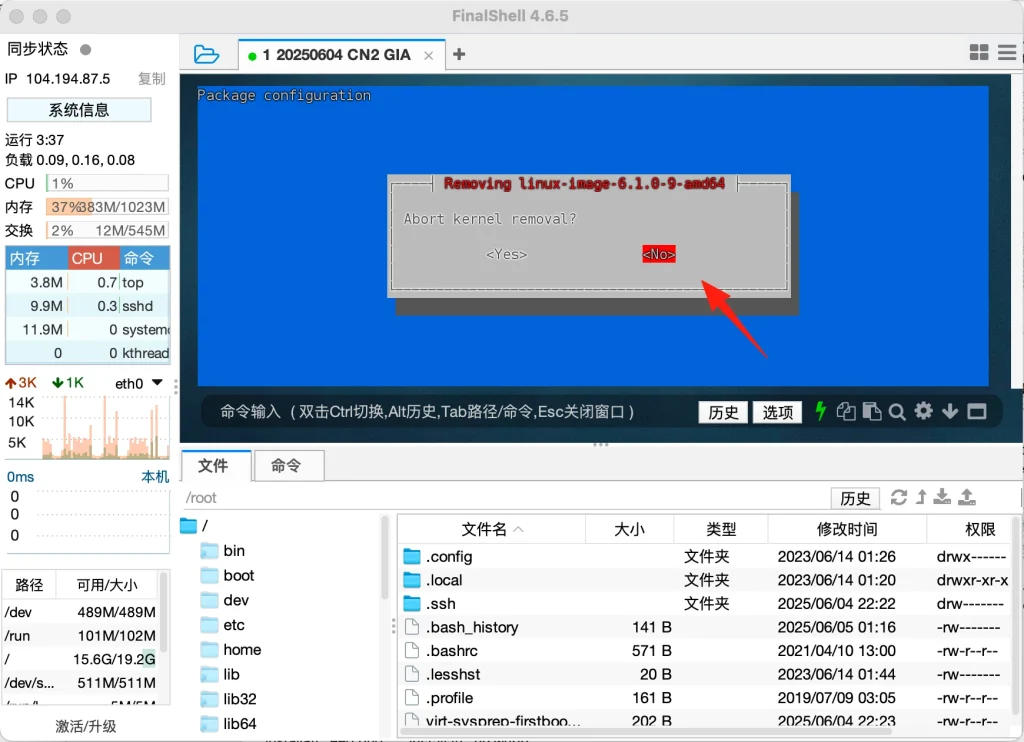
Choose "No" and press Enter. You'll need to wait a bit longer for it to continue.
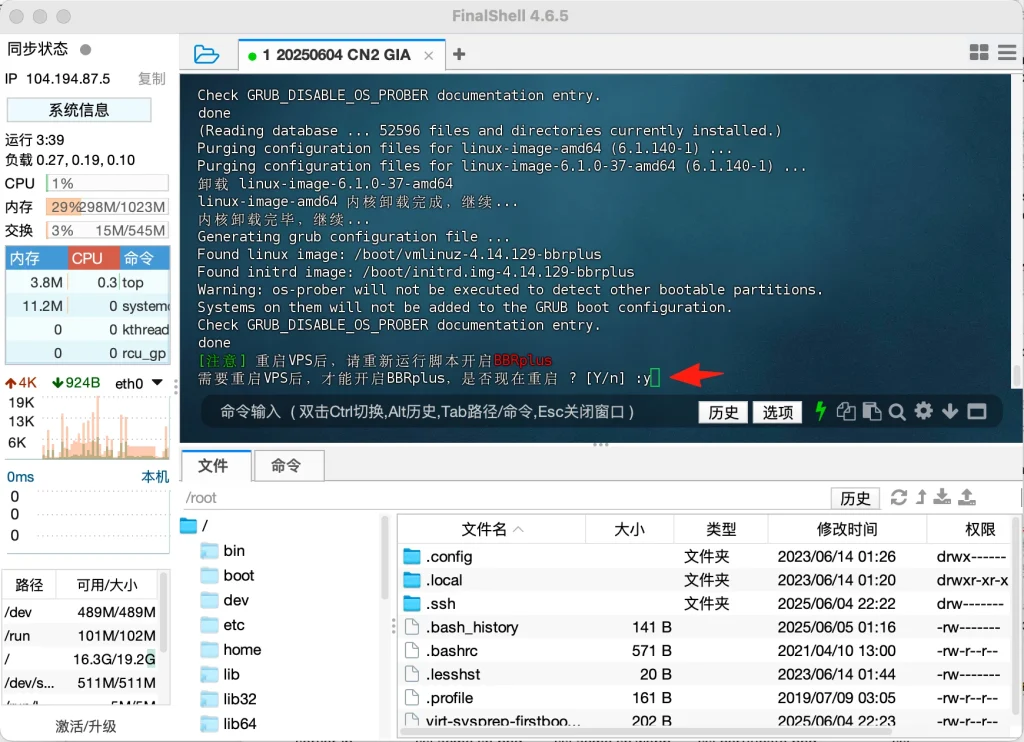
When you see this interface, type y and press Enter to restart.
Wait a bit longer until you see the "Connection Disconnected" interface. Once it appears, click the red lightning bolt icon.
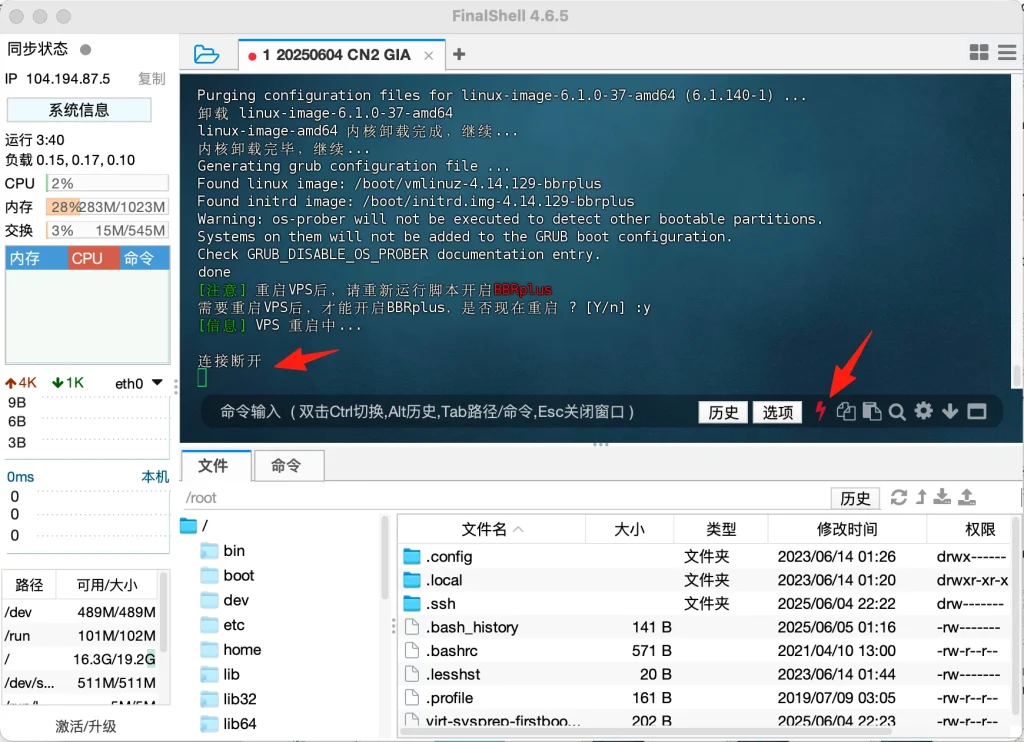
Once your VPS has restarted, you'll need to reconnect to it using FinalShell. After reconnecting, use this command again. Copy and paste it into the FinalShell terminal, then press Enter.
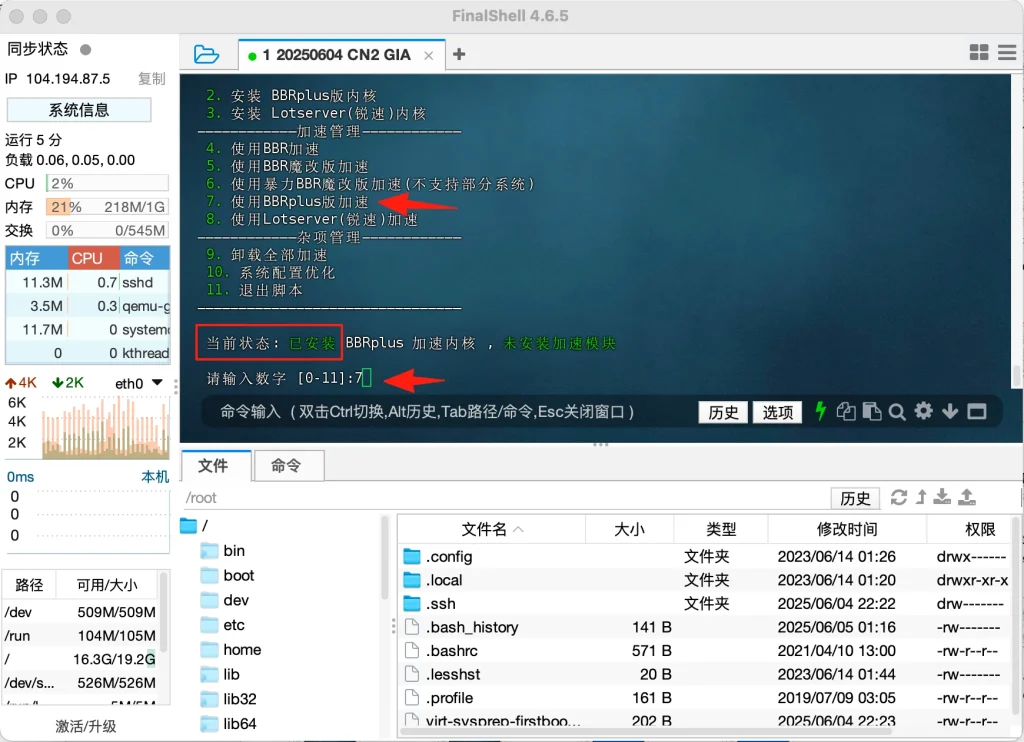
wget -N --no-check-certificate "https://raw.githubusercontent.com/chiakge/Linux-NetSpeed/master/tcp.sh" && chmod +x tcp.sh && ./tcp.shGreat! You can see that BBR acceleration is successfully installed. Now, let's start it by typing 7 and pressing Enter.
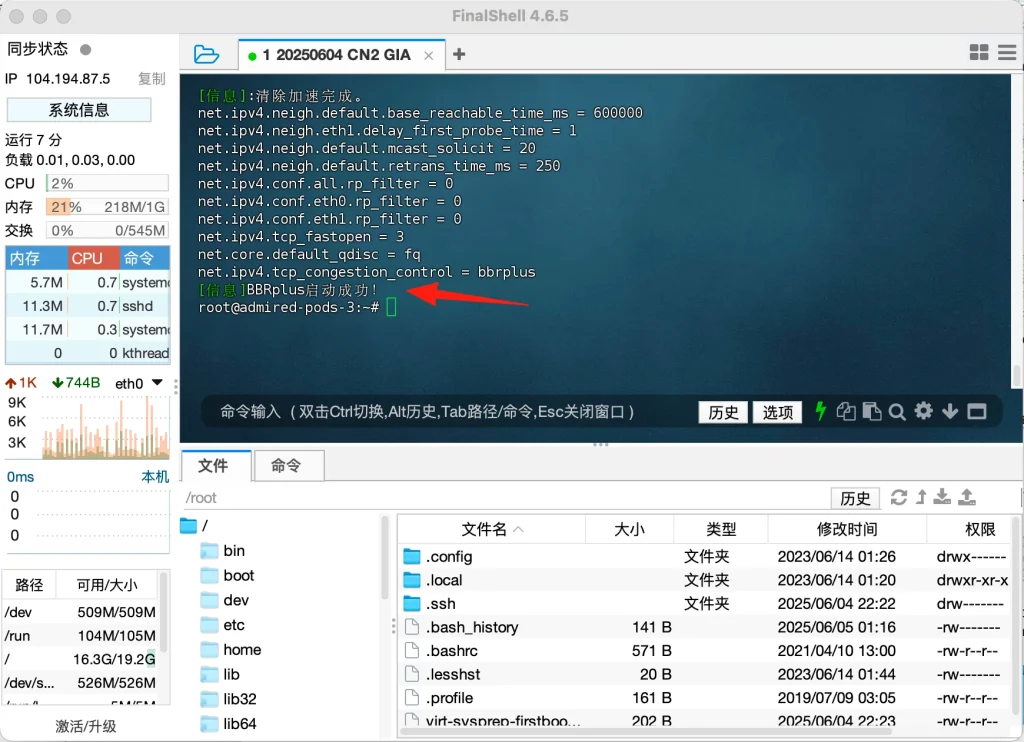
When you see this interface, it means BBR has successfully started!
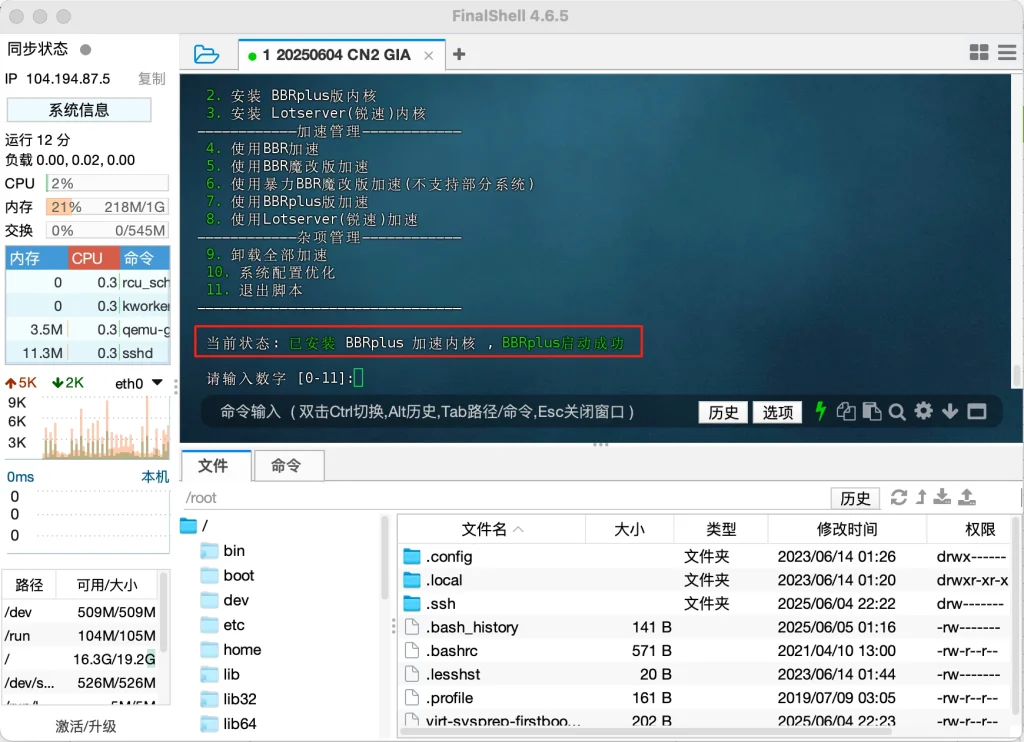
Copy and paste this command into FinalShell again and check it.
wget -N --no-check-certificate "https://raw.githubusercontent.com/chiakge/Linux-NetSpeed/master/tcp.sh" && chmod +x tcp.sh && ./tcp.shGreat! You can see that it's successful. Now, let's exit the script by typing 11 and pressing Enter.
6. Log in to Xray and Set Up a Node
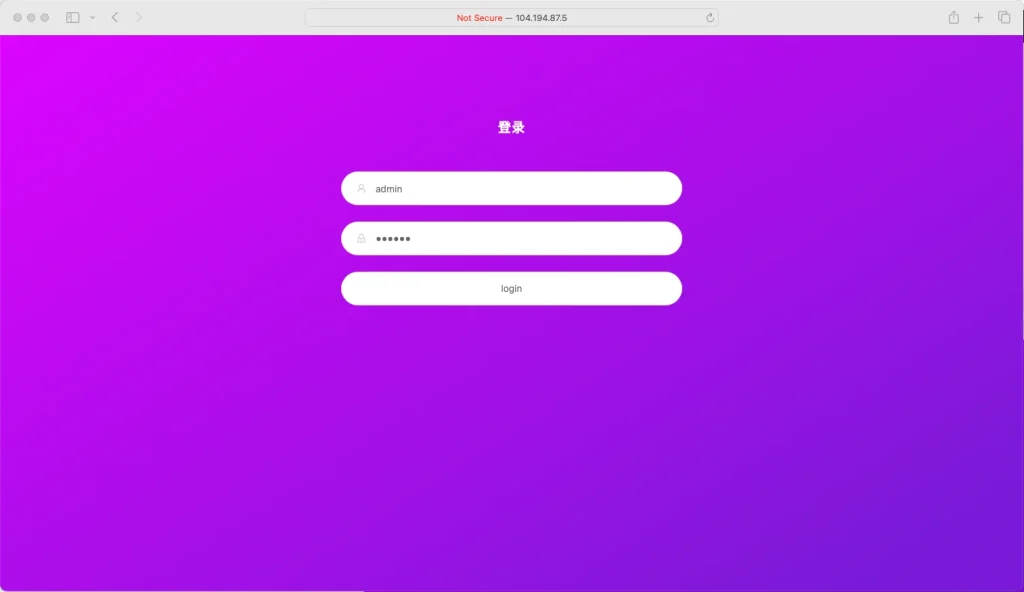
Enter the following address in your browser: 104.194.87.5:8443
This address consists of two parts: your server's IP address and the port we opened earlier (8443). Please make sure to enter it using English characters only!
The username and password are the ones you set previously.
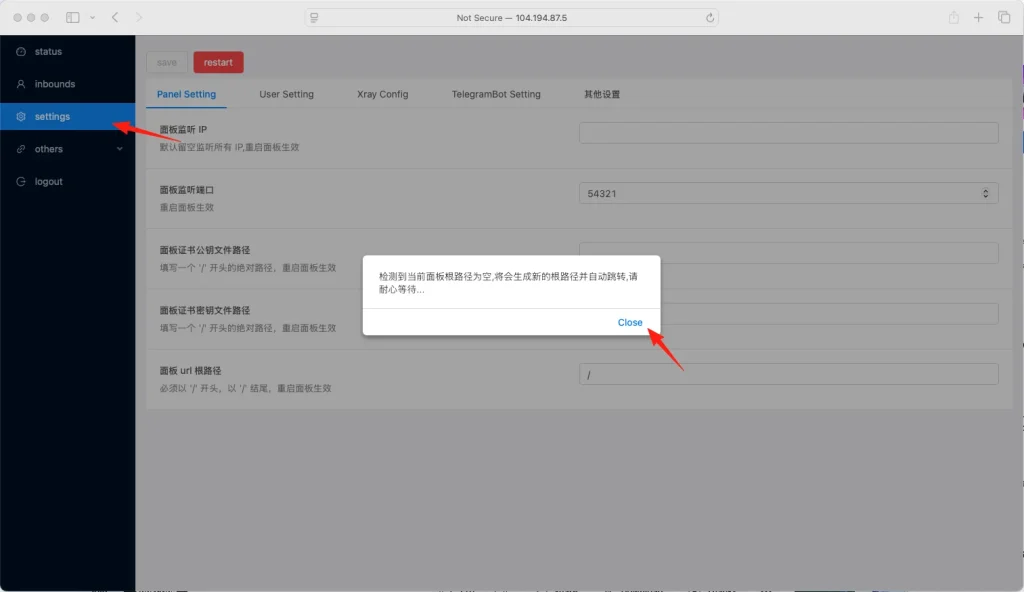
Click on "Settings" in the left sidebar, then click "Close" in the pop-up dialog box.
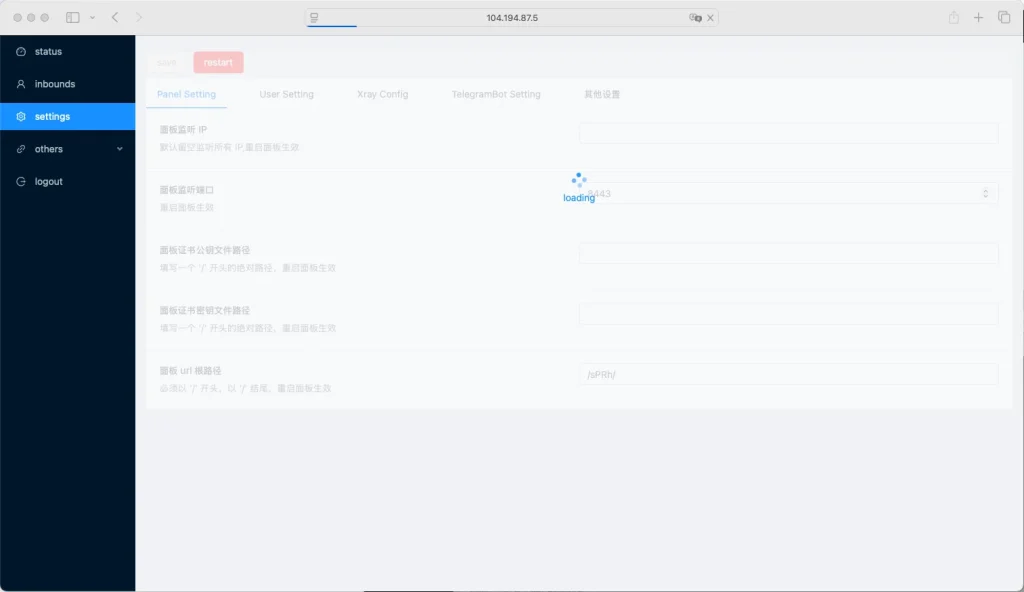
It will load for a bit after that.
Once it finishes loading, you'll be back on the Panel Settings page.
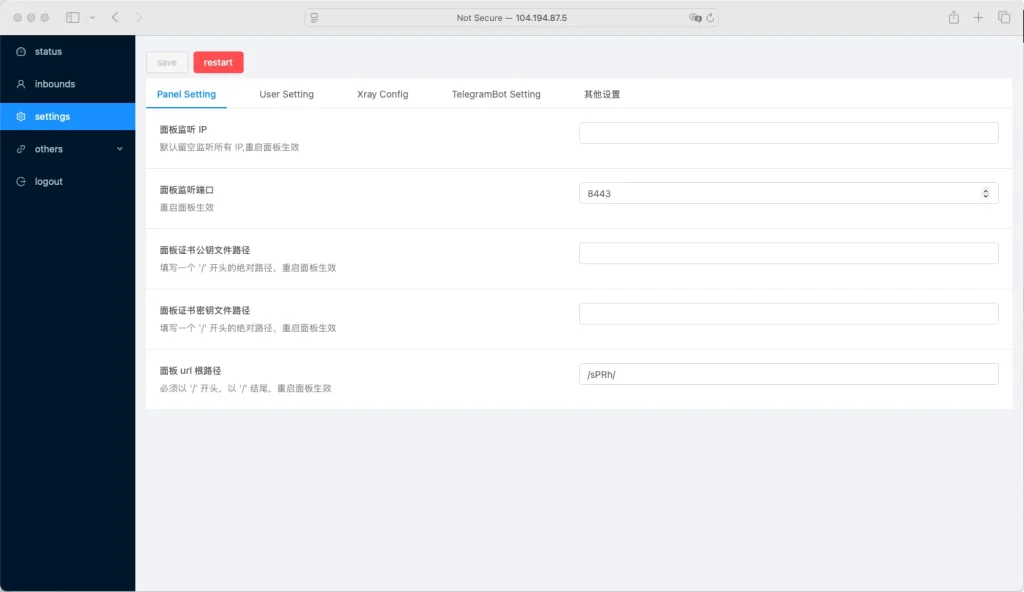
Now, we need to find the paths for the panel certificate public key file and the panel certificate private key file. In the FinalShell interface, click the refresh button.
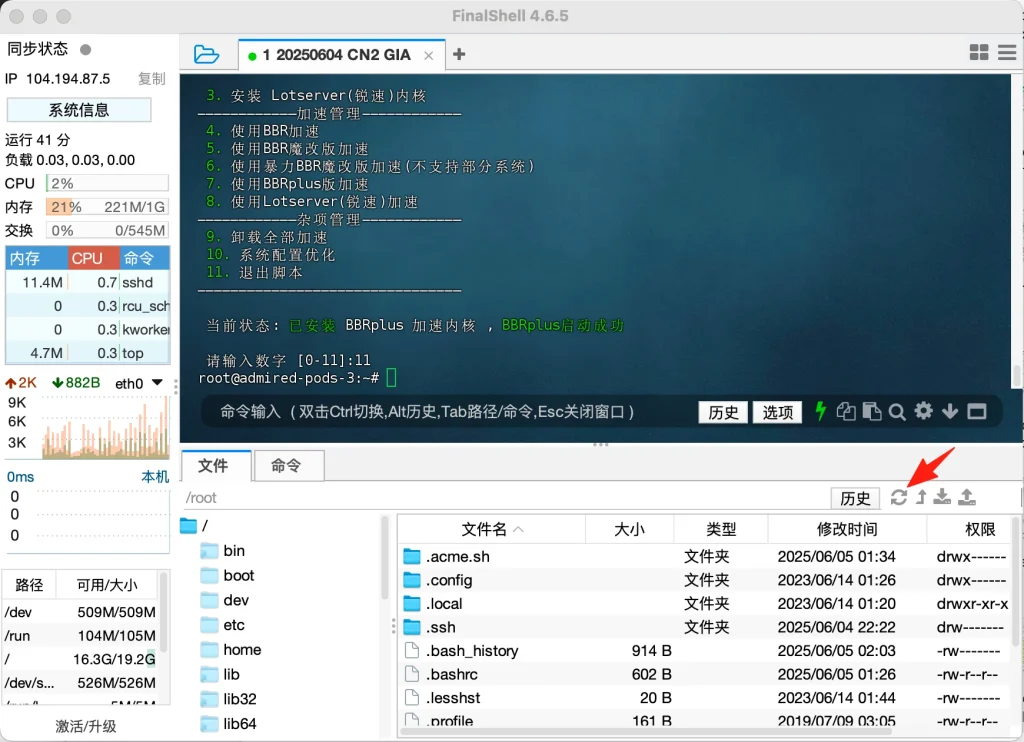
Open the first .acme.sh folder. Inside that, open the gia2.flightvolunteer.online subdomain folder.
Find the file ending with .cer. Right-click on it and copy the path. Paste this path into the "Panel certificate public key file path" field.
Find the file ending with .key. Right-click on it and copy the path. Paste this path into the "Panel certificate private key file path" field.
Next, customize a "Panel URL root path." Be sure to write this down for your records.
Finally, click "Save," and then click "Restart Panel" to apply the changes.
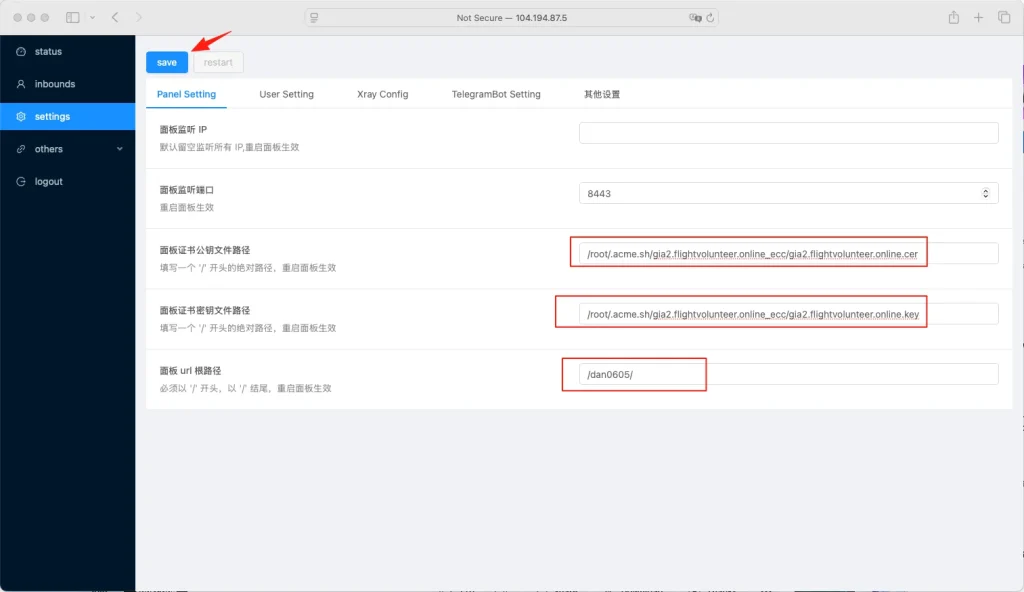
Now we need to log in to the Xray panel again. The previous login address, 104.194.87.5:8443, will no longer work. We need to change it.
You'll replace the IP address with your subdomain and add the custom panel URL root path you just set. The new address will look like this: gia2.flightvolunteer.online:8443/dan0605/
Here, gia2.flightvolunteer.onlineis the subdomain we set, 8443 is the port, and /dan0605/ is our custom panel URL path.
After entering this new address into your browser, you'll see the login dialog box again. Enter your username and password to log back into the Xray panel to add nodes.
Add Inbound
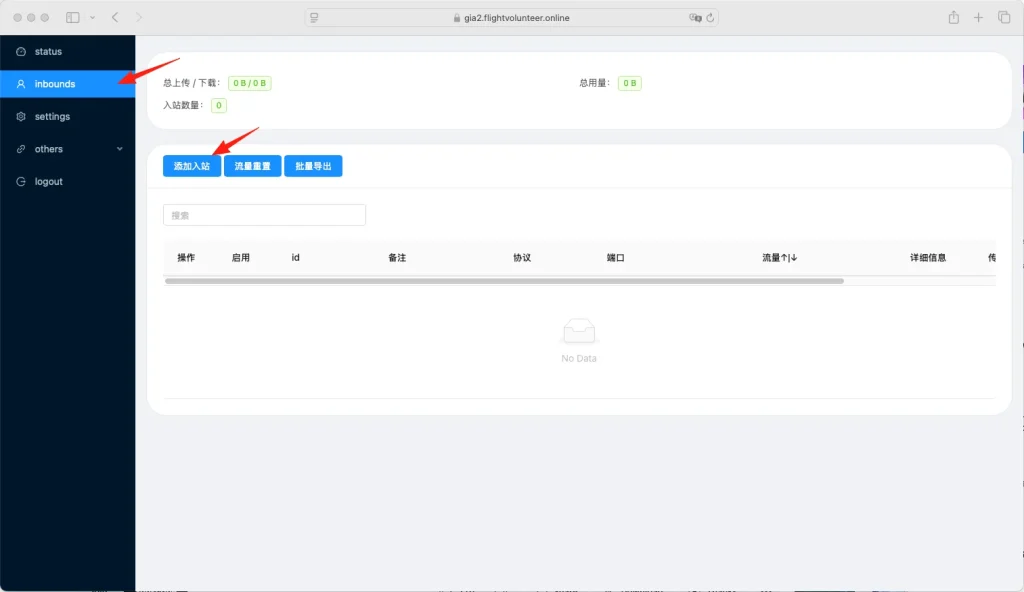
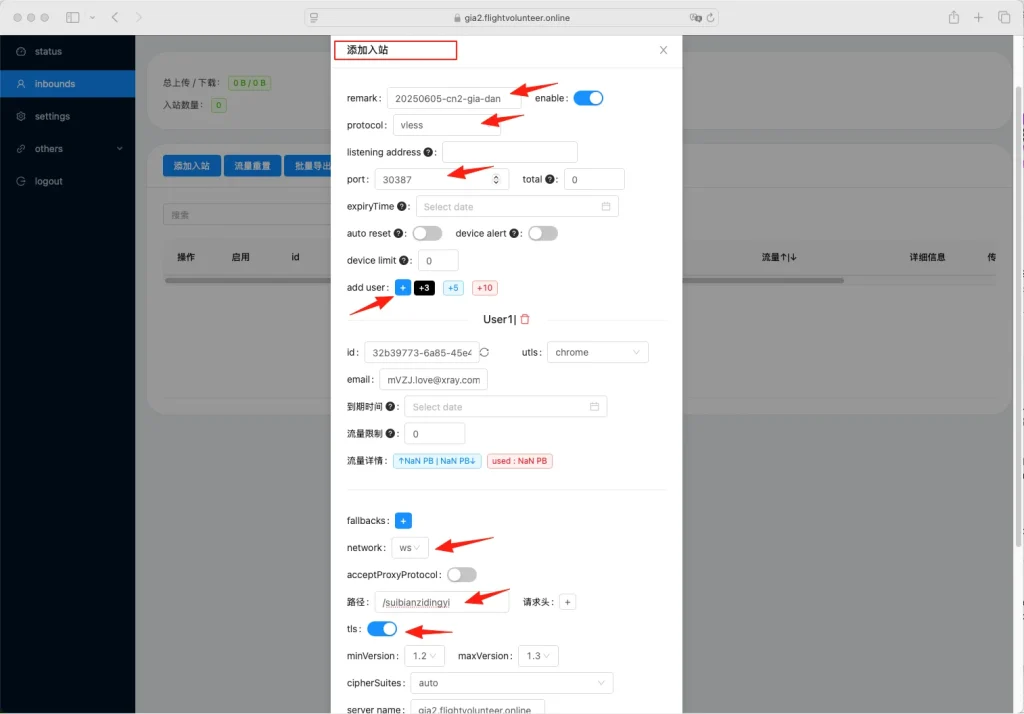
Okay, let's configure the inbound settings. Here are the steps:
Remark: Choose any name you like to help you identify this connection.
Protocol: Keep the default, which is VLESS.
Port: Use the default port that's already shown.
Next, click "Add User."
- Network: Select
ws(WebSocket). - Path: Customize this to any path you prefer, but make sure it's different from the custom panel root path you set earlier. If they are the same, you won't be able to access your panel.
- TLS: Make sure this is enabled.
Finally, scroll all the way down and click "Add."
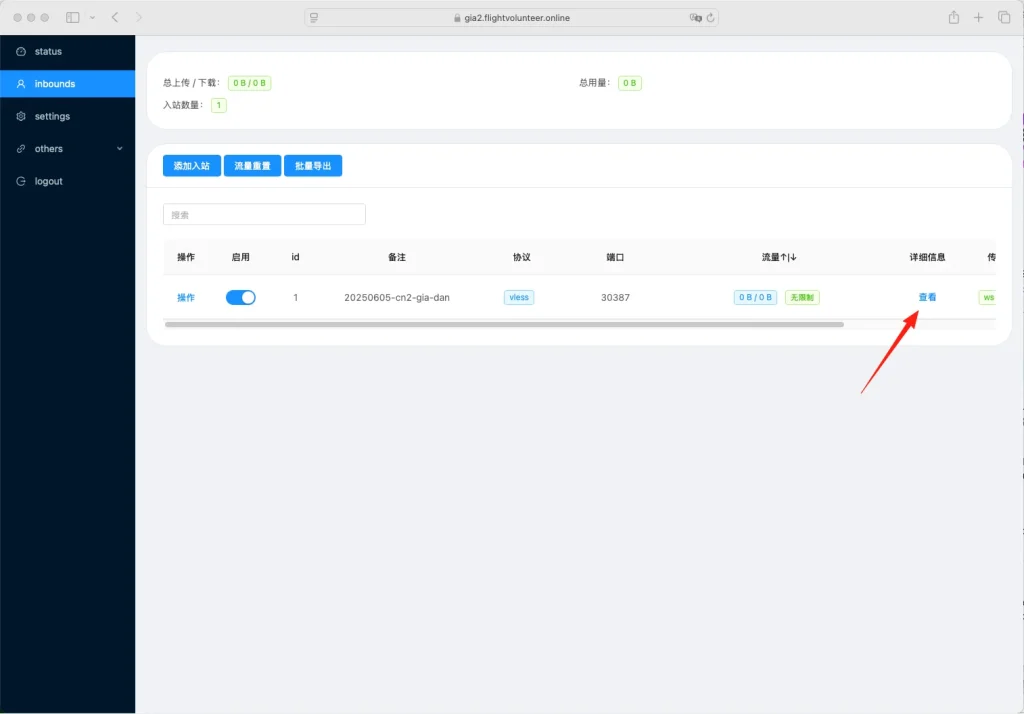
Click to view
Click to copy the link
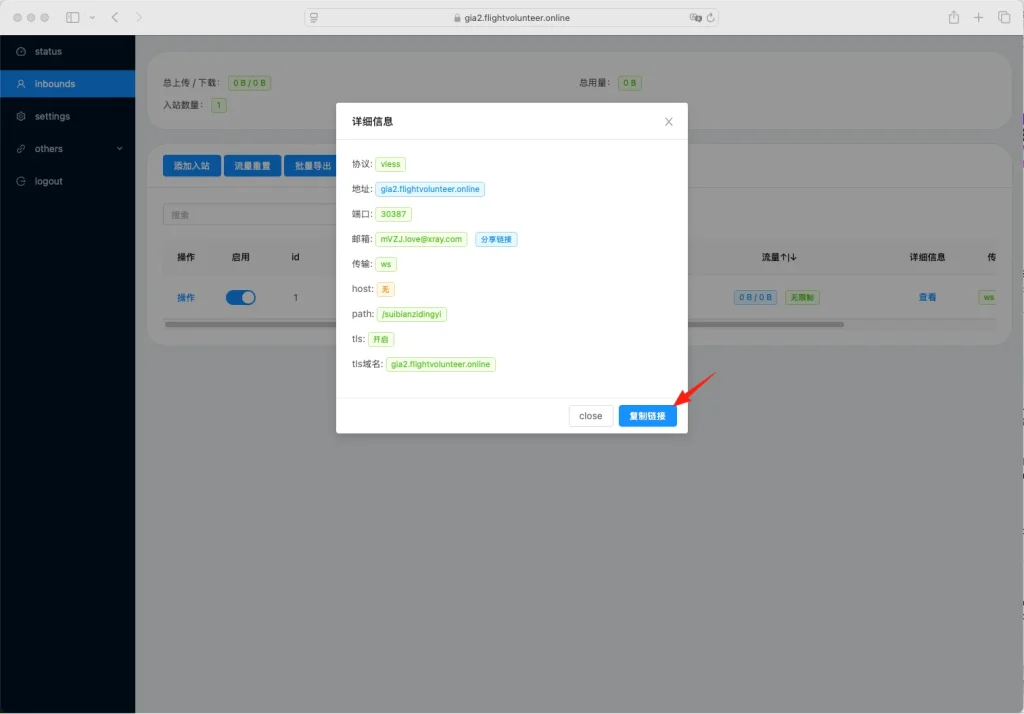
Now, you can just open V2RayN and paste it to add the node.
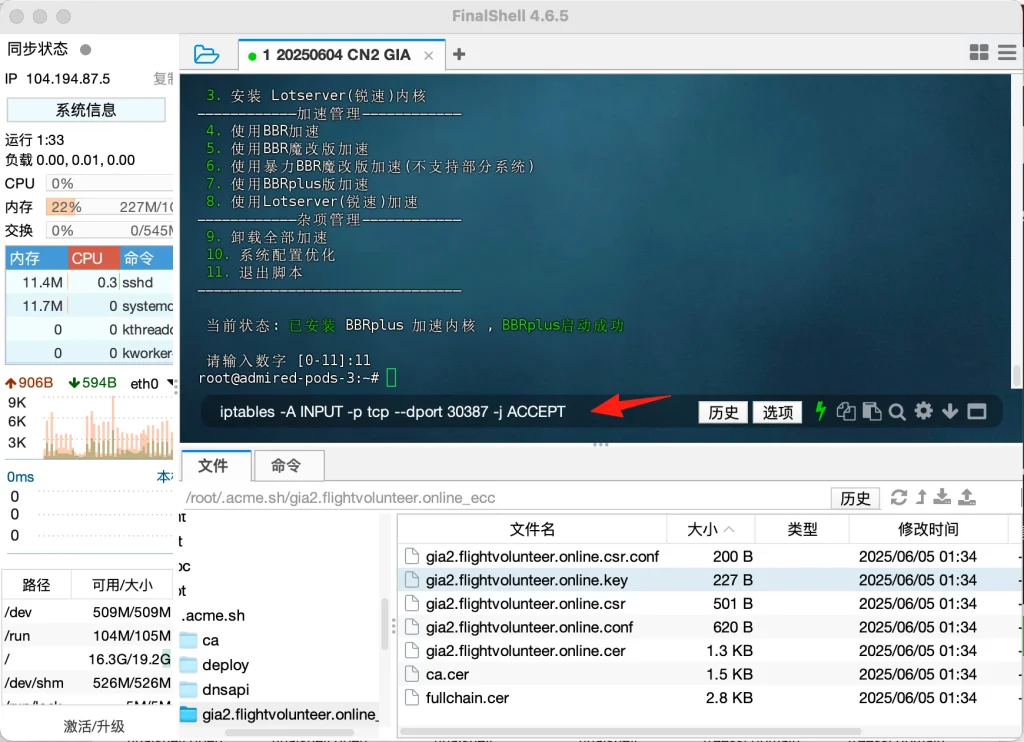
Finally, there's one more step: open this node's port in the firewall. Copy the command below.
Don't Copy This Port Number As-Is: You must replace the number after --dport with your own actual port. My port here is 30387, but yours will almost certainly be different, using this exact command unmodified opens the wrong port and your node won't connect.
iptables -A INPUT -p tcp --dport 30387 -j ACCEPTPaste it into FinalShell and hit Enter. If it runs without errors, that means the port has been successfully opened!
In V2RayN, simply select "Auto-configure system proxy" under the system proxy settings and then restart the application. You should then be able to use it.
every Thursday.
Hosting reviews, builder comparisons, performance tips, and plugin picks — curated weekly for WordPress site owners and builders.