Setting up your own proxy server usually means a long list of server commands. This walkthrough hands that list to AI agents instead: buy a Hostinger VPS, point a Cloudflare subdomain at it, put your credentials in .env and the deployment steps in SOP.md, and let the agents handle Xray, TLS and the VLESS inbound. Seven steps from purchase to a working server.
This is a hands-on tutorial. The goal is to stand up your own dedicated VPS node using a VPS, Cloudflare, and an AI coding agent that follows a fixed deployment SOP. Compared with a shared node from a subscription service, a dedicated VPS gives you your own server and your own public IP, which is a more stable foundation for long-running cross-border work.
The only parts left for you are buying the server and granting access. Server initialisation, Xray installation, TLS certificates, and the VLESS inbound all run inside the agent, driven by the SOP file you hand it.
Step 1: What You Need
Get these four things ready before you start. Missing any one of them will stall the setup halfway.
- A VPS. This tutorial uses a Hostinger VPS.
- A domain name, for the node’s DNS record and its TLS certificate.
- A Cloudflare account, for DNS management and the API token.
- An AI coding agent, such as Claude Code, Codex CLI, or ZCode.
Step 2: Buy a VPS
Everything in this section happens on Hostinger, and it is the only step you pay for.
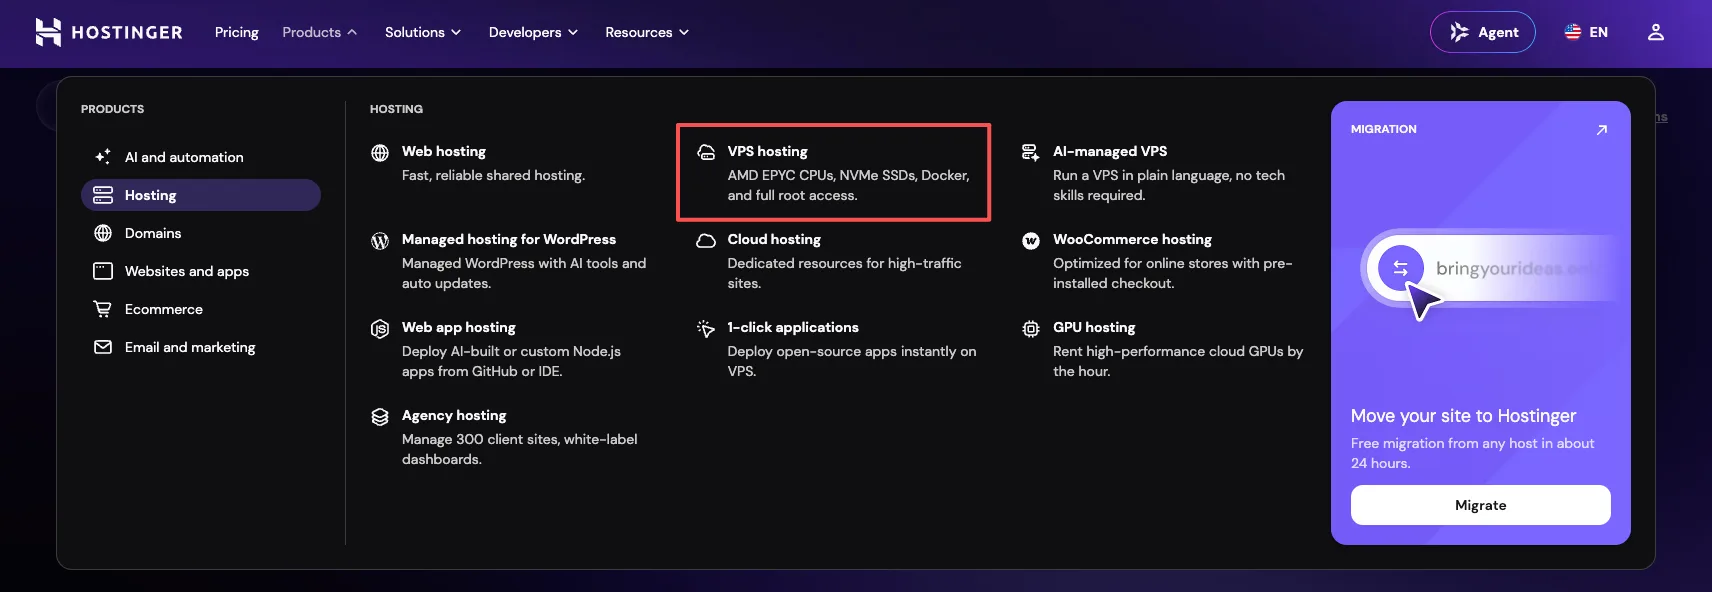
- Log in to Hostinger, then open Products, Hosting, and VPS hosting.

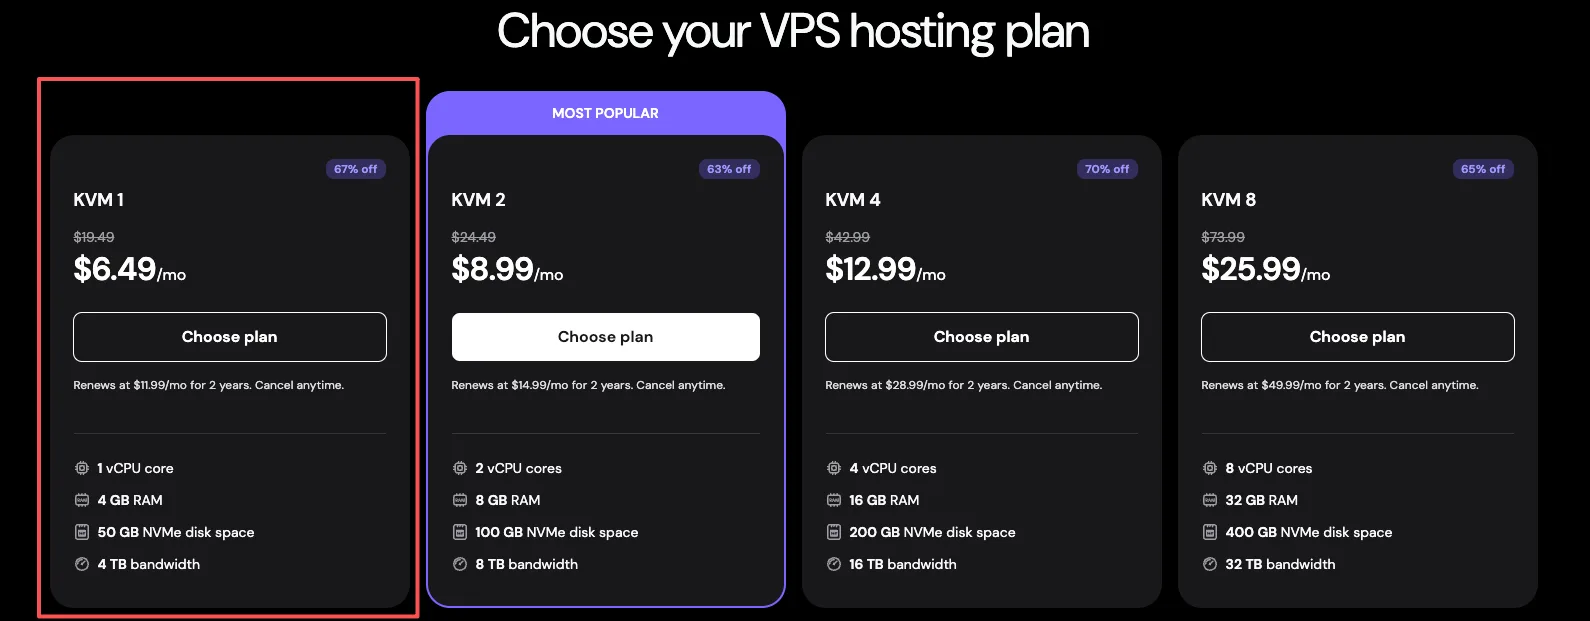
- Pick a plan. This tutorial uses KVM 1.
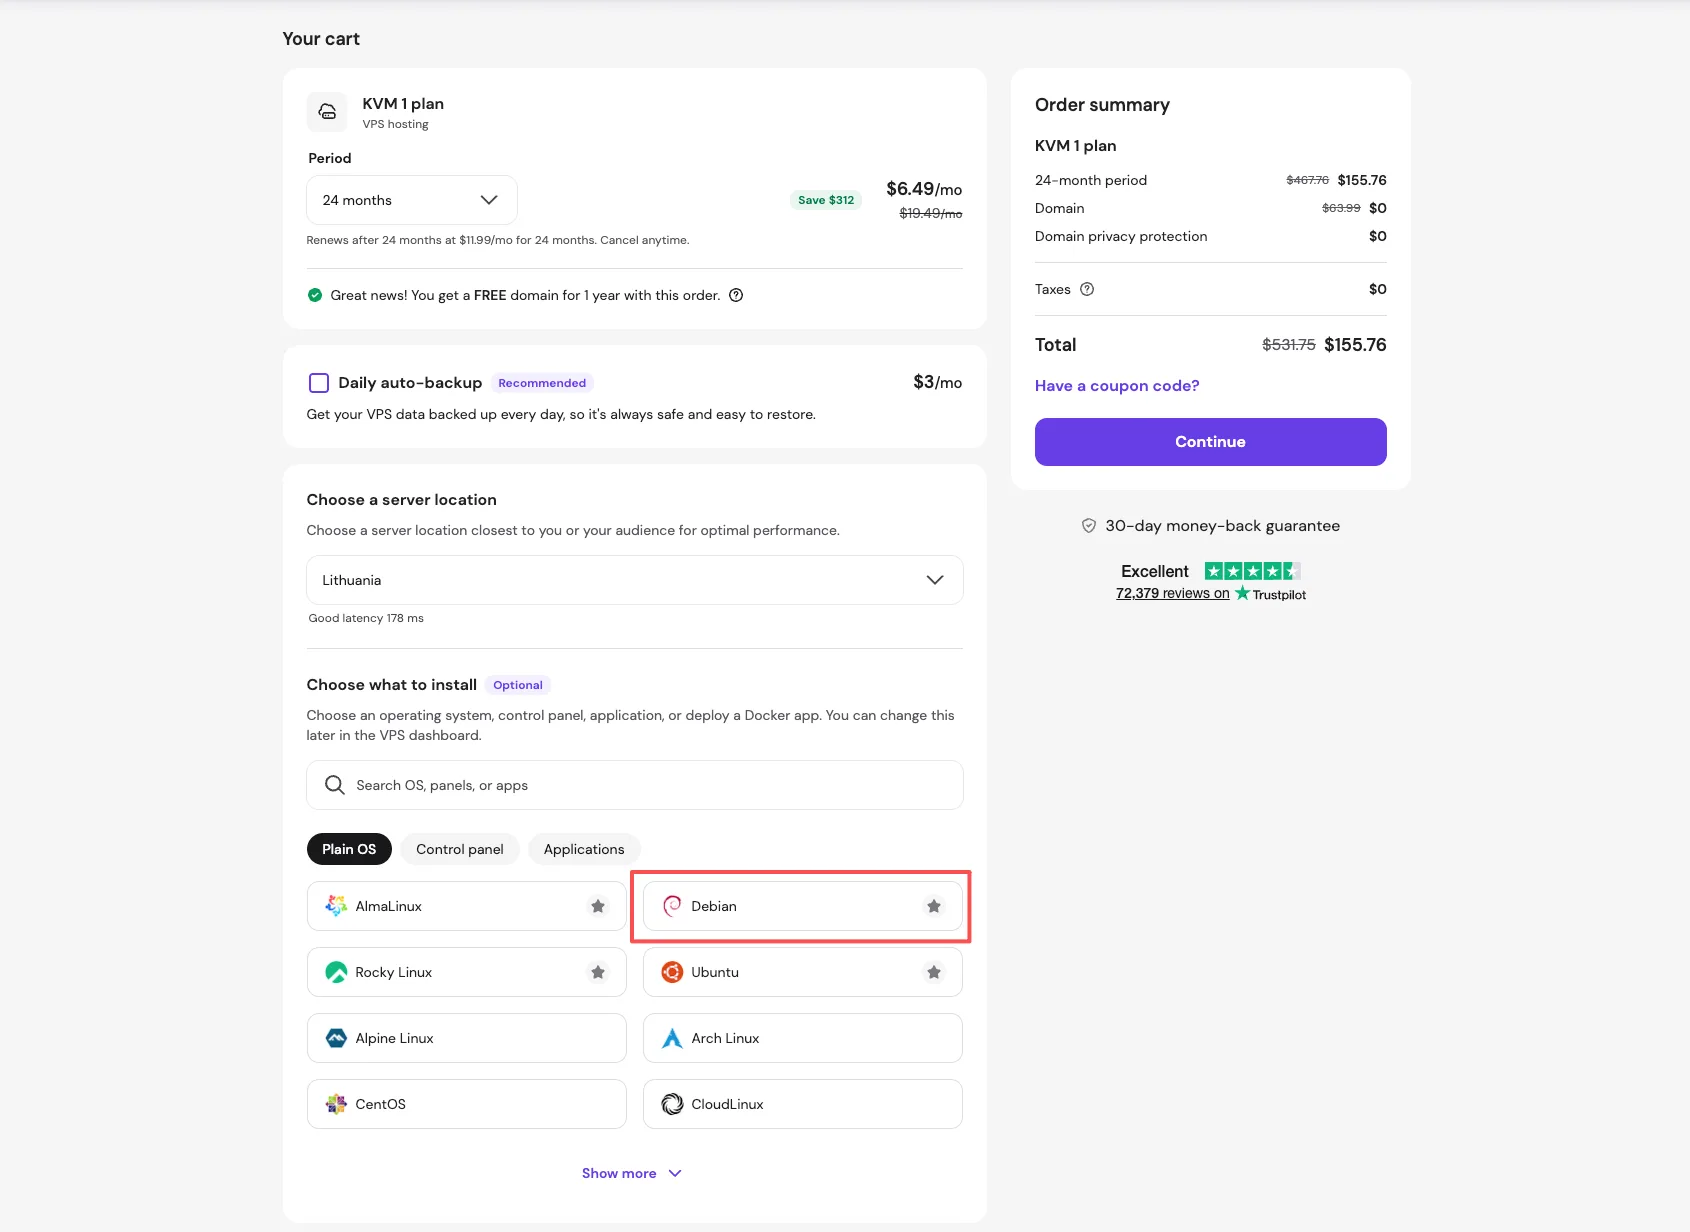
- In Your Cart, set the period, the server location, and the operating system.
| Plan | Specs | Good For |
|---|---|---|
| KVM 1 | 1 vCPU, 4 GB RAM, 50 GB NVMe, 4 TB bandwidth | The plan used here. Enough for one personal node |
| KVM 2 | 2 vCPU, 8 GB RAM, 100 GB NVMe, 8 TB bandwidth | Small teams sharing one node |
| KVM 4 or KVM 8 | 4 to 8 vCPU, 16 to 32 GB RAM, 200 to 400 GB NVMe | Business use with heavier concurrent traffic |
The billing period matters more than the plan. Choose the 24-month period, because that is where the largest discount sits on the order page, and a node like this stays in service for years. For the server location, pick whichever datacenter is closest to you or to your audience. Under Choose What to Install, open the Plain OS tab and select Debian, then continue to checkout and pay. Provisioning takes a minute or two.
Step 3: Get the VPS Login Details
Once the VPS is running, its access details live on the Overview page of hPanel.
- In hPanel, open VPS, then your server, then Overview.
- In the server information block, copy the IP, the SSH username (root by default), and the root password.
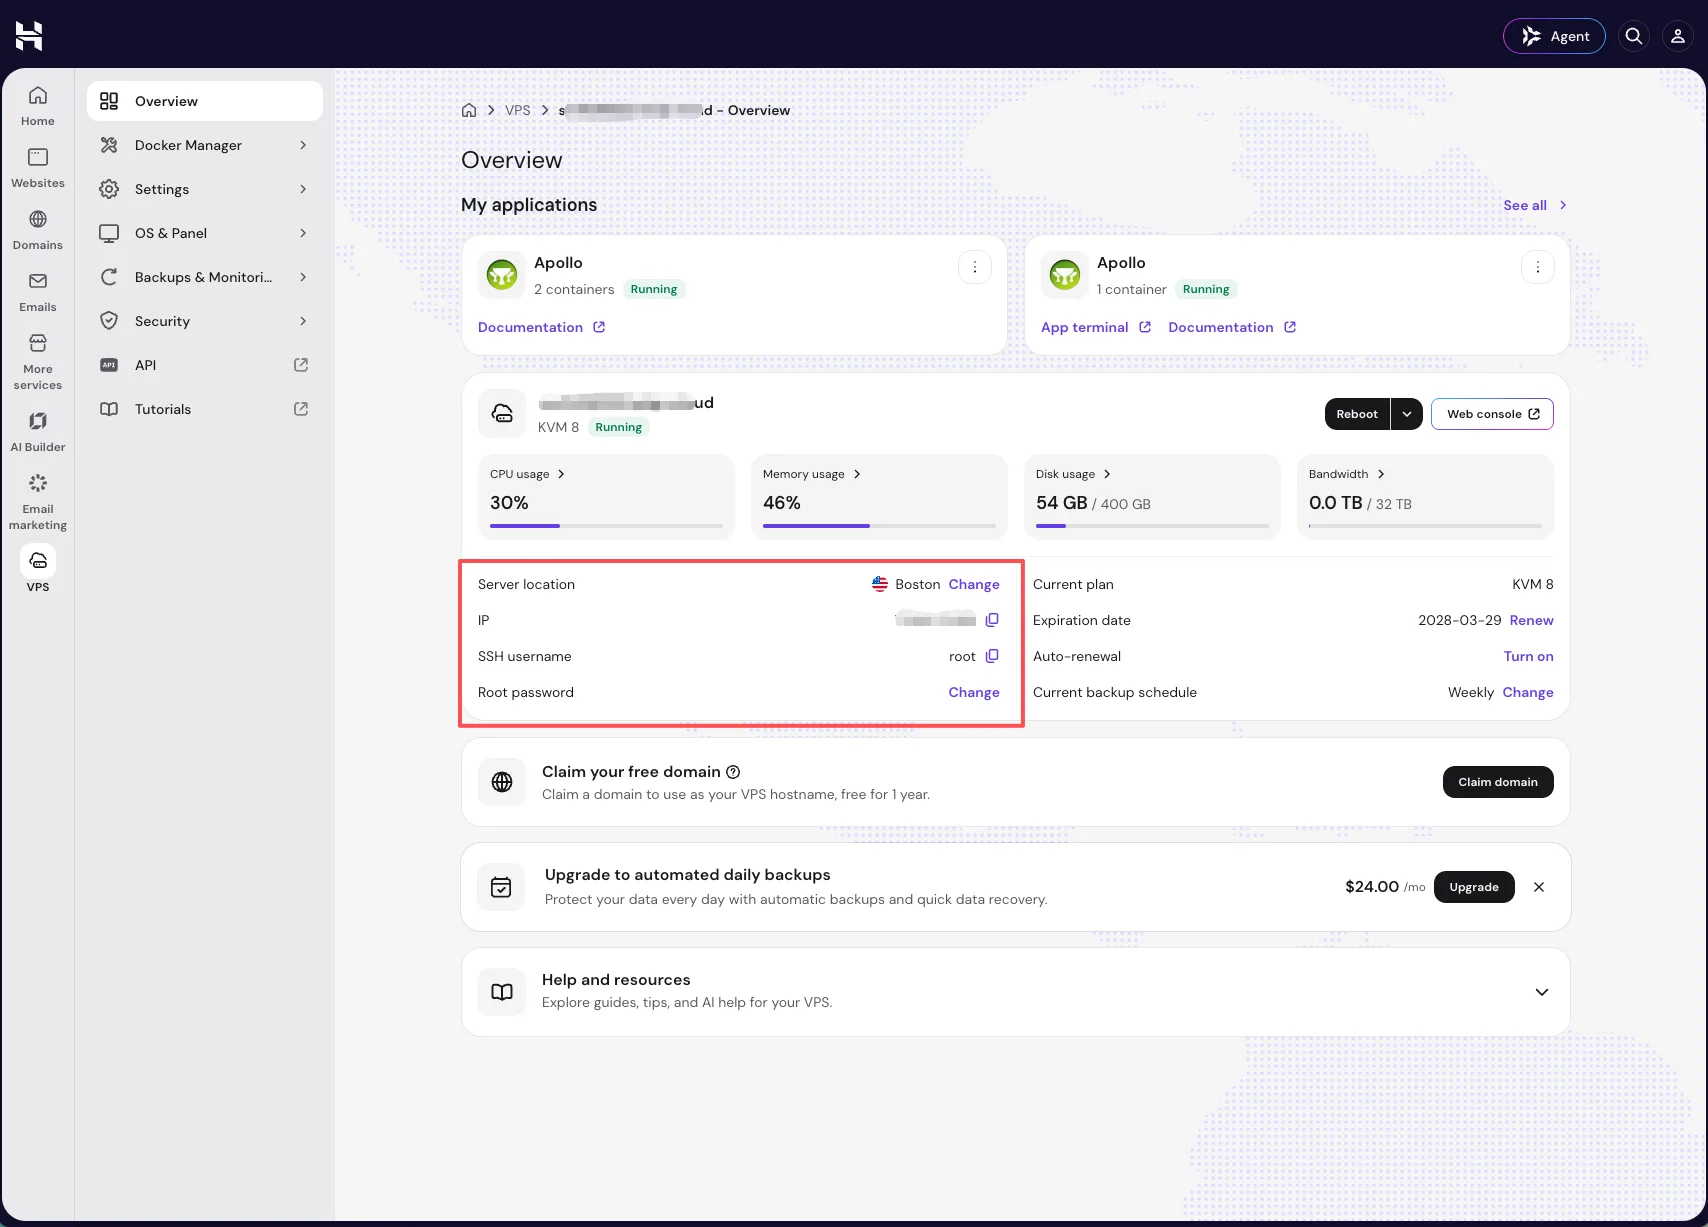
Keep these three values somewhere handy, because the agent needs them to connect to the server.
- IP address
- SSH username
- Root password
PRO TIP Log In With an SSH Key Instead
If you would rather not keep a password in the picture, switch the server to key-based authentication. The full walkthrough is in How to Create SSH Keys and Set Up Server Aliases for Your VPS.
Step 4: Configure the Domain in Cloudflare
The node needs a domain to carry its TLS certificate. Buy the domain first and move its DNS to Cloudflare, which is covered in Why Experienced Developers Prefer Hosting DNS on Cloudflare.
- Log in to Cloudflare, open Domains and Overview, and select your domain. The examples below use example.com.
- Create the subdomain for the node, for example gia.example.com.
- Open DNS and Records, click Add Record, and create an A record with these fields:
- Type: A
- Name: gia
- IPv4: your VPS IP
- Proxy Status: DNS Only
Click Save when the fields are filled in.
- Create an API token: click Quick Search in the left sidebar, type API Token, choose Account API Tokens, and click the create button.
- Set the permission to Edit Zone DNS, set Token Expiration to No Expiration, and add two addresses under Client IP Address Filtering: the VPS IP, and the IP of the machine that runs the agent.
- Click Review Token, then Create Token.
WARNING The Token Is Shown Once
Cloudflare displays the token a single time after creation. Save the Account ID and the API Token right away, because a lost token can only be replaced with a new one.
Step 5: Prepare the Agent Folder
Create a project folder and split the credentials from the deployment instructions into two files. The structure looks like this:
vps-node-agent/
├── .env
└── SOP.md
The .env file holds the connection details, in this format:
VPS_IP=
SSH_PORT=
ROOT_PASSWORD=
DOMAIN=
CF_TOKEN=
CF_ACCOUNT_ID=
Everything in .env is sensitive, so never commit it to a repository.
SOP.md holds the full deployment requirements, and every action the agent takes comes from it. Write down what to install, how far to take it, and what counts as done, and the agent behaves far more predictably.
Here is the complete SOP.md, ready to copy into a file:
# VLESS Node Setup SOP (2026, OS pre-installed at purchase, run it by hand or hand it to an AI agent)

Applies to: VPS providers where you pick the operating system while ordering (Vultr, DigitalOcean, Hostinger, RackNerd and most others). Providers that install the OS after purchase, such as Bandwagon, follow the separate KiwiVM guide.
System: Debian 12 (bookworm) 64-bit.
Environment: MacBook Terminal or Windows PowerShell (Windows 10 1809+ ships the OpenSSH client).
Apart from the SSH login and the client install, every command runs on the VPS (Debian). Both platforms are identical.

> Run this file step by step by hand, or hand the whole thing to a coding agent (Codex / Claude Code / ZCode and similar)
> and let it execute. Configure the SSH connection in the agent environment first. Every sensitive value (API token,
> panel password, UUID) is generated or typed in while it runs, so never write those into the document.
>
> Placeholders used below:
> - `gia.yourdomain.com` is your subdomain (example: `gia` + `yourdomain.com`)
> - `1.2.3.4` is the VPS IP

## Architecture at a glance

| Component | Choice | Why |
|---|---|---|
| Primary inbound | VLESS + WS + TLS (443) | Best client compatibility; standard HTTPS port, and if the IP gets blocked you can revive it through Cloudflare CDN |
| Backup inbound | VLESS + Vision + REALITY (2053) | No certificate needed, resists active probing; needs a reasonably new client |
| Panel | 3x-ui (actively maintained) | Port 8443, random path, HTTPS with the domain certificate |
| Certificate | acme.sh + Cloudflare DNS API | ECC certificate, renewed by cron |
| Acceleration | Kernel BBR (sysctl) | No third-party acceleration script |

Port plan: `443` WS+TLS primary / `2053` REALITY backup / `8443` panel / `80` reserved (HTTP validation fallback for certificates).

---

## Step 1 Buy the VPS (pick Debian 12 at checkout)

1. Choose the provider and the plan. A premium route to your region helps latency, and a standard international route still works with a slower peak-hour experience.
2. **Set the operating system to Debian 12 (64-bit) on the create or checkout page** (some providers list it as bookworm):
   - Do not pick Ubuntu, CentOS, or an image with a control panel or app template baked in, because the commands below are written for Debian;
   - 1 GB of RAM runs this comfortably and 10 GB of disk is enough.
3. Pick one authentication method:
   - Set a root password, which the provider shows in the console or sends by email;
   - Or upload your SSH public key, which is safer and the option we recommend.
4. Wait a minute or two for provisioning, then note the IP shown in the console: that is `1.2.3.4`.
5. If the console offers a **Cloud Firewall** or firewall template (Hostinger, Vultr, DigitalOcean and others do):
   - Leave it alone when it is disabled by default;
   - If it is enabled, allow TCP ports `80, 443, 2053, 8443`, otherwise the node and the panel stay unreachable.

## Step 2 Connect over SSH (on your own machine)

The command is the same in Mac Terminal and Windows PowerShell:

```bash
ssh [email protected]
# Type yes on the first connection to accept the fingerprint, then enter the root password
```

A few providers hand you a normal user instead of root. If that happens, run `sudo -i` after logging in and continue as root.

## Step 3 System initialisation + BBR (on the VPS)

```bash
apt update && apt upgrade -y
apt install -y curl socat

# Kernel BBR (native in Debian 12, no script needed)
cat > /etc/sysctl.d/99-bbr.conf <<'EOF'
net.ipv4.tcp_congestion_control=bbr
net.core.default_qdisc=fq
EOF
sysctl --system
sysctl net.ipv4.tcp_congestion_control   # should print bbr
```

## Step 4 Cloudflare setup (in the browser)

### 4.1 Subdomain A record

1. Cloudflare → `yourdomain.com` → DNS → Add record:
   - Type: `A`, Name: `gia`, IPv4: `1.2.3.4`
   - **Proxy status: off, grey cloud, DNS only** ← it has to be grey, otherwise direct connections to the node fail
2. Save, then confirm the record resolves from your machine (on PowerShell use `Resolve-DnsName gia.yourdomain.com`):

```bash
dig +short gia.yourdomain.com    # should return 1.2.3.4
```

### 4.2 Create an API token (for issuing and renewing the certificate on the VPS)

1. Cloudflare, click your avatar top right → My Profile → API Tokens → Create Token.
2. Pick the **Edit zone DNS** template:
   - Zone Resources: Include → Specific zone → `yourdomain.com`
   - Continue → Create, then copy the token, which is shown once.
3. Note the Account ID from the bottom right of the domain overview page.
4. **The important part is the IP allowlist.** Edit the token → Client IP Address Filtering → add the VPS egress IP:

```bash
# Ask the VPS for its own egress IP
curl -s https://api.ipify.org
```

   Without the allowlist, issuance fails with `Cannot use the access token from location: x.x.x.x`.
   Note that renewal runs on the VPS, so the allowlist always has to contain the VPS IP.

## Step 5 Issue the certificate (on the VPS)

```bash
curl https://get.acme.sh | sh -s [email protected]
source ~/.bashrc

export CF_Token="paste-the-API-token"
export CF_Account_ID="paste-the-account-ID"
acme.sh --set-default-ca --server letsencrypt

# DNS validation, issuing an ECC certificate
acme.sh --issue --server letsencrypt --dns dns_cf -d gia.yourdomain.com --keylength ec-256
```

Install it to a fixed path, which also syncs renewals and restarts the panel:

```bash
mkdir -p /root/cert
acme.sh --install-cert -d gia.yourdomain.com --ecc \
  --fullchain-file /root/cert/fullchain.pem \
  --cert-file /root/cert/cert.crt \
  --key-file /root/cert/private.key \
  --reloadcmd "systemctl try-restart x-ui || true"
chmod 644 /root/cert/fullchain.pem /root/cert/cert.crt
chmod 600 /root/cert/private.key

# Verify
openssl x509 -in /root/cert/fullchain.pem -noout -subject -enddate
```

Note: acme.sh stores `CF_Token` in `/root/.acme.sh/account.conf` so it can renew later, which is the standard approach.

## Step 6 Install the 3x-ui panel (on the VPS)

```bash
bash <(curl -Ls https://raw.githubusercontent.com/MHSanaei/3x-ui/main/install.sh)
```

Answer the wizard like this:

| Prompt | Answer |
|---|---|
| Database | `1` SQLite |
| Custom panel port? | `y` → enter `8443` |
| Custom WebBasePath? | `y` → enter a random path such as `/8fk2mq0xza/` (**it must start and end with /**; write it down) |
| Username / password | Set your own strong password (10+ random characters) |
| SSL Certificate Setup | choose **skip**, the certificate is set by hand in the next step |

The installer prints the panel details at the end. Confirm the service is up: `systemctl is-active x-ui`

## Step 7 Attach the certificate to the panel (on the VPS)

```bash
/usr/local/x-ui/x-ui setting -webCert /root/cert/fullchain.pem -webCertKey /root/cert/private.key
x-ui restart
```

Open `https://gia.yourdomain.com:8443/8fk2mq0xza/` and log in. The address bar should show a valid certificate and a lock icon.
**From now on the panel is reachable only through that domain and path, so keep the path private.**

## Step 8 Add the primary inbound: VLESS + WS + TLS (panel UI)

In the panel, go to the inbound list and click **+ Add Inbound**:

1. Remarks: `ws-tls-443`; Port: `443`; Protocol: `vless`.
2. Client: Email `ws-user`, let the ID generate itself, leave Flow empty.
3. Transport: `ws`; Security: `tls`.
4. TLS: choose **specify the certificate file paths**:
   - Public Key: `/root/cert/fullchain.pem`
   - Private Key: `/root/cert/private.key`
   - SNI / Server Name: `gia.yourdomain.com`; ALPN: `http/1.1`
5. WS Settings: set a custom Path such as `/ws5f8d2k1q`, which must differ from the panel path; Host: `gia.yourdomain.com`.
6. Save.

## Step 9 Add the backup inbound: VLESS + Vision + REALITY (panel UI)

Click **+ Add Inbound** again:

1. Remarks: `reality-2053`; Port: `2053`; Protocol: `vless`.
2. Client: Email `reality-user`, let the ID generate itself, and **set Flow to `xtls-rprx-vision`**.
3. Transport: `tcp`; Security: `reality`.
4. REALITY parameters:
   - Dest / Target: `www.microsoft.com:443`
   - SNI (Server Names): `www.microsoft.com`
   - Key pair: click **Get New Cert / generate key pair** and let it fill in Private Key and Public Key
   - Short ID: click the generate button to fill in one
   - Fingerprint: `chrome`; SpiderX: `/`
5. Save.

## Step 10 Verify

Confirm the listeners on the VPS:

```bash
ss -tlnp | grep -E ':(443|2053|8443)\b'
```

Check TLS from your own machine (openssl on Mac, openssl from Git Bash or a browser on Windows):

```bash
# Primary WS node (443): should return the Let's Encrypt certificate issued for your domain
echo | openssl s_client -connect gia.yourdomain.com:443 -servername gia.yourdomain.com 2>/dev/null | openssl x509 -noout -subject -enddate

# Backup REALITY (2053): for the disguised SNI it should return the real www.microsoft.com certificate
echo | openssl s_client -connect gia.yourdomain.com:2053 -servername www.microsoft.com 2>/dev/null | openssl x509 -noout -subject
```

On Windows you can instead open `https://gia.yourdomain.com:443` in a browser and check that the certificate is issued by Let's Encrypt. A protocol error page is expected there.

## Step 11 Import into a client

Each inbound in the panel exports a `vless://` link from its QR code or link button.

- **Windows: v2rayN** (download the zip with the core from GitHub Releases) → Servers → Import bulk URL from clipboard → paste the link → right-click the tray icon and pick the automatic system proxy option.
- **macOS: V2Box** (App Store) or FoXray → import the link from the clipboard → enable the VPN or proxy.
- Use the WS+TLS 443 node day to day, and keep REALITY on 2053 for clients that support it.

---

## Day-to-day maintenance

```bash
x-ui                 # management menu (ports, paths, resetting the account and more)
systemctl status x-ui
x-ui update          # panel upgrade
acme.sh --list       # certificates and their renewal dates
tail /var/log/x-ui/access.log    # xray access log (once enabled above)
cp /etc/x-ui/x-ui.db /root/x-ui-backup.db   # configuration backup (every inbound and account lives in here)
```

## Troubleshooting

| Symptom | What to do |
|---|---|
| A freshly bought server has every port closed | Check the provider's **Cloud Firewall** first and allow 80/443/2053/8443 (Step 1.5). This is the most common trap on the pre-installed image route |
| The client cannot connect to REALITY | If `ss -tlnp \| grep 2053` shows a listener on the VPS, compare the client's pbk/sid/sni/fingerprint with the panel (fingerprint must not be empty), check that Flow is xtls-rprx-vision, and keep the device clock within 2 minutes; `authentication failed` in `/var/log/x-ui/error.log` means a client handshake parameter problem |
| The WS node does not connect | Check that the domain is grey cloud and direct, that path and host match, and read certificate errors with `journalctl -u x-ui -n 50` |
| The panel does not open | Check port 8443, the trailing slash in the path, and `systemctl is-active x-ui` |
| Certificate renewal fails | Usually an expired CF token or a changed IP allowlist: run `export CF_Token=...` again, then `acme.sh --renew -d gia.yourdomain.com --ecc --force` |
| Renewal suddenly fails with `Invalid API Token` from `user/tokens/verify` | This is not necessarily the IP allowlist. The CF token itself may have expired or been revoked, and testing from the IP it was bound to returns the same error. Generate a new token in the Cloudflare dashboard and set the allowlist again as in Step 4.2 |
| The VPS IP gets blocked | Turn the `gia` record to orange cloud in Cloudflare, and the primary WS node on 443 works through the CDN right away (the panel on 8443 the same way). The REALITY backup node does not work in this mode |
| A chained proxy tests fine but every site fails, with the client port already confirmed | This usually happens when the node acts as the entry point and a SOCKS5 landing proxy, such as an ISP Proxy from [IPRoyal](https://iproyal.com), acts as the exit: device → entry node → SOCKS5 exit → target site. Work through it in this order:<br>**1. Rule out the wrong entry port first.** The entry port in the client chain must be 443, not 8443, which is the panel port. `journalctl -u x-ui --since '10 min ago' \| grep 'bad certificate'` shows the traces of a client pointed at 8443.<br>**2. If the port is right and it still fails, the problem is almost always the landing proxy, not this node.** Test the landing proxy on its own from the VPS with a raw Python socket that performs the SOCKS5 handshake and a CONNECT to the target domain, following RFC1928, and read the REP code it returns: `0x00` means allowed, `0x02` means the proxy itself rejected that target by its own rules.<br>**3. With ISP or residential proxies such as IPRoyal, a single exit port degrades and stops working over time.** That is a known stability trait of this class of service rather than a configuration mistake. Switching to another port or IP inside the same plan in the provider dashboard usually restores it immediately, without rebuilding the entry node or changing the VPS IP, which is mostly wasted effort because the problem was never on the entry side |

## Security notes

- Random panel path plus a strong password; 3x-ui rate limits logins itself (five failures lock it for 15 minutes).
- Give the CF API token DNS edit rights on one zone only, and pin it to the VPS IP allowlist.
- The IP can change if you reinstall the system, so update the A record and the token allowlist together.
- Run `x-ui update` regularly, and shut the VPS down when you will not use it for a long stretch.
- When an AI agent runs this: pass tokens and passwords through interactive input or a protected key file, and keep them out of logs, documents and conversation history.
- If you use SSH key authentication at purchase, protect the provider account password, because anyone who gets into the console can reinstall your system.

## How this differs from the 2023 guide

| Old article (2023) | This SOP (2026) |
|---|---|
| Manual EAB certificate signing on freessl.cn | acme.sh with the Cloudflare DNS API, automatic renewal |
| slobys/x-ui (no longer maintained) | 3x-ui (maintained, ships rate limiting and fail2ban) |
| A single VLESS+WS+TLS inbound | WS+TLS on 443 as the primary node, which can move behind CDN, plus REALITY on 2053 as backup |
| BBR installed by the Linux-NetSpeed script | Native kernel sysctl, two lines of config |
| Ports opened by hand with iptables | No firewall by default; open 443/2053/8443/80 only where a firewall exists |
| Panel on HTTP, reached by IP | Domain, random path, HTTPS with a valid certificate |

> Disclaimer: this document is for technical learning and personal legitimate use. Follow the laws and regulations that apply to you and the terms of your VPS provider.
Step 6: Let the Agent Run the Deployment
Move into the project folder:
cd vps-node-agent
Start your agent and point it at SOP.md in the current folder. This prompt works as it is:
Read SOP.md in the current folder and complete the VPS node deployment following that document. Requirements:
1. Connect to the VPS
2. Initialise the server environment
3. Install the required components
4. Configure Xray
5. Configure TLS
6. Create the VLESS inbound
7. Print the client configuration link
8. Credentials are in .env, never print them in plain text
9. Create and maintain CLAUDE.md (or AGENTS.md) and PROGRESS.md for the task
When it finishes, the agent prints the VLESS URI and the node details.
Step 7: Verify the Node
You should now hold a VLESS link that looks like vless://xxxx. Import it into a client and the node is ready to use.
- macOS: Shadowrocket, V2Box
- Windows: v2rayN, Clash Verge
Open a few sites through the node to confirm it connects before you move on to the extension in the next section.
The Whole Flow in Seven Steps
The run from buying a server to holding a working node compresses into seven steps.
The workflow in seven steps
What You Need
VPS, domain, Cloudflare, agent
Buy a VPS
KVM 1 on a 24-month term
Get the Login Details
IP, SSH username, root password
Set Up the Domain
DNS record plus API token
Prepare the Folder
Write .env and SOP.md
Run the Agent
From initialisation to inbound
Verify the Node
Import a client and connect
Next Step: Chaining an ISP Residential Proxy
The node settles the entry point. The exit IP is what decides the region platforms see you as. If the setup is only for reading documentation and running business tools, this is where you stop. If you also run social media accounts, put an ISP residential proxy behind the node, which produces this structure:
How a chained proxy connects
Your Computer
Local client
→
VLESS Node
Handles entry speed
→
Residential Proxy
ISP Residential Proxy
→
Target Platforms
TikTok, Facebook and more
The next step supplies the exit: buying a fixed ISP residential IP from IPRoyal, after which we wire the chained proxy up in Shadowrocket and Clash Verge.
every Thursday.
Hosting reviews, builder comparisons, performance tips, and plugin picks — curated weekly for WordPress site owners and builders.