Table of Contents

How to Connect Your Website to Google Search Console and Submit a Sitemap?

Setting up Google Search Console and submitting your sitemap is essential for optimizing your website’s SEO. Begin by creating a Google account, then log in to Google Search Console and add your domain or URL prefix. Verify ownership by adding a TXT value to your DNS settings. Once verified, submit your sitemap to help Google index your pages more efficiently. Google Search Console provides valuable insights into your site’s performance, indexing status, and potential issues, allowing you to refine your SEO strategies and improve your site’s visibility in search results.

When your website is complete and you’re ready to start SEO, to know the Google Search Console setup and submit your sitemap is a crucial step. Google Search Console is a free tool that helps webmasters monitor their site’s performance in Google Search. It can be used for various SEO tasks, including:

  1. Checking if your site is indexed and displayed correctly in search results. You can view the number of indexed pages, the number of clicks and impressions your site receives, and the average ranking.
  2. Identifying and fixing website errors. Search Console notifies you of errors that may affect your site’s ranking, such as broken links, image loading issues, and mobile usability problems.
  3. Understanding your website traffic. You can see where your visitors are coming from, the search terms they use, and the pages they visit.
  4. Submitting your sitemap. A sitemap is a file that contains links to all pages on your site. Submitting a sitemap helps Google find and index your pages more quickly and easily.
  5. Monitoring changes over time. Search Console provides various historical data on site performance, helping you identify trends and measure the effectiveness of your SEO efforts.

Steps of Google Search Console Setup, and Submit your Sitemap

Prepare a Google Account

Step 1: First, you need a Google account.

Search GSC

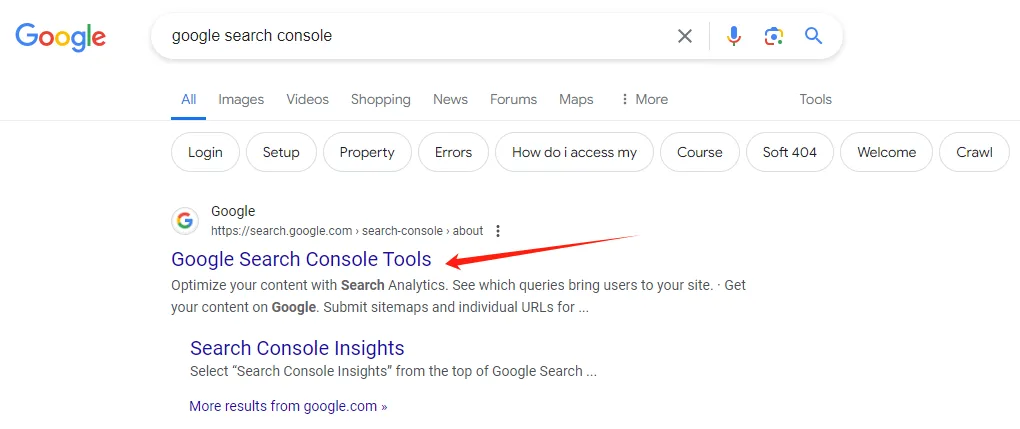
Step 2: Search for Google Search Console on Google and click on Google Search Console Tools.

Google Search Console Setup Step 1 Google search for Google Search Console

Start GSC

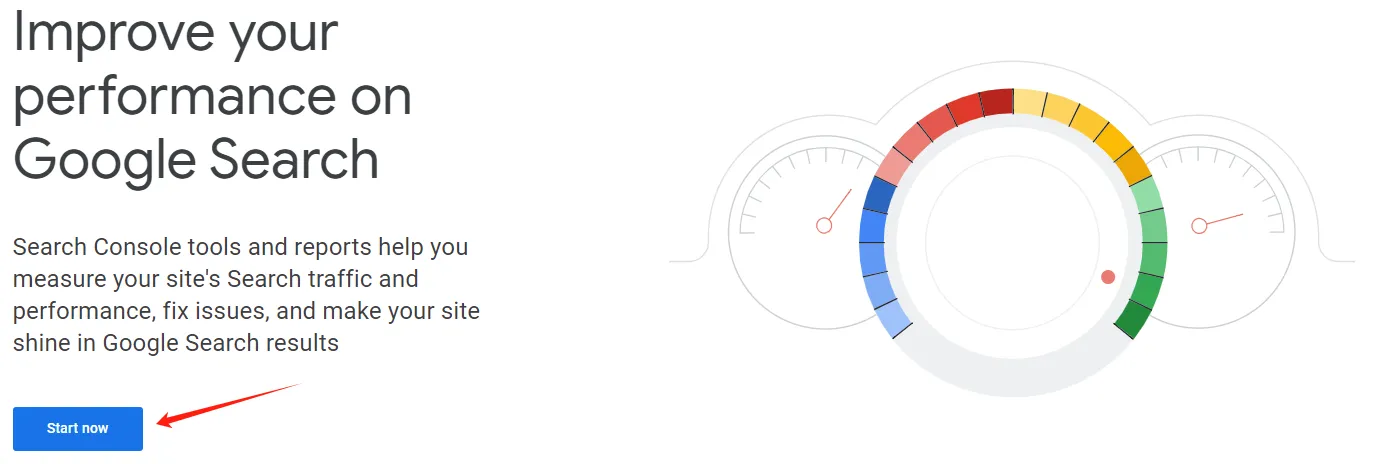
Step 3: Click the “Start Now” button.

Click Start Now button on Google Search Console

Select Property Type

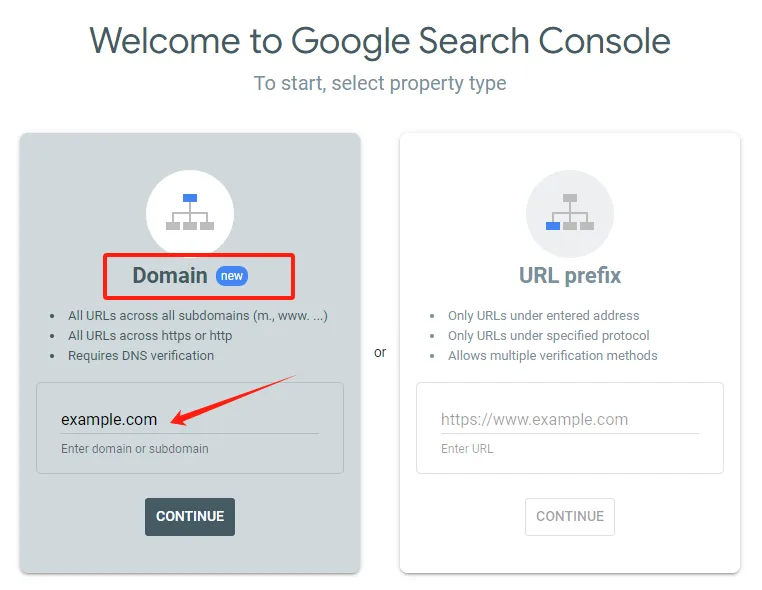
Step 4: Enter your domain in the “Domain” section and click “CONTINUE”.

Domain property type is suitable for websites with subdomains. By adding the Domain property type, such websites can cover the entire domain and all subdomains for comprehensive monitoring and management. However, a drawback is that you cannot use Google’s disavow feature to disavow backlinks.

For most websites, simply adding a URL prefix as the property type is sufficient.

Regardless of which method you choose, the subsequent verification steps are the same. You can also add both property types, and the data you see in Google Search Console for each type will be different.

Select add domain in Google Search Console

Domain

  • Adding a domain allows you to submit your primary domain and all its subdomains to Google Search Console. This lets you see overall data about your entire website, including:
    • Clicks and impressions
    • Average ranking
    • Common search terms
    • Traffic sources from Google Search
  • After adding a domain, you can also set up various tools to monitor and manage your site’s performance, such as:
    • Coverage report: Identifies any crawling or indexing errors on your site.
    • URL Parameters tool: Tells Google how to handle URL parameters on your site.
    • Links tool: Views links pointing to your site.

URL Prefix

  • Adding a URL Prefix allows you to submit your primary domain and all subdomains with a specific prefix to Google Search Console. This is useful for sites with different versions (e.g., desktop and mobile) or using different subdomains.

Copy the Given TXT Value

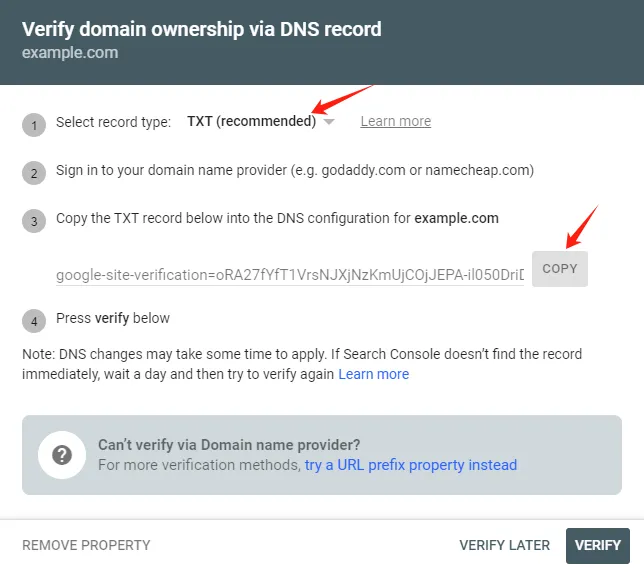
Step 5: In the pop-up window for domain ownership verification, follow the setup suggestions to complete the verification. It is recommended to use the TXT method. Click “COPY” to copy the TXT value.

Verify ownership of the added domain in Google Search Console

Add the Given TXT Value

Step 6: Add this TXT value in your DNS settings. Here’s how to add TXT values in SiteGround and Hostinger’s DNS Zone Editor:

Siteground

Log in to SiteGround, select the website you need to add the TXT value to, and click “SITE TOOLS”.

Click website site tools in SiteGround

Click “DNS Zone Editor” under the Domain section, select TXT, paste the copied TXT value into the “Value” field, and click “Create”.

Add TXT value in DNS Zone Editor in SiteGround

The propagation can take up to 48 hours, but generally, you can click “VERIFY” after a few minutes to complete the verification.

Verify ownership of the domain in Google Search Console
Domain ownership successfully verified in Google Search Console

Hostinger

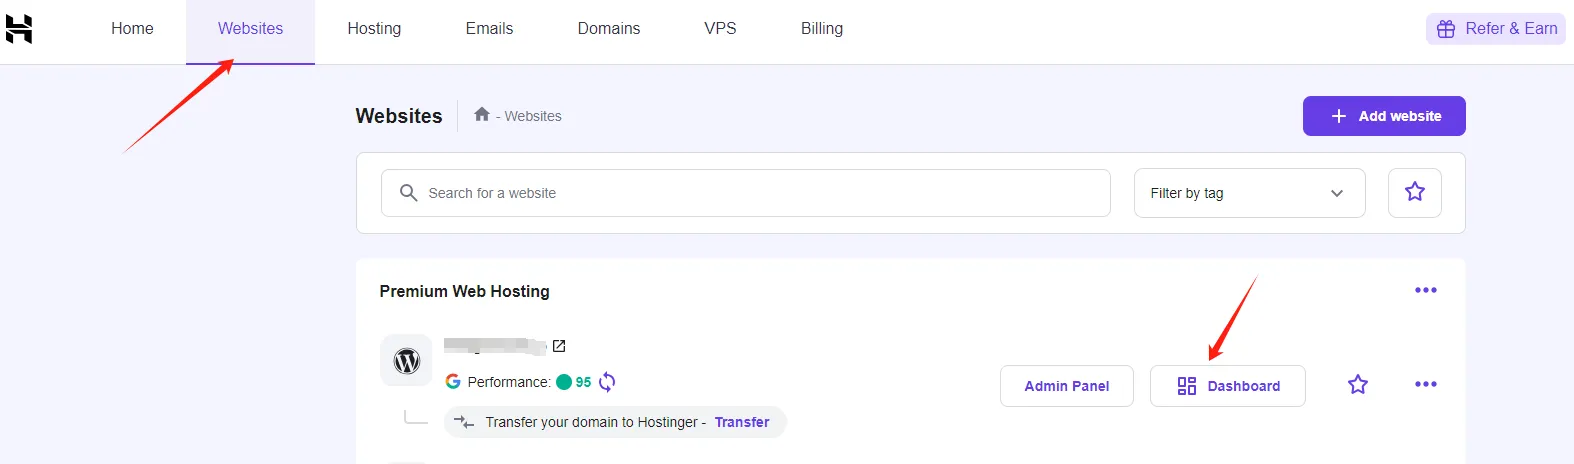
Log in to Hostinger, select the website you need to add the TXT value to, and click “Dashboard”.

Click website dashboard in Hostinger

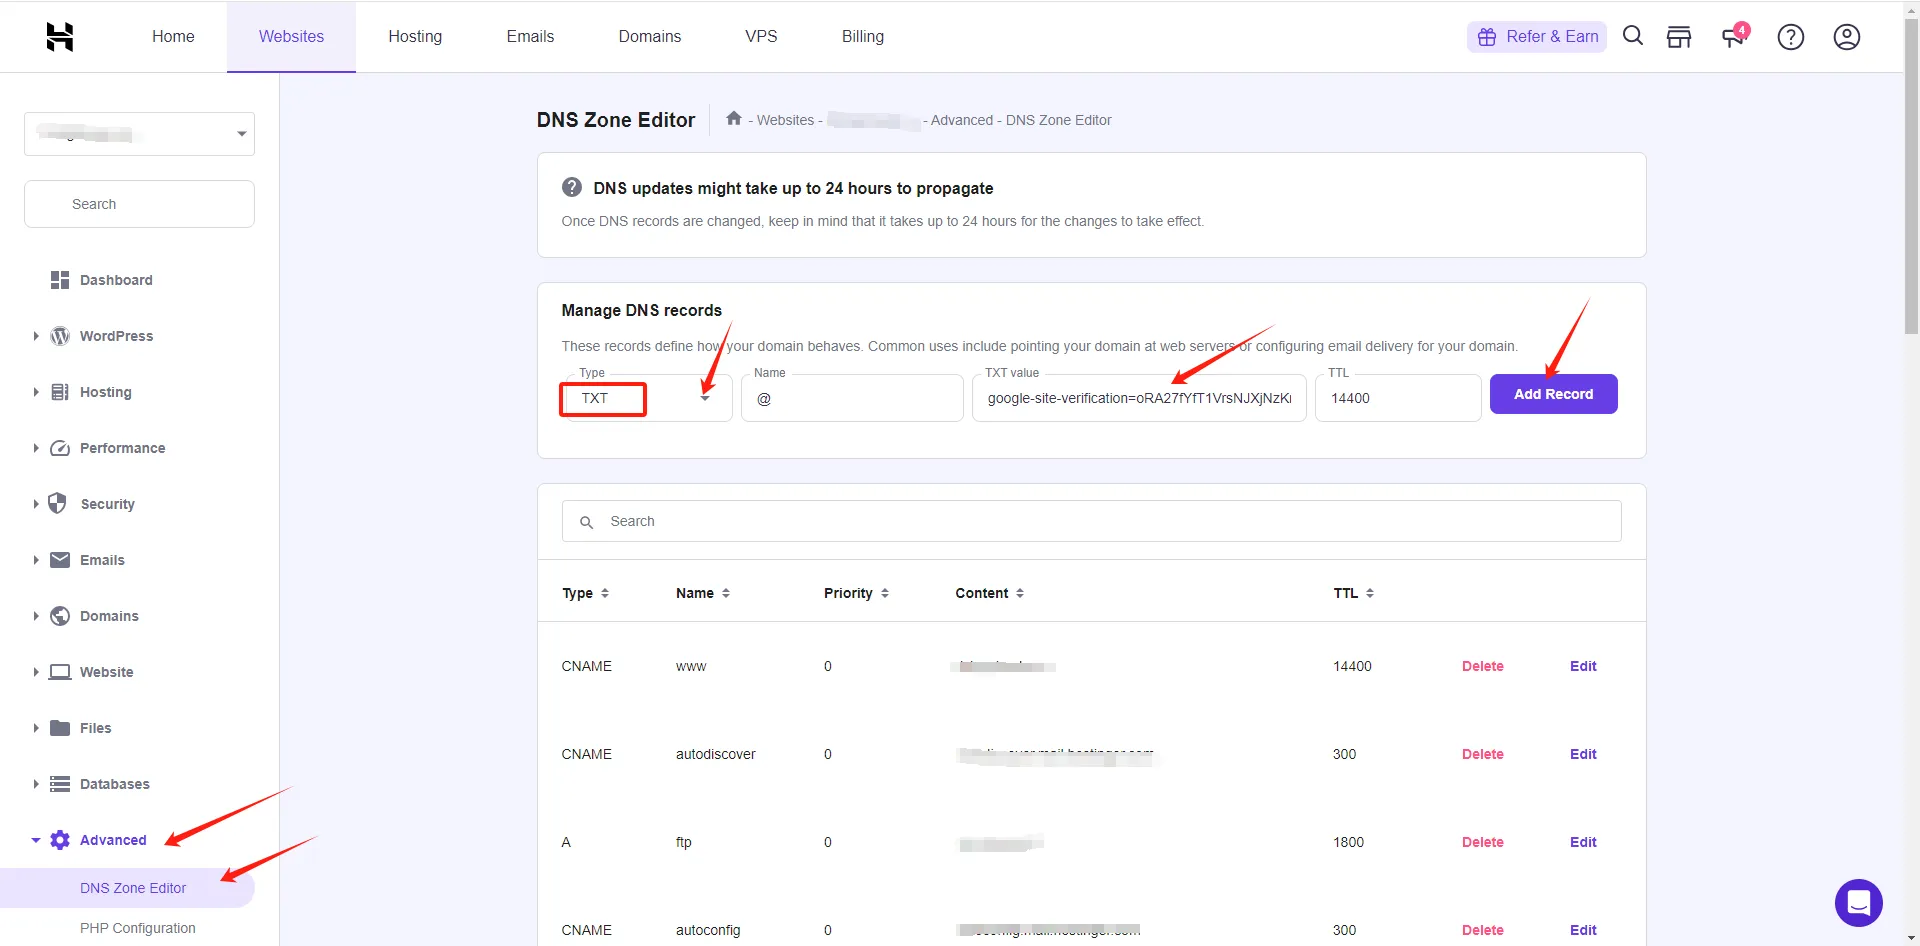
Click “DNS Zone Editor” under the Advanced section, select DNS records type as TXT, paste the copied TXT value into the “TXT Value” field, and click “Add Record”.

Add TXT value in DNS Zone Editor in Hostinger

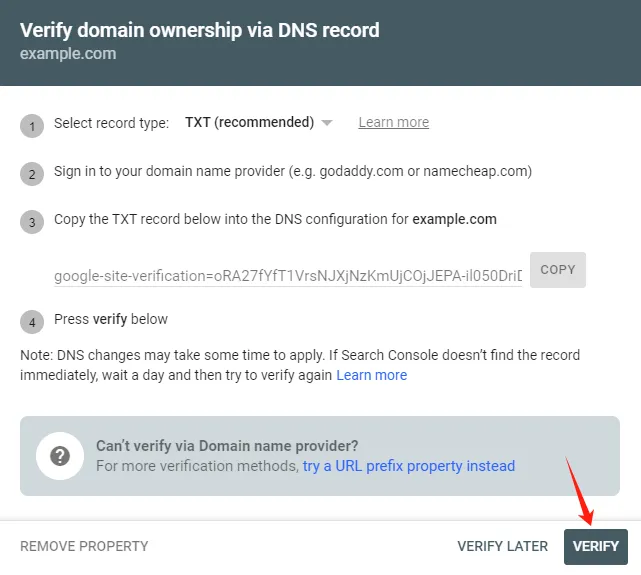
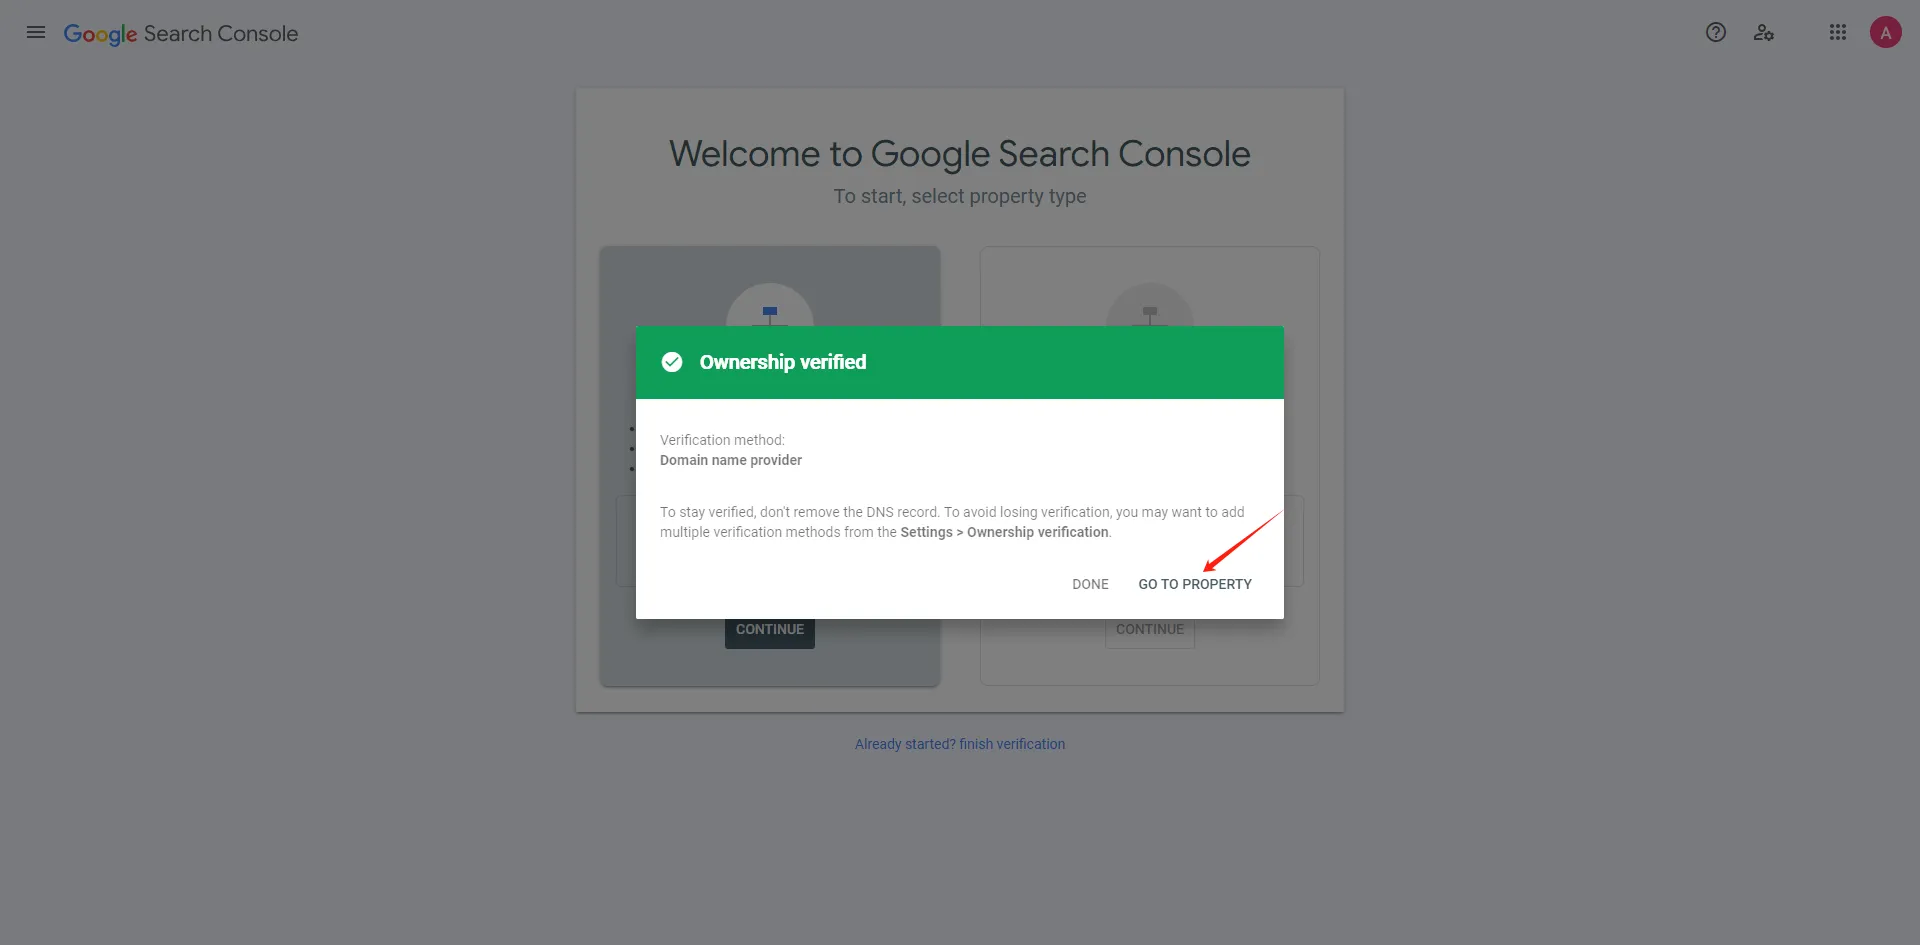
The propagation can take up to 48 hours, but generally, you can click “VERIFY” after a few minutes to complete the verification. Now you have finished the google search console setup, let’s move to next step – submit your sitemap.

Verify ownership of the domain in Google Search Console
Domain ownership successfully verified in Google Search Console

Submit Your Sitemap

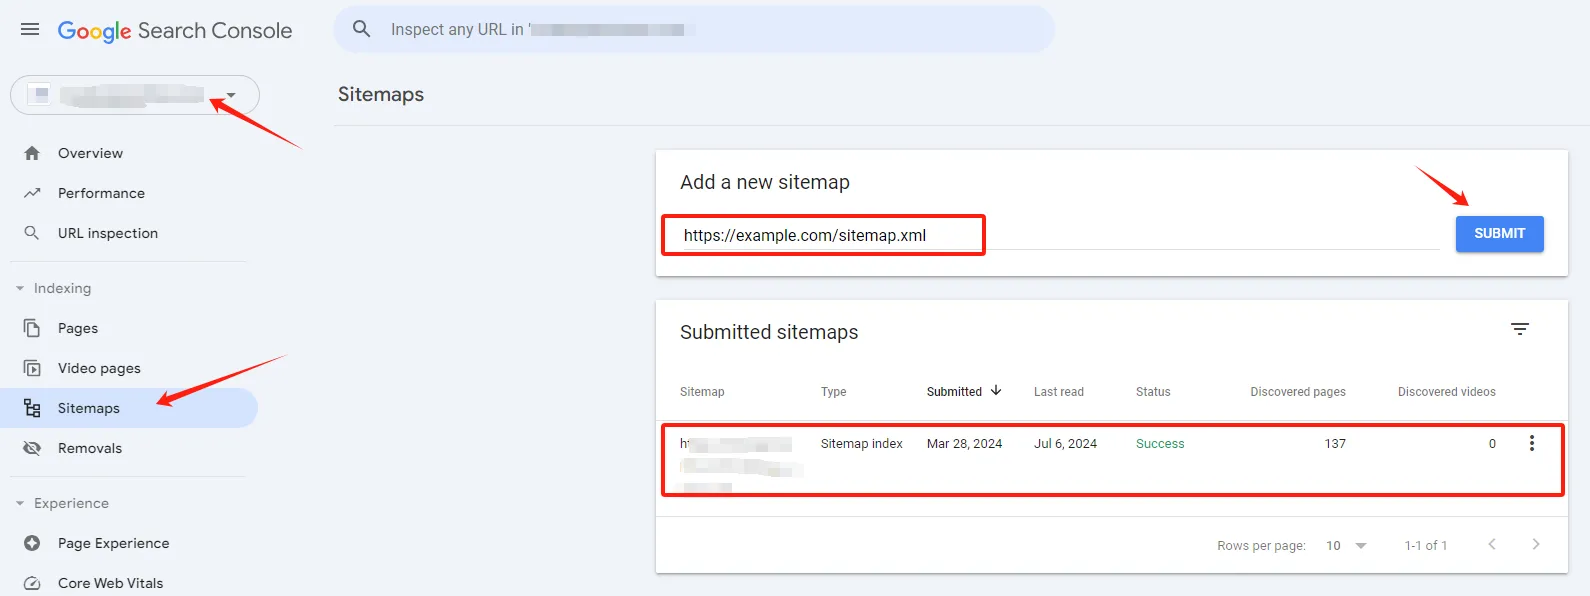
Step 7: Once verified, submit your sitemap. Select your property (domain), and click “Sitemaps” in the left sidebar. Generally, the sitemap format should be https://example.com/sitemap.xml. However, some SEO plugins (like Yoast SEO) might generate different formats, such as https://example.com/sitemap_index.xml, so make sure to submit the correct format.

The last step of google search console setup - submit your sitemap

Check Discovered Pages

Step 8: After submitting the sitemap, wait a while, and you will see the number of discovered pages in the “Discovered pages” section. Over time, Google Search will gradually index the pages.

Mastering the google search console setup and knowing how to submit your sitemap are crucial steps in optimizing your website for search engines. Google Search Console is an invaluable tool for webmasters, offering insights into your site’s performance and helping you identify and fix potential issues. By understanding your site’s indexing status, monitoring website errors, and analyzing traffic data, you can enhance your SEO strategies and improve your site’s visibility in search results.

By following the steps of google search console setup outlined in this guide, you will be able to efficiently set up Google Search Console and submit your sitemap. This will enable Google to find and index your pages more quickly and easily, providing you with comprehensive data to fine-tune your digital marketing efforts. Start using Google Search Console today to take full control of your website’s performance and ensure its success in the competitive online landscape.

author avatar
Danny SEO
Danny Ni is an experienced SEO specialist with expertise in WordPress and digital marketing. Currently working at a company, he is responsible for SEO optimization, website development, and managing multiple social media platforms. With a strong focus on SEO, WordPress, and digital marketing, Danny helps businesses enhance their online presence and grow their digital footprint.

Share on:

Share on: