Buying the residential IP is only half of it, it still has to be wired into a client. This walkthrough chains an entry node and an ISP residential IP together: Shadowrocket on iPhone and Mac for the Socks5 credentials and the exit check, then Clash Verge Rev on Windows, where the node becomes a YAML profile, the ISP node is added by hand and Chain Proxy links the two in order.
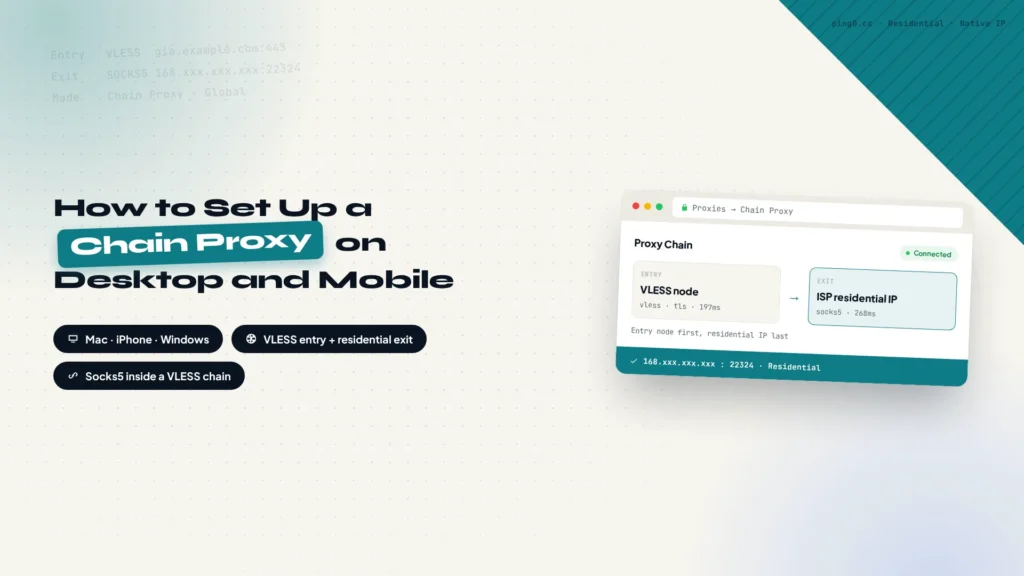
A chain proxy runs two nodes in sequence: traffic leaves through the entry node first, then lands on the exit IP. The entry is the dedicated VLESS node you built on your own server with an AI agent, and the exit is the fixed ISP residential IP you bought from IPRoyal. The order cannot be reversed. The entry node comes first and the residential IP comes last, because the platform sees the second address, and flipping them leaves the platform looking at a datacenter IP again.
Compared with running straight off a datacenter node, a residential IP is registered to a local ISP and looks like an ordinary home broadband connection to the platform. When you run social media accounts, or sign up for services that are strict about account risk such as ChatGPT and Claude Code, a datacenter IP is easy to flag as an abnormal environment and the signup often stalls at verification. A residential IP trips those checks far less often. Shadowrocket covers iPhone and Mac, Clash Verge Rev covers Windows. The two parts stand on their own, so read whichever one matches the device you work on.
Setting It Up on macOS and iPhone With Shadowrocket
Step 1: Install Shadowrocket
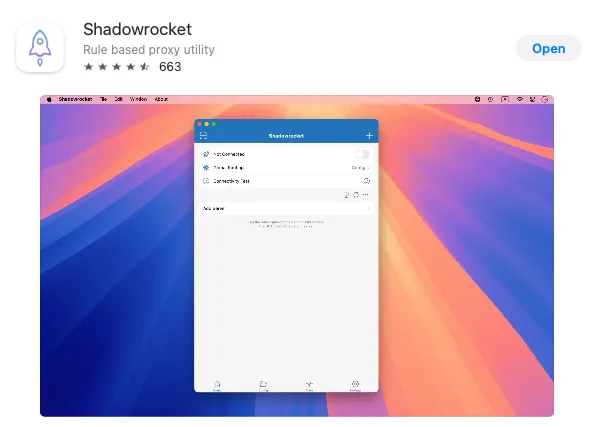
Search for Shadowrocket in the App Store and install it. The same app covers Mac and iPhone, so one purchase covers both. It is not available in the mainland China App Store, so sign in with an Apple Account from another region first. The full walkthrough for that is in How to Subscribe to ChatGPT and Claude Code Without a Credit Card.
Step 2: Import the VLESS Node
Copy the VLESS share link, or have your agent generate a QR code for it. Shadowrocket checks the clipboard on launch and asks whether you want to import what it finds, so confirming the prompt is enough. Importing by QR code works the same way.
Step 3: Add the ISP Residential IP as a Second Node
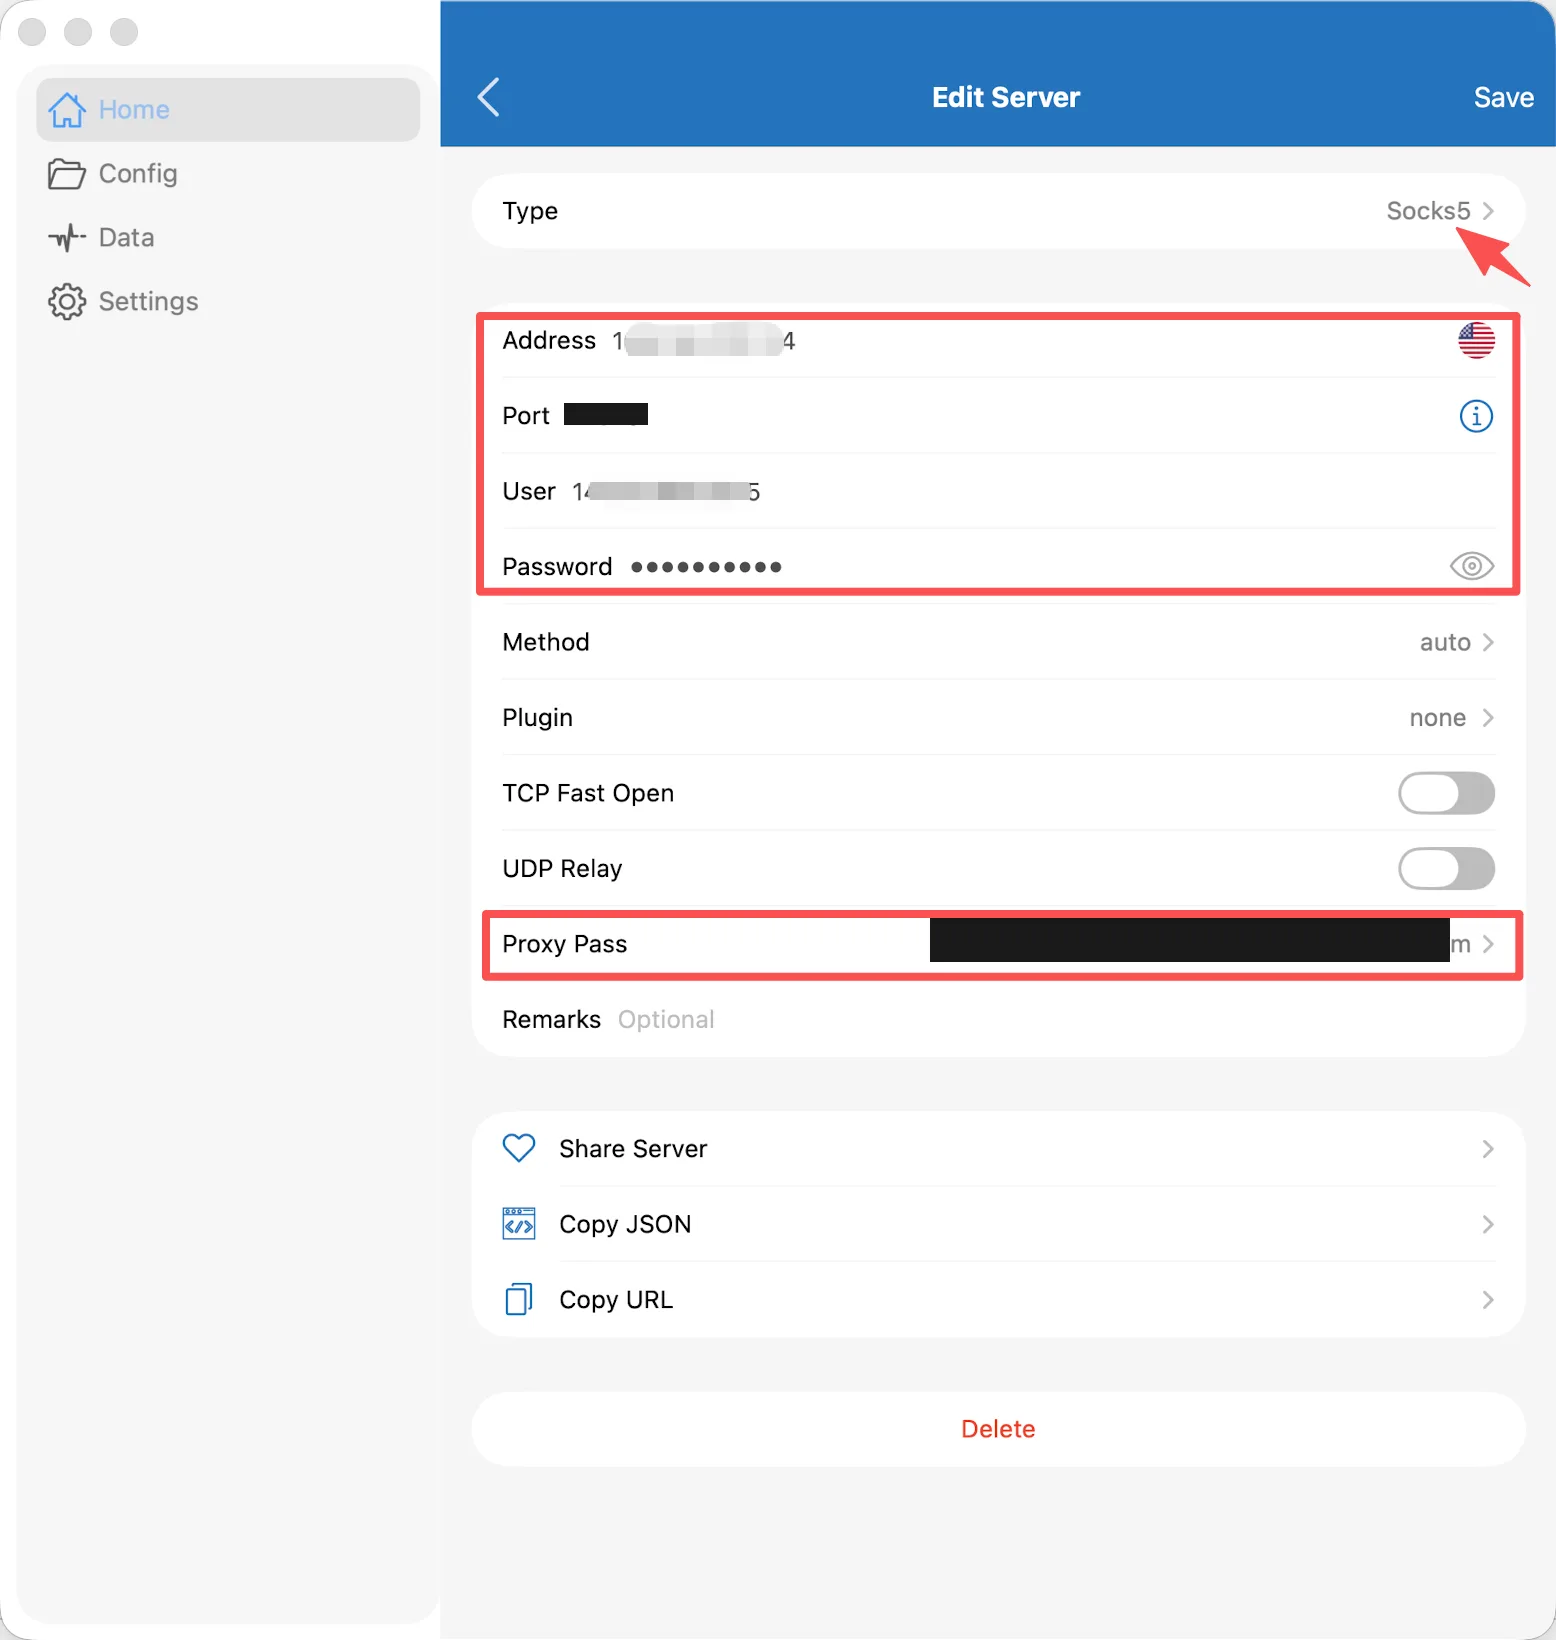
Tap the plus button in the top right to add a server, set the type to SOCKS5, paste in the four credentials from your IPRoyal dashboard, then point Proxy Pass at the node you imported in Step 2. The form fields go like this:
- Type: SOCKS5
- Address or Host: the ISP IP address you bought
- Port: the port shown on your order, for example 1080
- User: the username on your order
- Password: the password on your order
- Proxy Pass: the VLESS node imported in the previous step
Tap Save in the top right when the fields are filled in.
Proxy Pass Is What Makes It a Chain
In Shadowrocket a server can use another server as its front hop. Once Proxy Pass is set, the ISP IP does not dial out directly: requests go through the VLESS node you selected first and land on the residential IP afterwards. Leave that field empty and the client connects straight to the ISP proxy, which means the node is not in the path at all and the entry speed it provides is wasted.
Step 4: Test the Nodes and Select the ISP IP
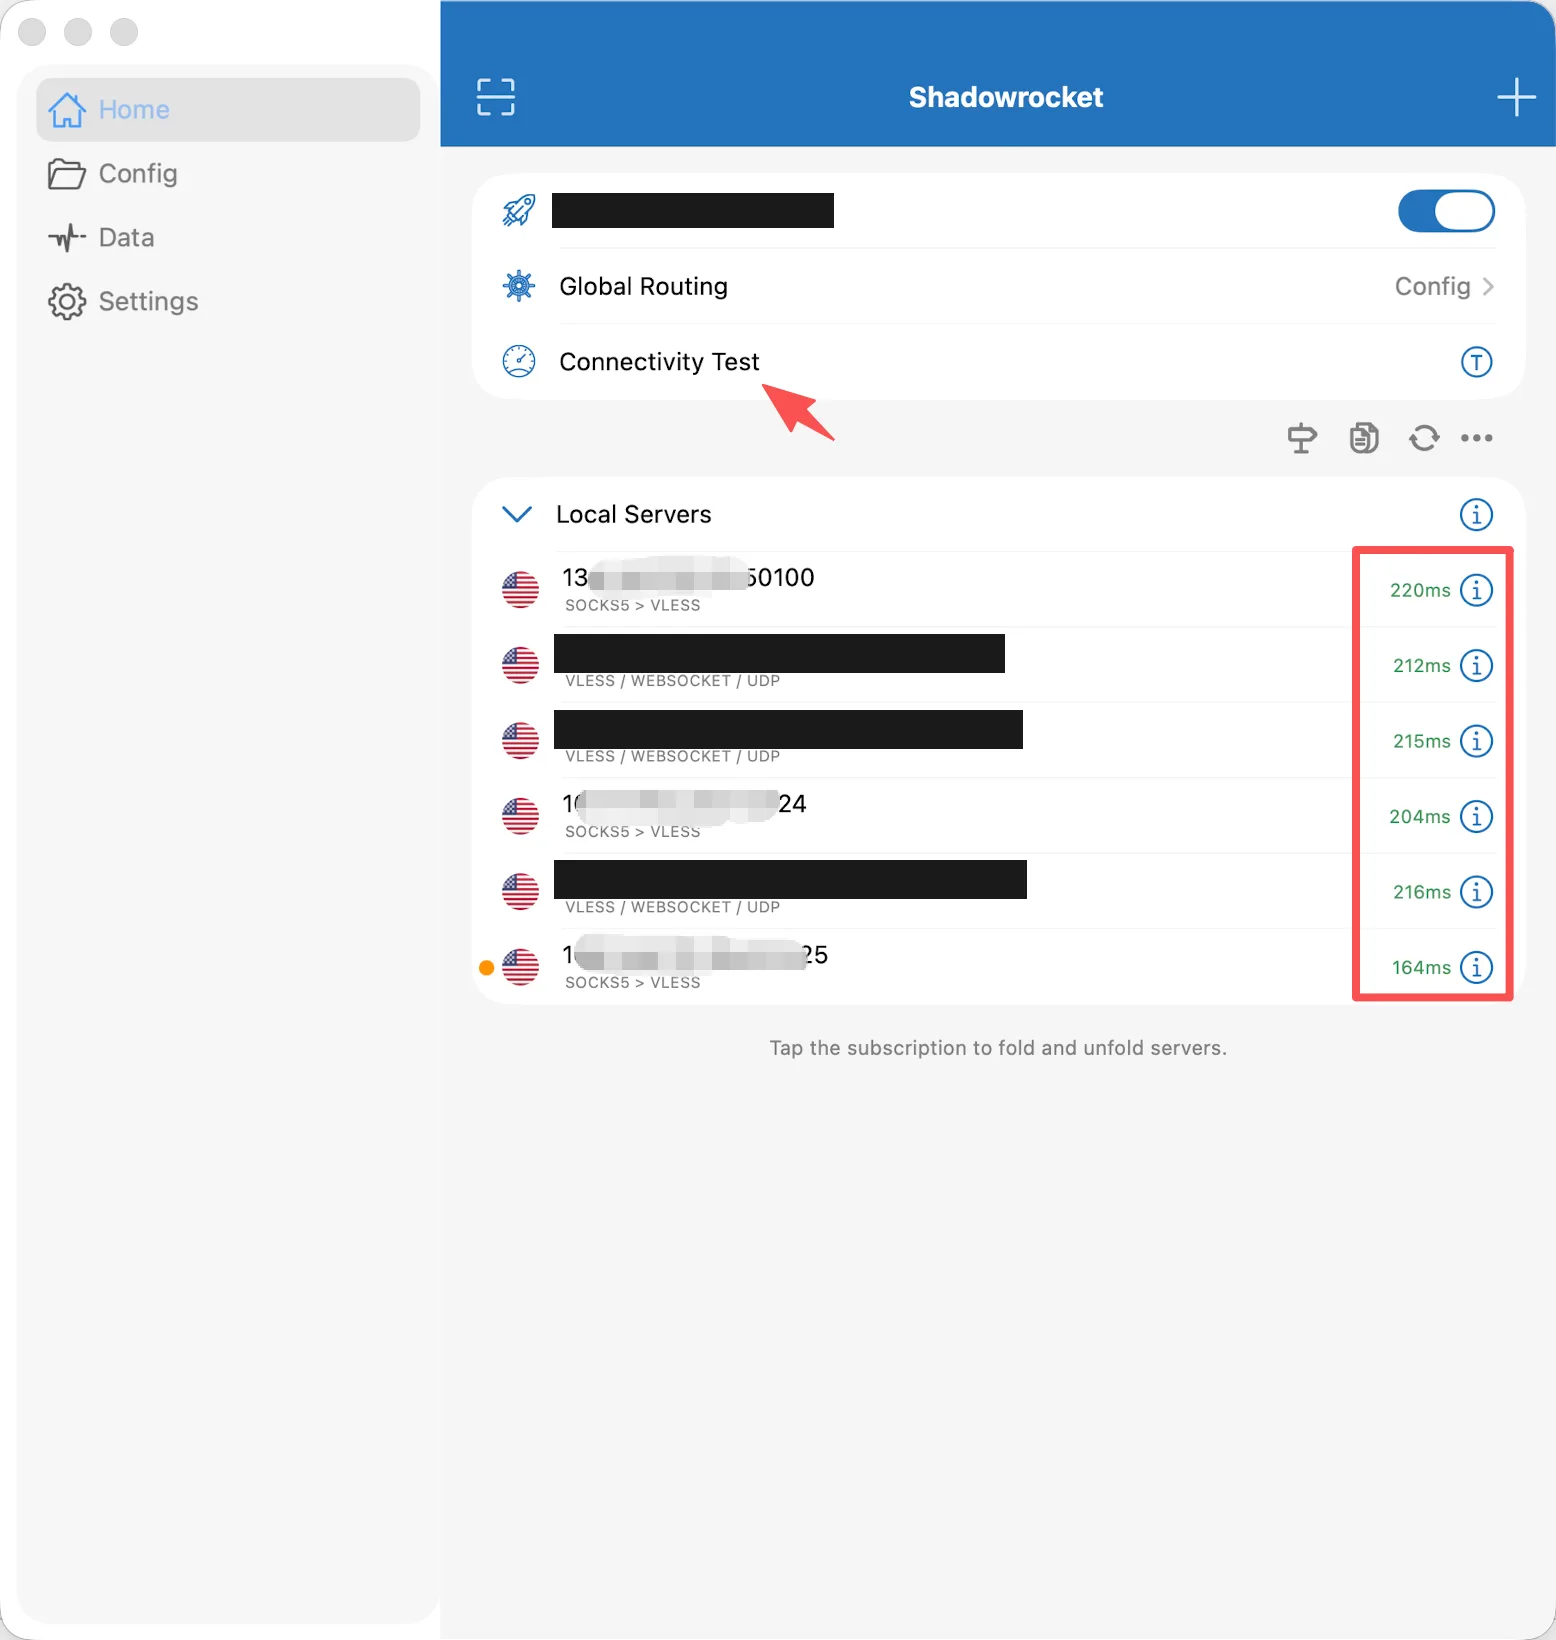
Go back to the home screen and tap Connectivity Test. Each node shows a latency figure on the right. A green millisecond number means the connection is up, while Timeout means it is not. Once the test finishes, select the ISP IP node as the active proxy. The current node at the top of the home screen becomes the address and port you just entered.
Step 5: Confirm the Exit Is a Residential IP
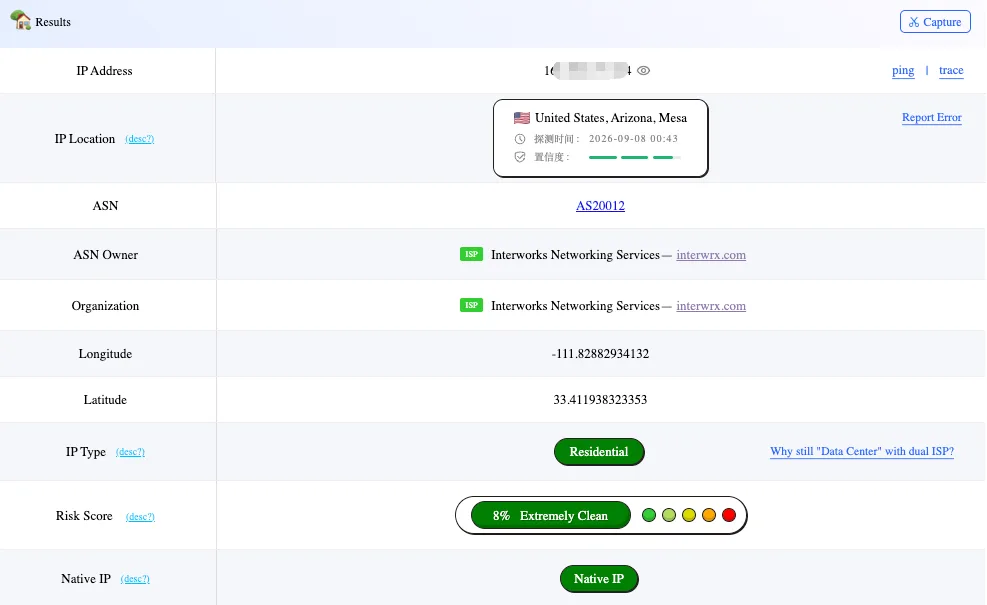
Open an IP lookup site such as ping0.cc and check four things: the IP address should be the residential IP you bought rather than the node’s datacenter address, IP Type should read Residential, Risk Score should be a low percentage marked Extremely Clean, and Native IP should be green. When all four line up, the chain is working and the exit really is a residential address.
Setting It Up on Windows With Clash Verge Rev
Step 1: Convert the VLESS Node Into Clash YAML
Clash Verge Rev reads a YAML profile and does not accept the share link Shadowrocket uses, so convert the node to YAML and save the file locally first. The Proxy Config Converter on this site handles it: paste the VLESS share link, pick Clash as the output format and download the generated file.
Step 2: Import the Profile Into Clash Verge Rev
Download and install Clash Verge Rev, then open Profiles in the left sidebar and click the new profile button in the top right. Choose Local as the type, upload the YAML file you just downloaded and save. A new entry appears in the list, and that entry is your node.
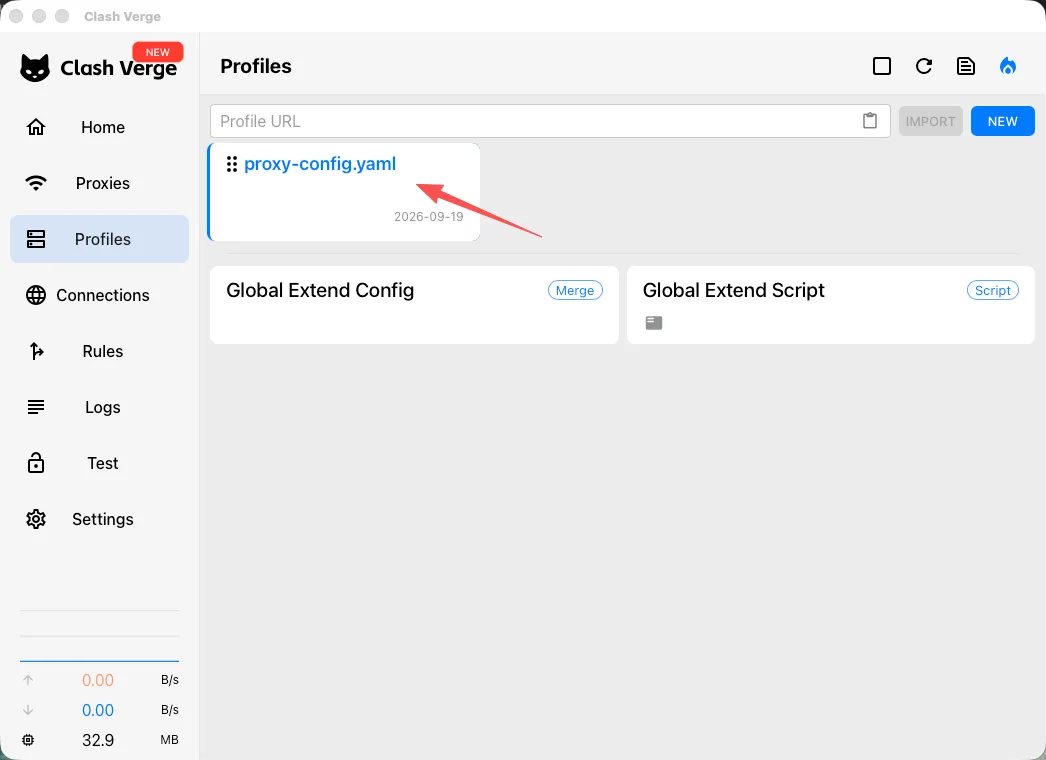
Step 3: Edit the Profile and Add the ISP Node
Still on the Profiles screen, right click the imported profile and choose Edit File to open the YAML editor.
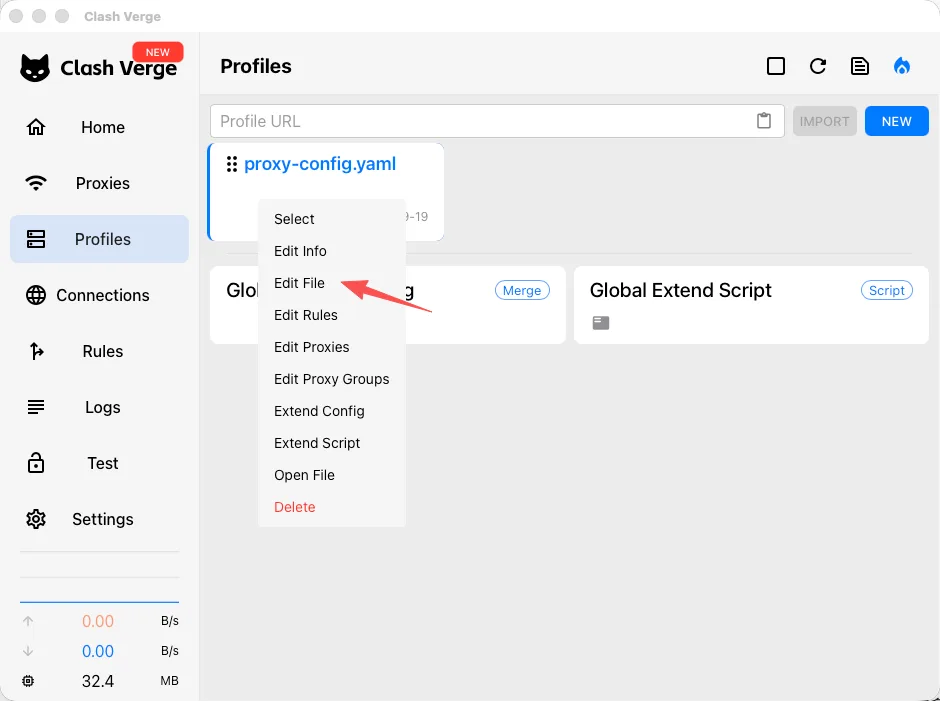
The profile has three sections: proxies holds the nodes, proxy-groups holds the node groups, and rules holds the routing rules.
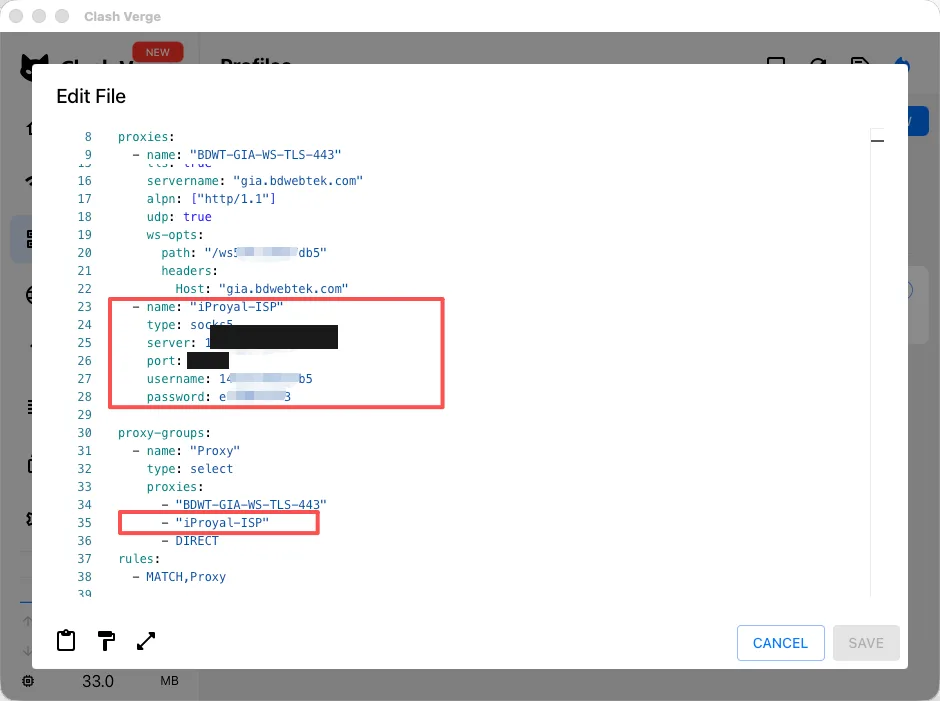
Add the ISP proxy to the proxies section:
  - name: "iProyal-ISP"
    type: socks5
    server: 168.xxx.xxx.xxx
    port: 1080
    username: 14xxxxxxxx5
    password: exxxxxxxx3
Then add the new node to the group’s proxies list under proxy-groups:
- "iProyal-ISP"
Click Save at the bottom of the editor when you are done.
Step 4: Chain the Entry and Exit Nodes
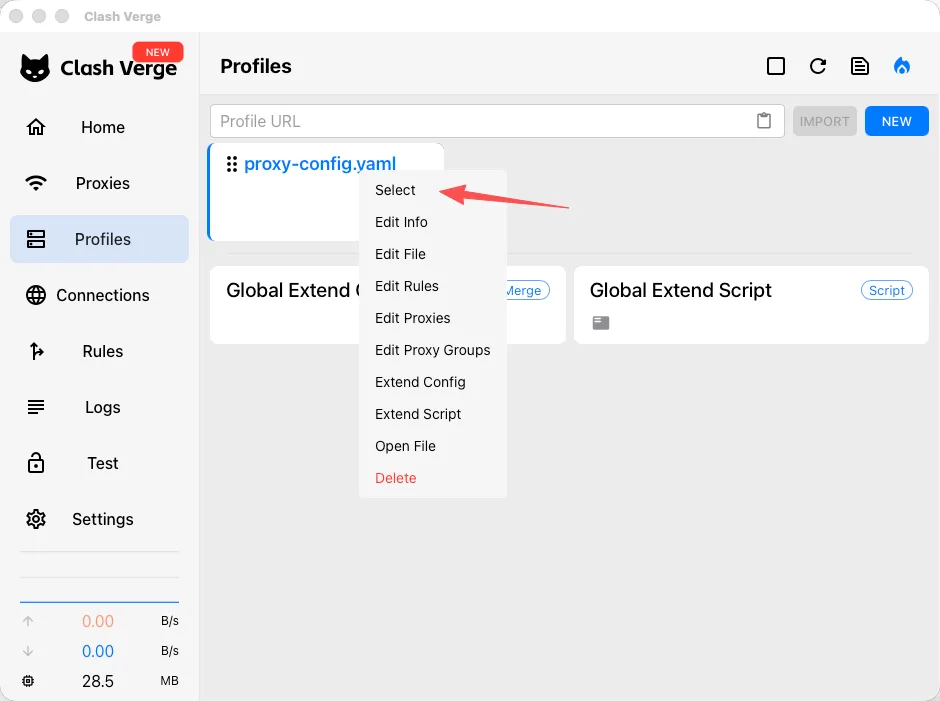
Back on the Profiles screen, right click the profile and choose Select to make it the active one.
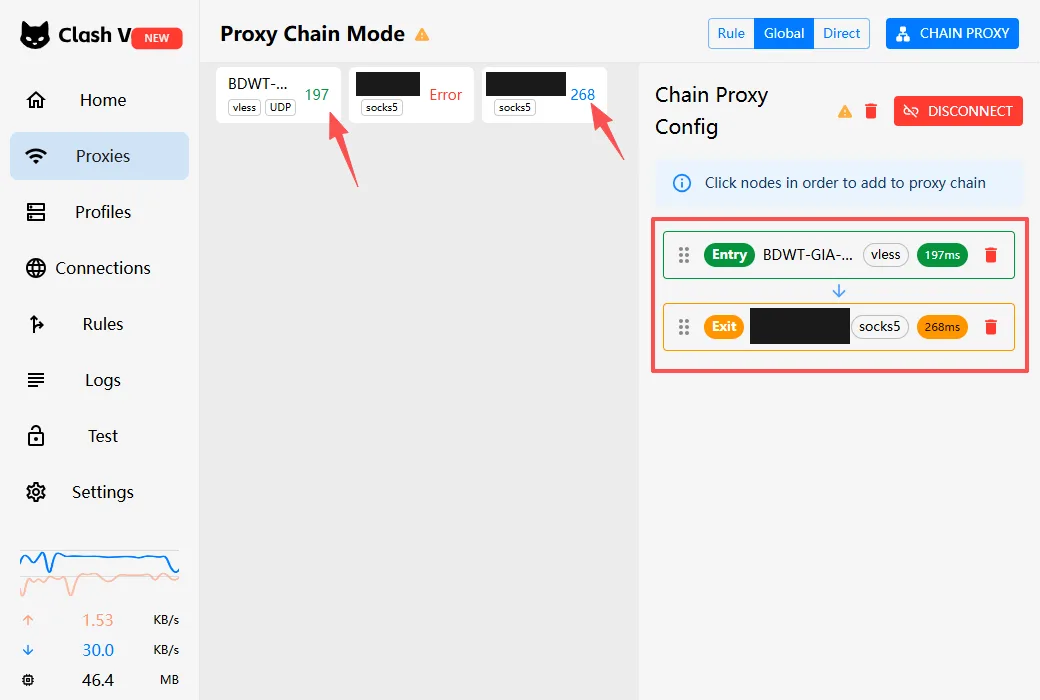
Then open Proxies in the left sidebar and click Chain Proxy in the top right. Click the two node cards in order: the entry VLESS node first, then the ISP Socks5 node. The Chain Proxy Config panel above shows Entry and Exit, matching the order you clicked in.
Click Check on both nodes to see their status. A latency number means the connection is up.
PRO TIP Swap the Port When the Exit Times Out
The ISP node occasionally shows Timeout. Change the port on the IPRoyal order first, update the port value in the profile and retry, since most timeouts clear up with a different port. If that does not help, request a different IP address or ask support to look at the current one.
Step 5: Turn On System Proxy and Tun Mode, Switch to Global
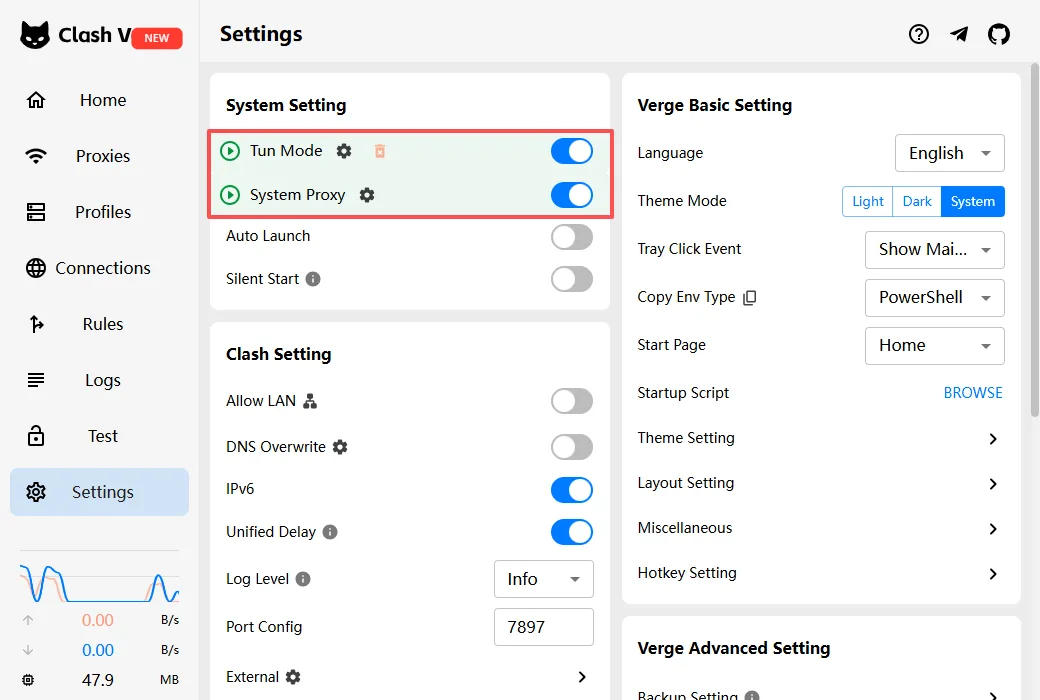
Open Settings in the left sidebar and turn on both System Proxy and Tun Mode.
WARNING Install the Service Before Enabling Tun Mode
Tun Mode depends on a system service, so flipping the switch the first time will fail. Click the small wrench button next to the switch to install the service first, which asks for administrator rights, and the switch will work afterwards.
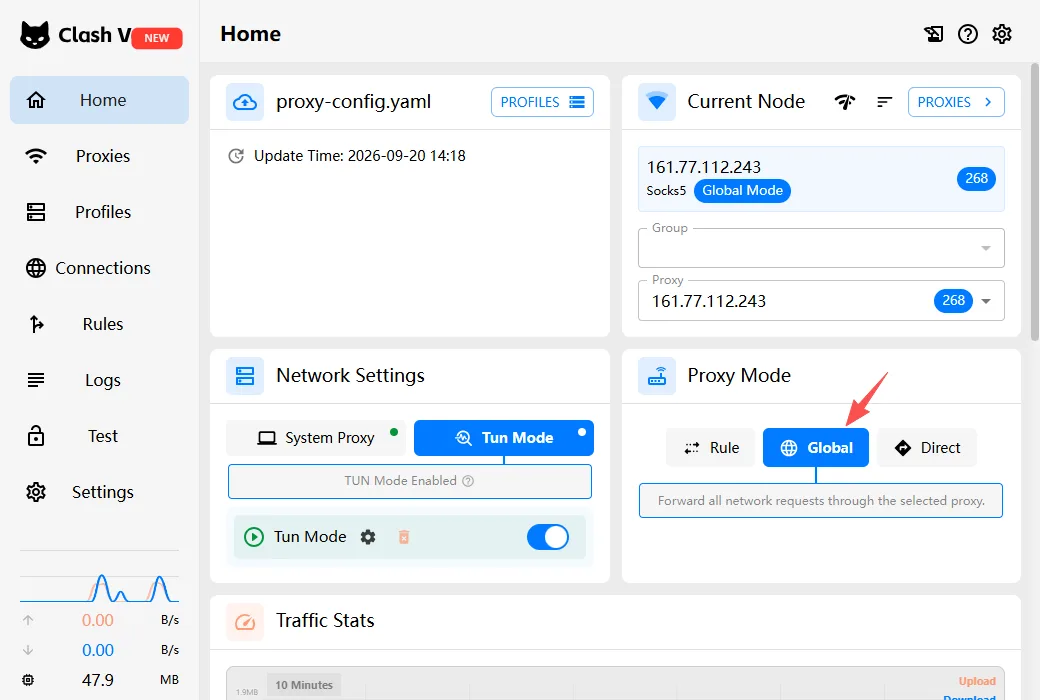
Finally go back to the home screen and change Proxy Mode from Rule to Global so all traffic runs through the chain.
Step 6: Confirm the Exit on Windows
Repeat the Step 5 check on ping0.cc and verify the same four fields. Mac and Windows run different clients, but they share the same ISP residential IP, so both should report the same exit address. If one shows a residential IP and the other still shows a datacenter one, check whether the active node is selected correctly in that client, then whether Tun Mode is actually on.
Which Client to Pick
If you have an iPhone or a Mac, go with the Shadowrocket path first. One app covers both your phone and your computer, and importing the node, filling in Proxy Pass and switching the exit all happen in a single interface. There is no step where you convert the node to YAML and then edit the profile by hand, which removes the easiest way to break the setup.
Clash Verge Rev suits people who only work on Windows. It is free and its rule based routing is more flexible, at the cost of writing the profile yourself, where a single wrong indent takes the whole chain down.
| Item | Shadowrocket | Clash Verge Rev |
|---|---|---|
| Devices | iPhone, iPad, Mac | Windows, macOS, Linux |
| How to get it | Paid on the App Store, needs an account from outside mainland China | Free download from the official site or GitHub |
| Node format | Share link or QR code, imported directly | YAML profile, needs a conversion step first |
| Building the chain | Point the ISP node’s Proxy Pass at the entry node | Write both nodes into the YAML, then pick them in order under Chain Proxy |
| Stability | A few taps in the interface, no profile editing, better for long running accounts | Depends on a hand written profile, one wrong line breaks the chain |
| Best fit | You have an iPhone or a Mac and want the least hassle | You only work on Windows, or you prefer editing the profile yourself |
The Whole Flow, Both Paths
The chain splits into two paths, so read the one that matches your device.
macOS and iPhone (Shadowrocket): five steps
Install the client
Shadowrocket from the App Store
Import the node
Load the VLESS share link
Add the exit
Socks5 plus Proxy Pass
Test and select
Connectivity Test
Verify the exit
Four fields on ping0.cc
Windows (Clash Verge Rev): six steps
Convert the format
VLESS to Clash YAML
Import the profile
New local profile in Profiles
Write in the ISP node
Edit the YAML and save
Build the chain
Select and Chain Proxy
Turn the proxy on
System Proxy and Tun Mode
Verify again
Check the Windows exit
Closing Thoughts
Once the chain is running, the next problem is the accounts themselves. When several platform accounts share one residential IP, the platform has one more shared signal to work with, and the more accounts you run the harder it gets to avoid separating them. The next post covers running multiple accounts from isolated environments in AdsPower, one exit per environment.
every Thursday.
Hosting reviews, builder comparisons, performance tips, and plugin picks — curated weekly for WordPress site owners and builders.